Producing 'Threaded Together' | Breakdown

Making Of / 03 June 2023

ABOUT:

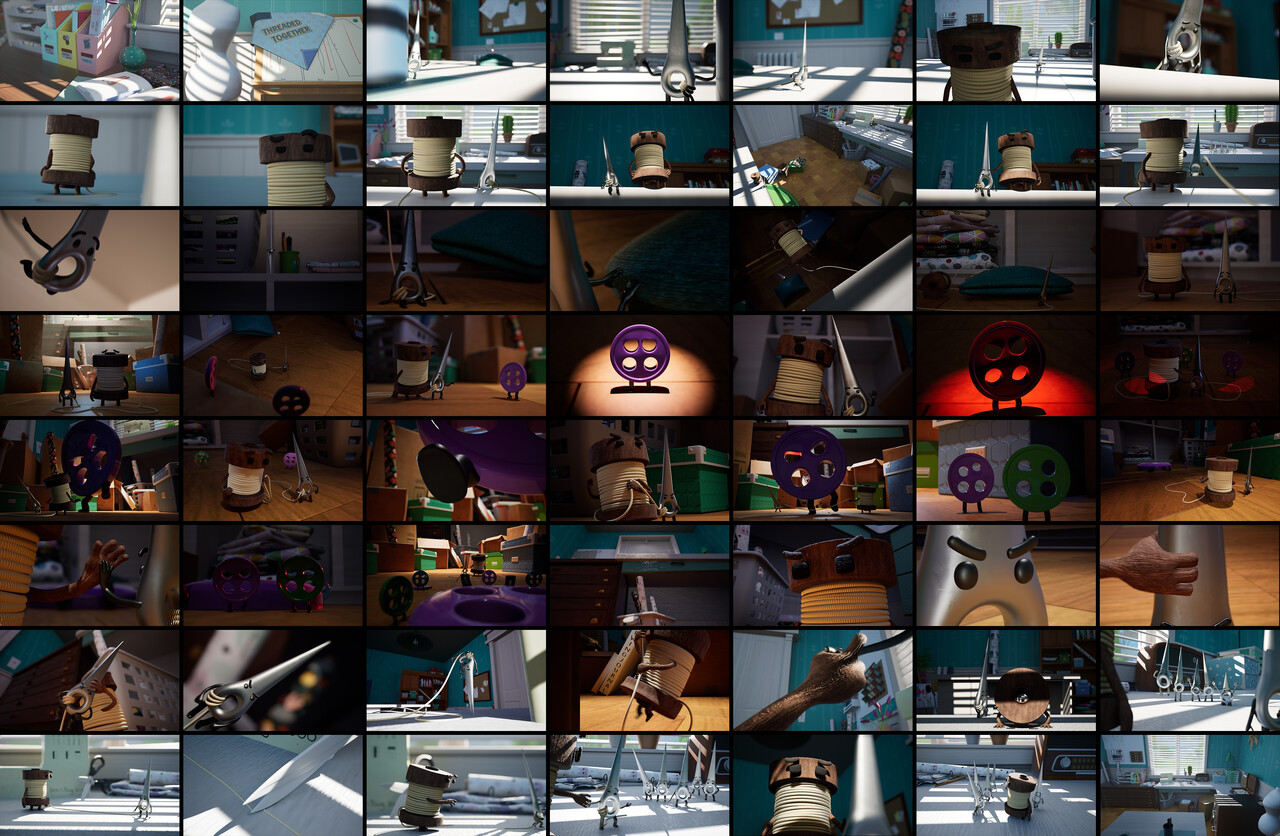
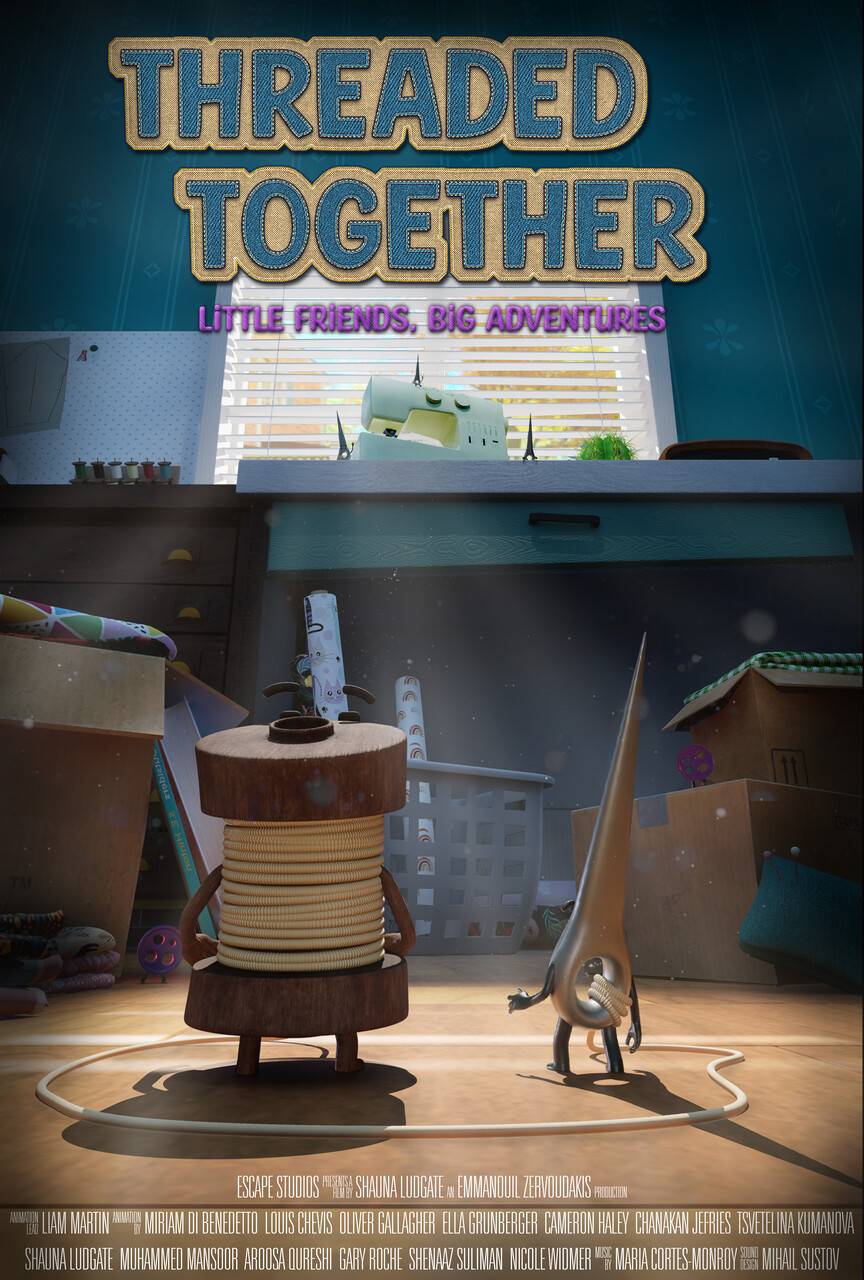
Threaded Together” is an award winning, 3D animated short film which is written & directed by Shauna Ludgate and produced by Manos Zervoudakis, within 16 weeks at Escape Studios in London.


SHORT FILM:

The story is about a Needle who got separated from his friends and embarks on a journey of friendship with an uncooperative Spool. Only there is one small issue, they’re attached! Their adventure leads them to dark and daunting places as they learn to work together, and find the very thing that tethers them, might be the answer to their problems!


CHARACTER DESIGNS:

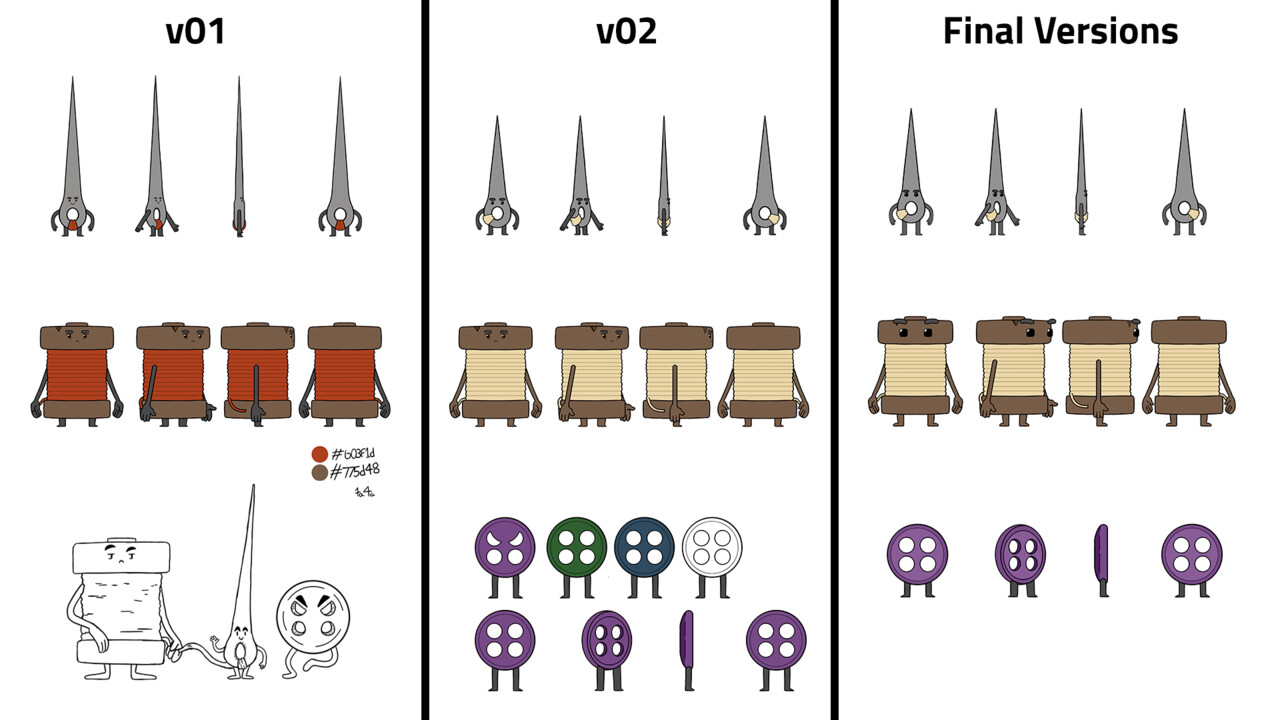
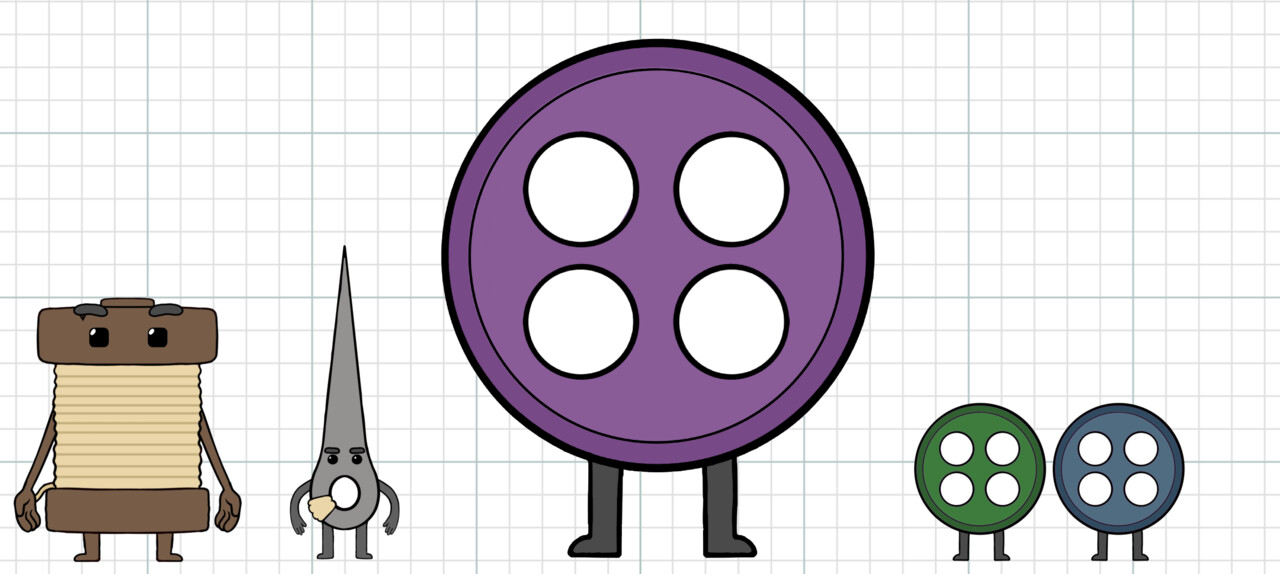
The vibrant personalities of Needle, Spool, and Buttons were brought to life through the process of creating their character designs, starting from initial sketches. After iterating through several versions, we finally settled on a combination of colours and facial features. Our primary goal was to ensure they look adorable, with large expressive eyes to convey their emotions effectively. In our creative decision-making, we intentionally chose not to include mouths, allowing us to emphasize the eyes and eyebrows during animation. This choice was also influenced by the fact that our short film would not have any dialogue.


STORYBOARDING:

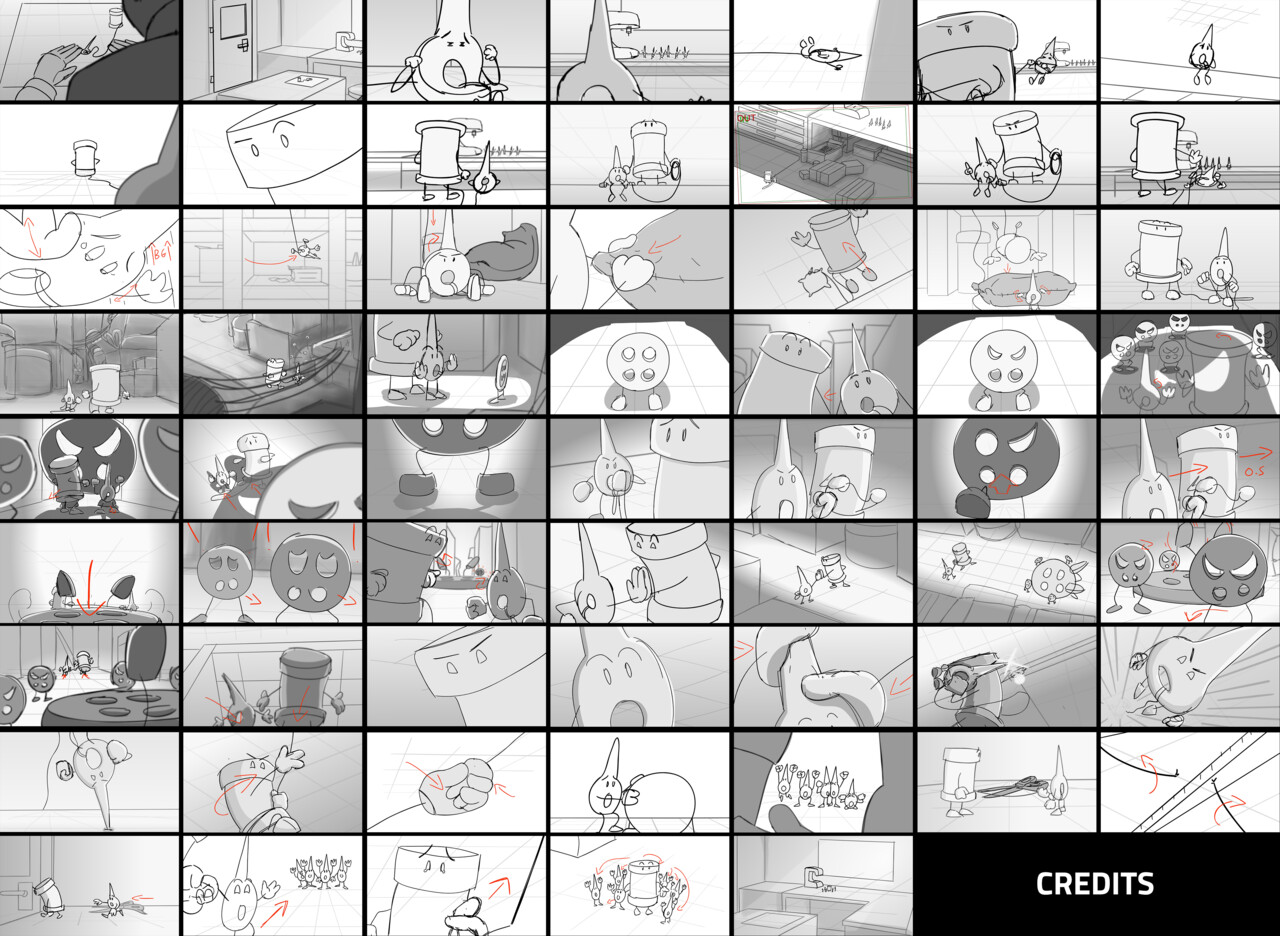
The director initially created a rough first pass of the storyboards, providing a rough outline of the project. This storyboard was then presented to Austin Hill, who was pitched the idea and was happy to join us. He dedicated a couple of weeks to drawing all the storyboarding panels while offering valuable suggestions for camera angles and story adjustments. Through this collaborative process, we progressively refined the storyboard until we achieved a version that perfectly aligned with the director's vision.


ANIMATIC:

While we were fine-tuning our storyboarding panels, we were also working on editing an animatic. The version below was approved and it's the one that we have proceeded with for production.


COLOUR SCRIPT:

Creating the colour script early on was an important step for us. It allowed the director to get a feel for what the movie will look like, long before the animation and lighting is complete. We selected the three pivotal moments in our short that had very different moods and lighting setups and painted over them. This process allowed us to establish a clear roadmap, guiding us towards our desired look.


MODELING AND RIGGING:

Next, we proceeded to the process of modeling and rigging our characters. Our objective was to maintain Needle's straight and pointed appearance, while giving Spool floppy arms to create a contrast with his solid and robust body. As for the Buttons, we intentionally designed them without arms, encouraging the animators to convey emotions mainly through their eyes. One challenge we encountered was that the rigs got really heavy due to body deformations, which made animation more challenging. To address this issue, we provided the animators with the flexibility to switch between low-poly and high-poly rigs, depending on the specific shot requirements.

Please see below for our character turnarounds in different stages.


ANIMATION:

Animation proved to be a massive task for the team, with the film including 60 animated shots. Each animator was responsible for completing approximately 5 shots, and numerous processes were involved in the finalization of our short. To create a solid base for our animation and ensure the timing works within shots, we utilized references that were recorded by individual animators for their assigned shots. Moreover, we used Studio Library, where animators could use the poses and expressions provided to keep consistency throughout the project.

Check out the first two videos below to see examples of our references.


We all know that rushing through blocking can ruin a good shot so we made sure to follow a proper workflow and dedicate enough time on each step. The following video demonstrates the different animation stages we went through, from previz to the final render.


THREAD SIMULATIONS:

The simulation of the thread played a crucial role in our story, requiring extensive use of hair simulations in Maya 2022. In total, we simulated the thread in 36 shots using rivets and the sweep tool. However, one of the major challenges we encountered was that certain simulations did not align properly with the character positions, movements, and overall interactions. To overcome this issue, we decided to hand-animate those specific threads, ensuring a more seamless integration with the overall scene.

Please see below for some breakdowns of the process of simulating the threads, and animating them by hand, in their different stages.


LIGHTING AND RENDERING:

For the lighting and rendering phase, we chose Unreal Engine due to its real-time rendering capabilities. This enabled us to achieve faster rendering speeds and easily implement changes while consistently generating full renders throughout the production process.

Despite having a single environment, we made the decision to split it into two distinct sets. This approach not only allowed us to emphasize the scale of the environment compared to the characters and create different lighting setups to match the desired moods, but it also allowed our artists to work in both environments at the same time.

Towards the latter stages of production, we incorporated Nuke X into our workflow, which helped us incorporate god-rays and adding additional depth to a handful of shots.

Please see below for our lighting/rendering and post breakdown videos.


Ensuring lighting consistency between shots is crucial. One effective method is to create a quick script that includes all the shots, enabling you to identify any potential issues early on and make prompt corrections. By addressing these concerns proactively, you can avoid last-minute adjustments that may disrupt the overall flow of the production process.


PRODUCTION MANAGEMENT:

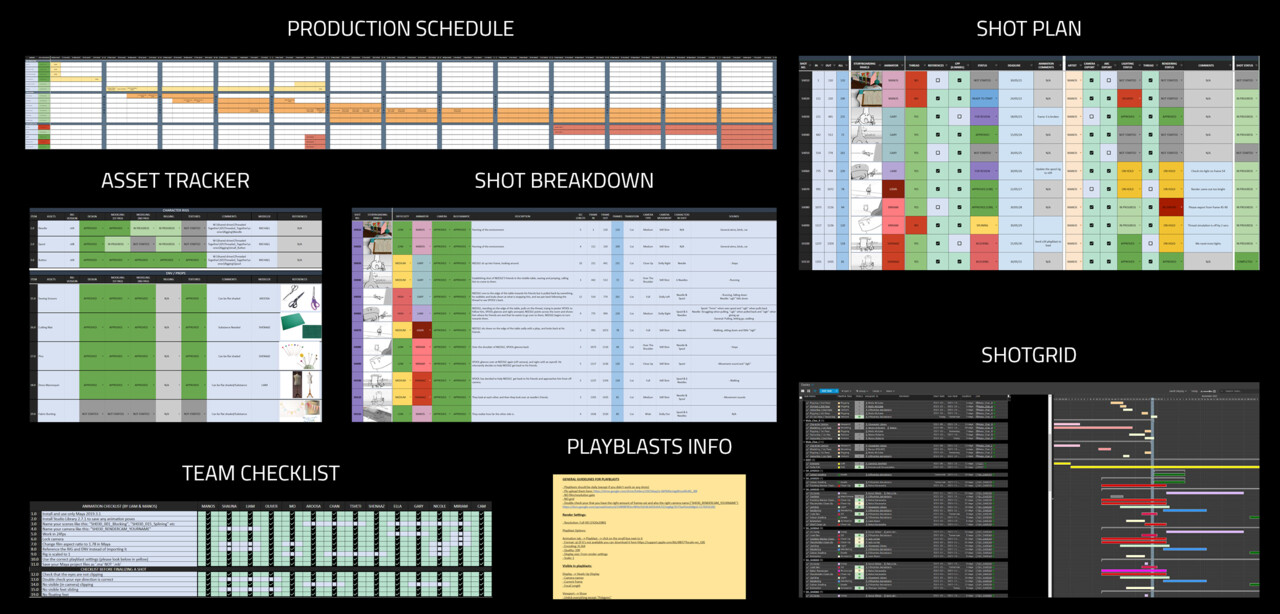
'Threaded Together' was managed using both ShotGrid and Google Sheets.

Please see below for our most important software/documents.

I'll quickly mention a few things for each one.

-    Shotgrid: 
Everything was in one place and connected, work was visually assigned and easily readable. Artists were also receiving notifications via email and the overall progress tracking was more efficient.

-    Production Schedule: 
General overview of the whole schedule with progress bars and status options for the main actions in a form of a colour coded calendar.

-    Shot Breakdown: 
Mostly used in pre-production, it displays shot numbers, animation complexity, assigned animators, previz status, shot durations, frame counts, camera types, transitions, and sound effects.

-    Asset Tracker: 
Tracks the progress of designing, modeling, rigging and texturing for all characters and environments using dropdown lists with different status. It also displays the current rig versions with links attached, assigned individuals, any references used, and a notes section for general comments.

-    Shot Plan:
Tracks all shots from previz to comping. It presents a detailed overview of each shot, including frame ranges, assigned individuals, cameras and ABC exports, thread simulations, as well as the current status of animation, lighting, rendering, and compositing (''In Progress'', ''On Hold'', ''Re-Export'', ''Delayed'', ''CBB'', ''Approved'')

-    Team Checklist:
This is a document I usually create with the department leads in order to provide the team with a checklist to to ensure that essential elements are in place before starting work on each shot. This includes software and version requirements, naming conventions, FPS, camera specifications, aspect ratio, and referencing guidelines.

-    Playblast Info:
A common observation across all my projects was the lack of consistency in animators' playblasts. To address this issue, I created a script that provides detailed instructions on properly exporting playblasts. This document outlines the importance of excluding the grid or film gate, ensuring the correct resolution, format, and settings, and specifying the desired visible elements within the viewport, naming convention and destination folder.


PERSONAL REFLECTION:

-    Better preparation
The director and I started working on the story a month ahead, creating the script and the initial storyboarding panels. These panels gave us a good understanding of what works and what needs improvement. Shortly after, we collaborated closely with the storyboard artist to refine the panels, camera angles, and overall narrative, resulting in a successful animatic in a short period.

-    Efficient production management
Having already produced six short films prior to 'Thread Together', I had acquired enough experience in creating effective and efficient production docs using Google Docs. Moreover, we were able to utilize Shotgrid, which helped us streamline some of the processes. Learning never stops though so I'm looking forward to the next production so I can improve again my progress tacking techniques, software and documents.

-    Better team coordination
Having led a variety of creative teams throughout my prior projects, I gained a deeper understanding of the team's dynamics and how to harness the skills and potential of every individual involved. This enabled me to cultivate a healthy work environment for everyone. Our communication and collaboration were excellent, and the positive impact of this was evident in the final visual aesthetic of our film.

-    Proactive risk management
This production required a lot of alertness and proactive anticipation of potential issues due to the fact that Needle was connected to Spool in most of the shots. It was crucial for us to identify any problems early on and either take preventive measures or minimize their impact to the best of our ability. 

-    Largest project - 60 shots
'Threaded Together' was the largest project I have ever produced which consisted of 60 shots and involving a team of over 20+ individuals who dedicated 16 weeks to its completion. Given the ambitious nature of both the narrative and the technical expertise required, the project presented significant challenges. However, I'm proud to say that we refused to compromise on any aspect and consistently pushed ourselves to get the most out of it, which I believe worked out great.


TEAM:

Writer & Director: Shauna Ludgate
Producer: Emmanouil Zervoudakis
Character Design: Oliver Gallagher
Storyboarding: Austin Hill
Colour Script: Tsvetelina Kumanova
Modelling, Rigging & Texturing: Michael Davies
2D Artists: Chanakan Jeffries
Animation: Liam Martin, Shauna Ludgate, Nicole Widmer, Muhammed Mansoor, Tsvetelina Kumanova, Oliver Gallagher, Aroosa Qureshi, Chanakan Jeffries, Shenaaz Suliman, Ella Grunberger, Gary Roche, Miriam Di Benedetto, Louis Chevis & Cameron Haley
Lighting & Rendering (Unreal Engine): Emmanouil Zervoudakis & Shauna Ludgate
Music: Maria Cortes-Monroy
Sound Design: Mihail Sustov
Editing: Emmanouil Zervoudakis

Report

Producing 'Sweet Heart' | Breakdown

Making Of / 05 June 2023

ABOUT:

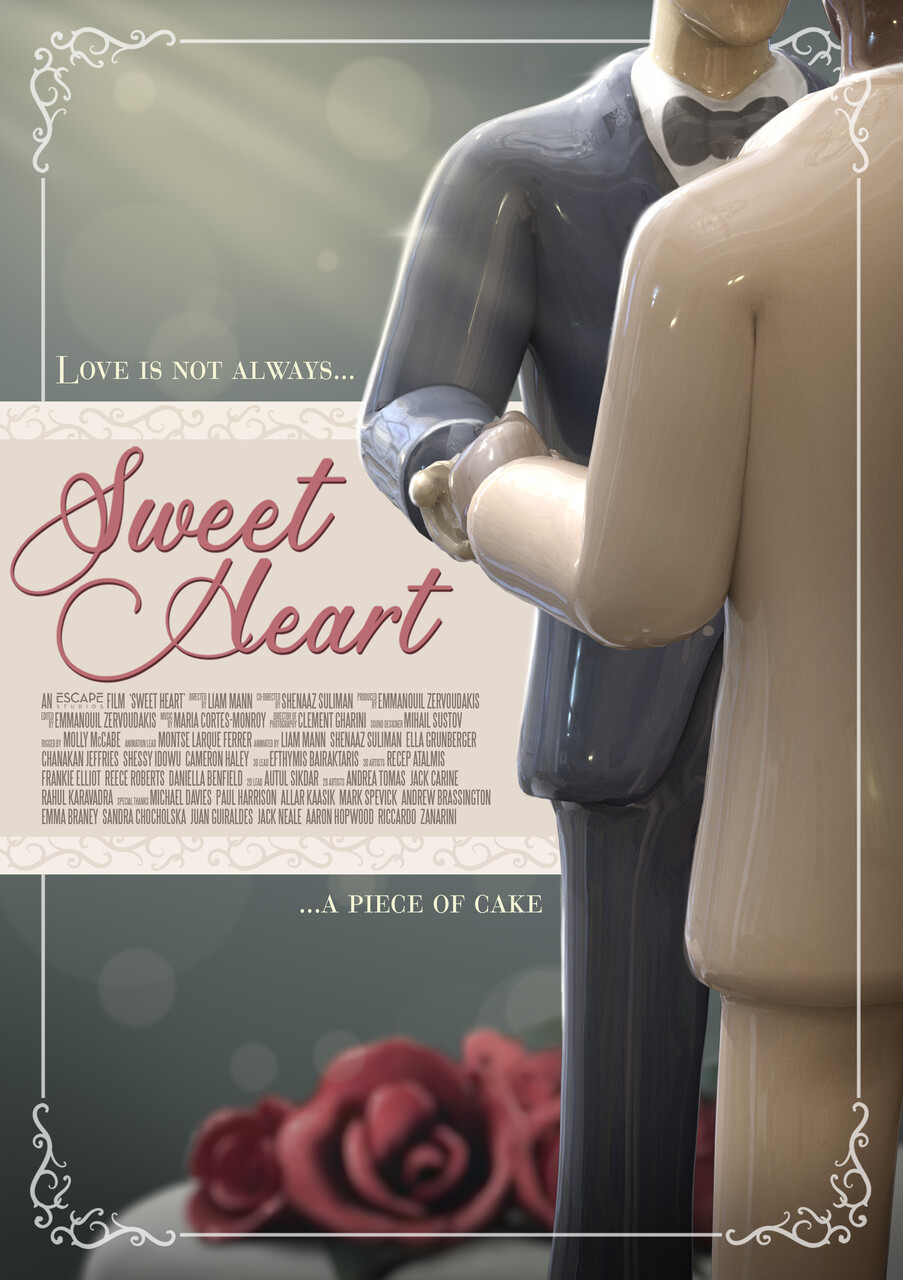
'Sweet Heart' is a 3D VFX short film which is written and directed by Liam Mann and produced by Manos Zervoudakis, within twelve weeks at Escape Studios in London.


SHORT FILM:

The story is is about two male wedding figurines that fall in love but are mismatched by the baker when placing them on top of the wedding cake.


CHARACTER DESIGNS:

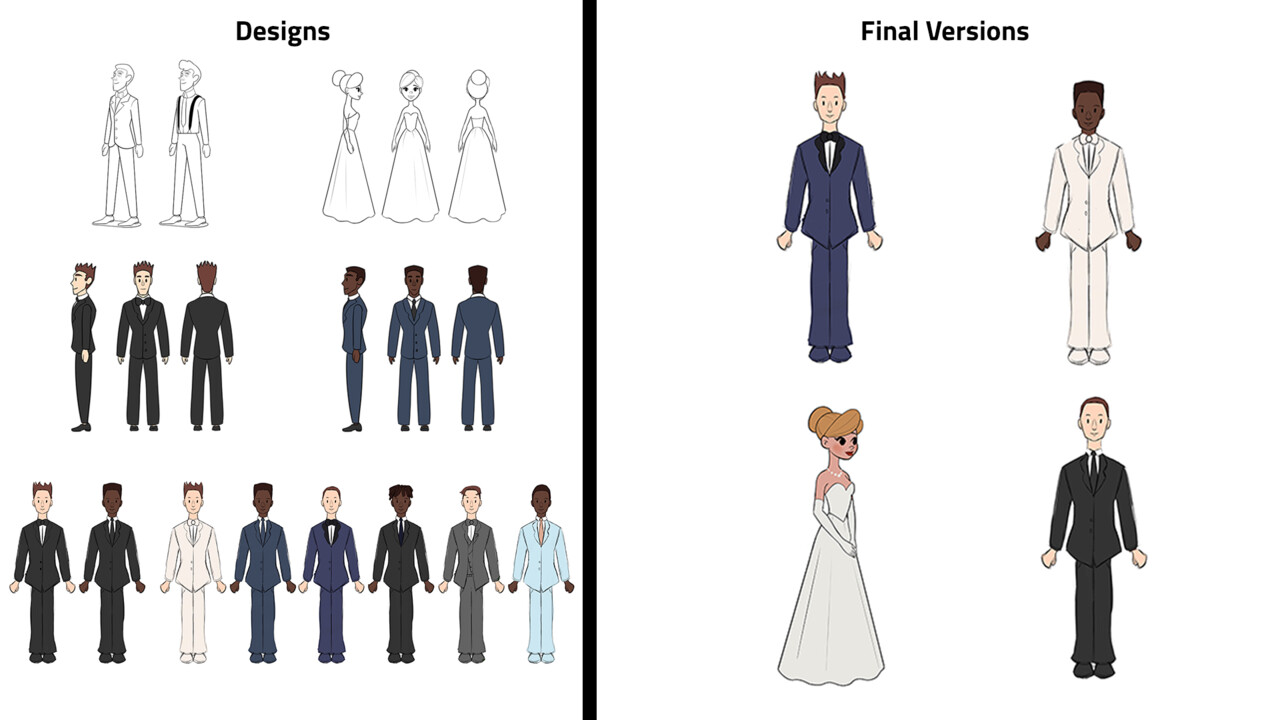
We explored numerous designs featuring various suits, dresses, and colours until we found the ones that perfectly matched our theme. Presented below are a collection of our initial designs alongside the final versions.


STORYBOARDING:

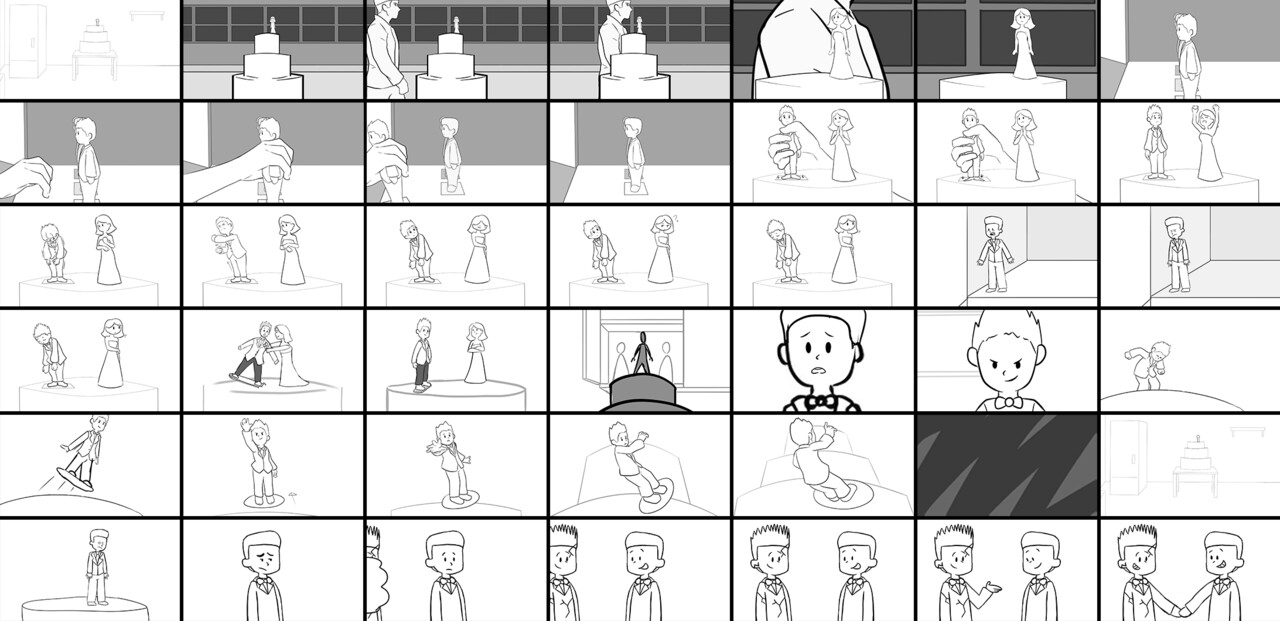
During this phase, our primary goal was to ensure the effectiveness of the story. What set this project apart from all my previous ones was the approach of shooting the live action material based on the storyboards, leaving no room for reshooting a shot if the angle proved ineffective. As a result, we had to be extra careful and explore a wide range of ideas before we settle. After undergoing numerous revisions with the storyboarding team for a week, we ultimately reached a final decision on the following panels.


ANIMATIC:

Once we had the final panels, we proceeded to create an animatic, incorporating a temporary music track and sound effects.


COLOUR SCRIPT:

Prior to entering the production phase, we made the decision to create a colour key. We specifically selected the three pivotal moments in the film and painted them accordingly, with the purpose of establishing the mood and lighting conditions for the short.


''CRAPAMATIC''

Just before the live action shooting, we decided to shoot a 'crapamatic', using our own camera equipment. Through test shootings, we examined the feasibility of our ideas, focusing primarily on positions, camera angles, and timing.


LIVE SHOOTING:

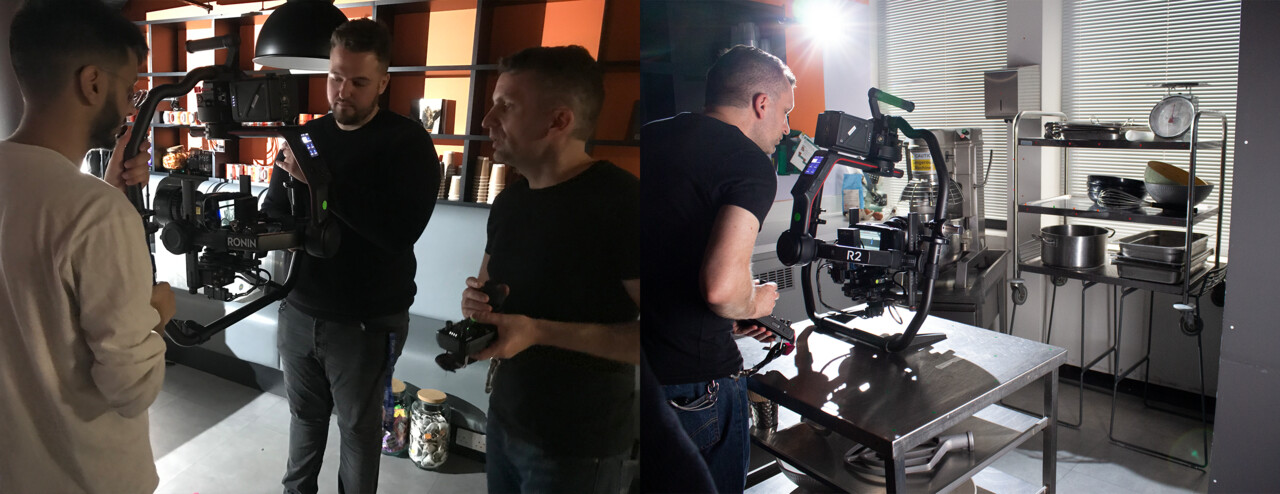
The day of the shooting soon arrived, we had booked our space, purchased all our costumes and character placeholders, set all equipment, and have the call sheet ready for the day. By closely working closely with the creative director and director of photography, we were able to successfully shoot everything we planned for and even some extra angles which gave us some flexibility after. Having a well-thought animatic and going the extra mile to create a "crapamatic," greatly assisted us during the day of shooting.

Please see below for a couple of pictures during the shooting and a time-lapse video.


PHOTOGRAMMETRY:

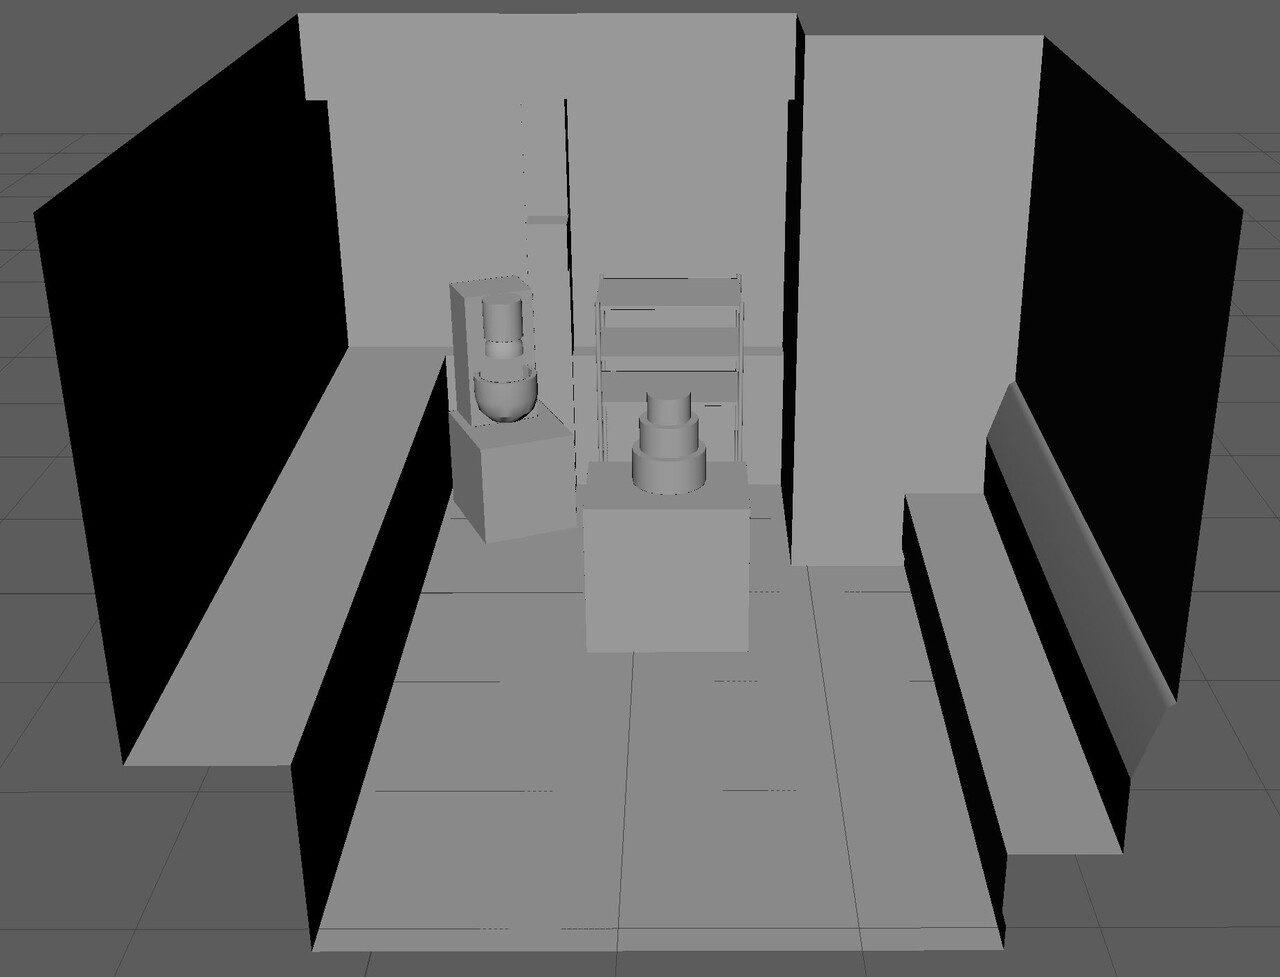
After shooting the film, we took many photos of the space and equipment to be able to build the environment in 3D without having to start from scratch or worry about the accurate positions of some items. 


SHOOTING EDIT:

Once the shooting was done, the comp team started by organising the live action plates and converting them to 2K EXRs (ASCIS) so they are ready to be edited. 

The following edit contains all the trackers and place holders.


CUT-OUTS EDIT:

As it was our first time making an edit with animation and live action footage, we made the decision to merge the characters from the storyboard panels with the live action plates and create an edit which would help us identify any issues before starting animating.


CINEMATOGRAPHY:

The following video showcases the considerable changes in our camera angles compared to the animatic. Due to the prevailing COVID situation, we were unable to visit the shooting location in advance and plan properly. As a result, we found ourselves adjusting and improving certain camera angles on the go.

Throughout the production of this short film, I was asking myself the following questions whenever someone was suggesting a change:
- What is our motivation to make this adjustment?
- Does it help the story?
- Do we have enough time?
- Can we afford it?
- What potential future issues may arise from this change?


MODELING AND TEXTURING:

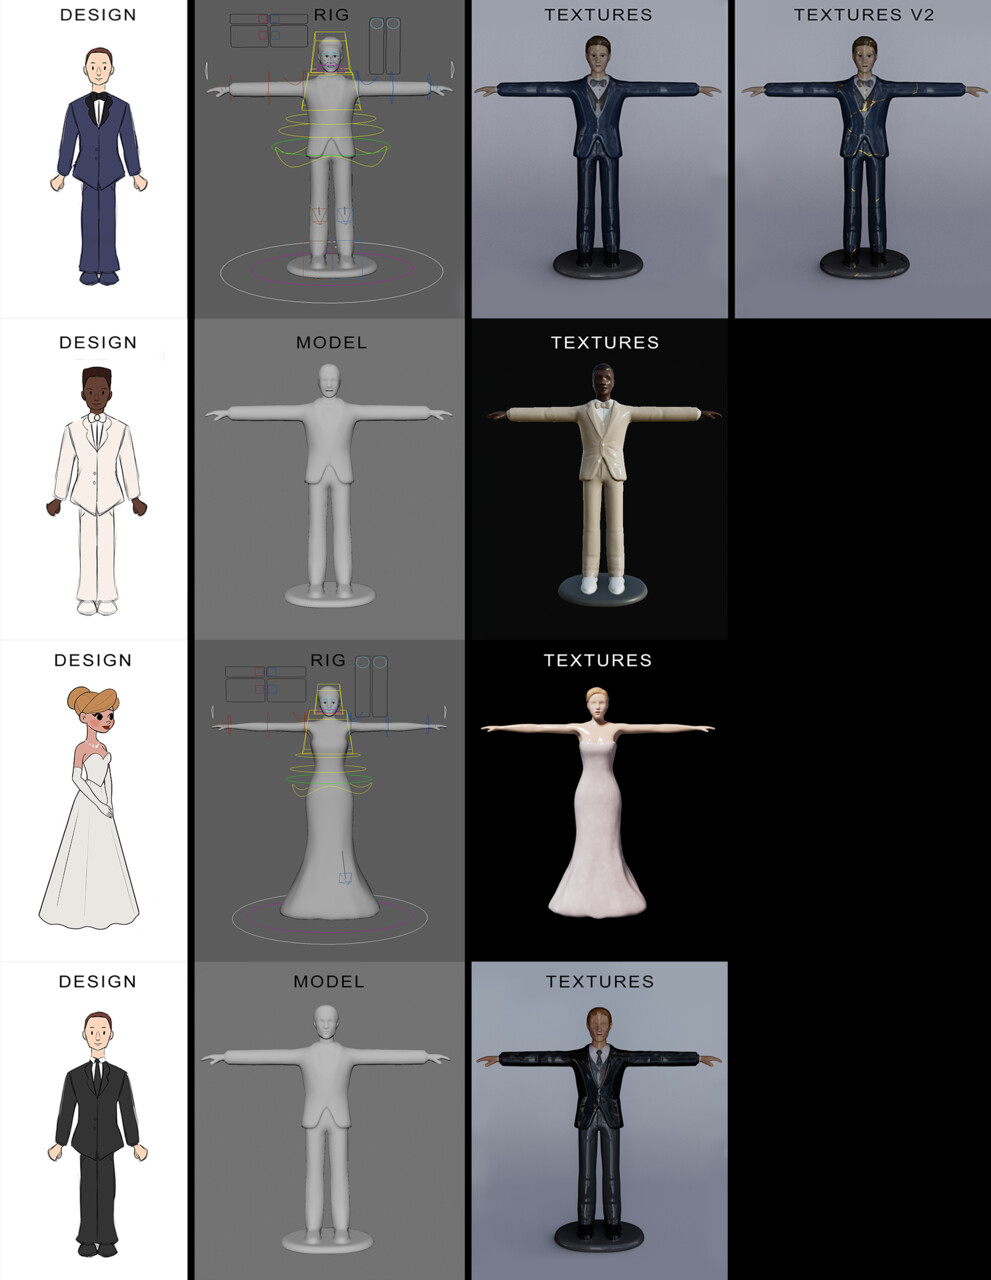
Below you can find a few images showcasing the characters' evolution from the design stage to a rendered version.

You may be curious about why our protagonist has two textures. The reason behind this is that after he falls down and breaks, he is reassembled using a centuries-old Japanese repair technique called 'Kintsugi'. It roughly translates as 'joining with gold' and it uses urushi (Japanese lacquer) dusted with powdered gold to restore broken ceramic and porcelain vessels.


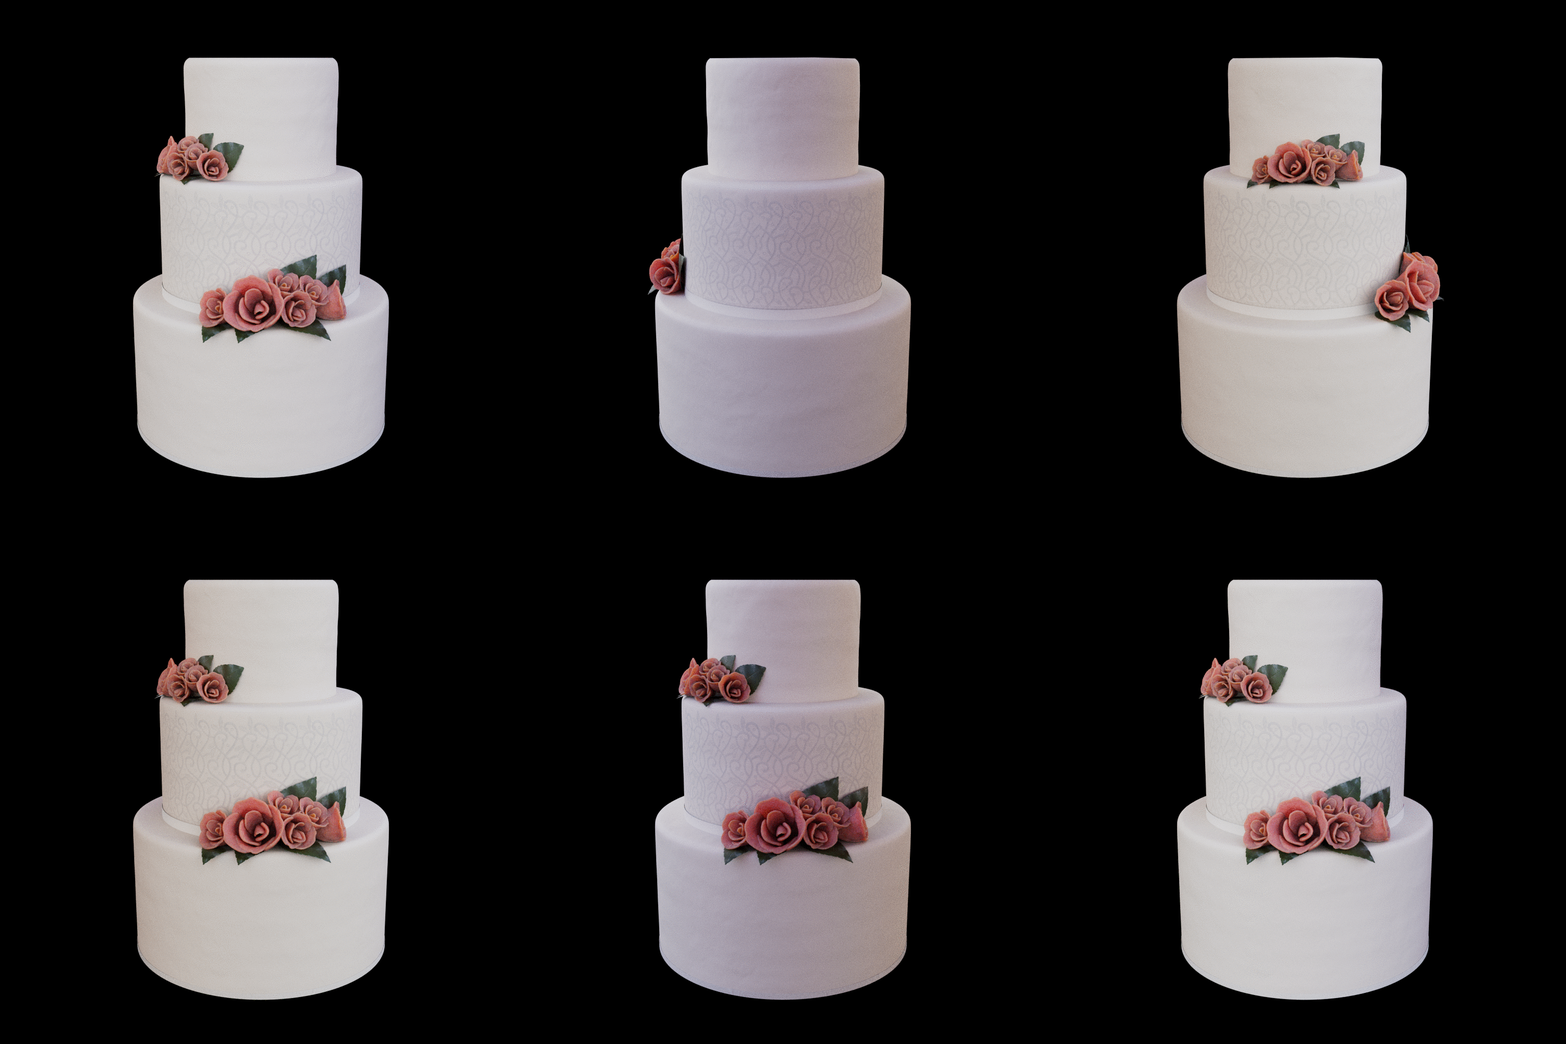
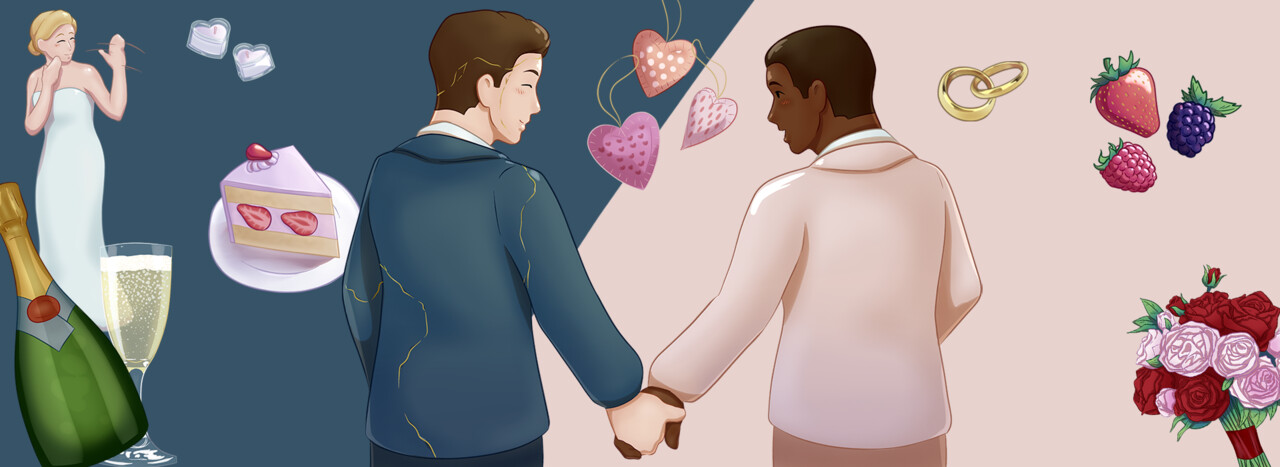
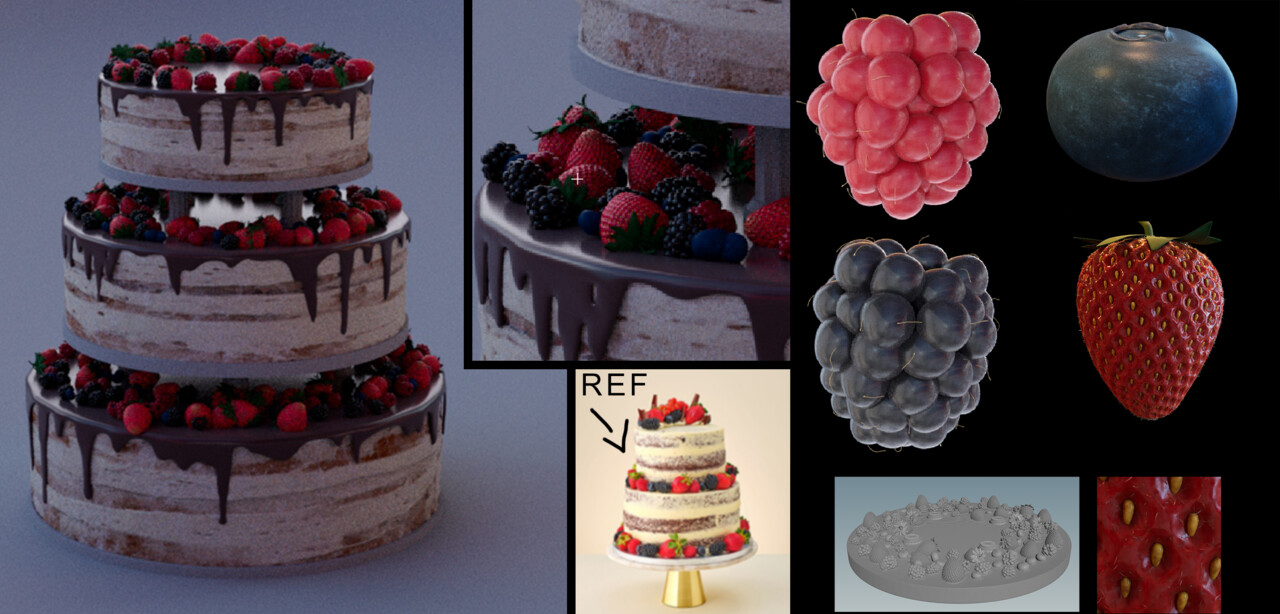
Below you can see the two cakes we designed, modelled and textured for the film. We wanted for the first one to be simple but elegant while the second one would be vibrant and colourful, aligning with the visual representation of our characters' emotions.

Cake No1:

Cake No2:


ANIMATION:

References are key. I cannot stretch enough how important they are for animators. We made sure to ask all animators to film their own references, and get the director to approve them before start animating. Once the blocking stage had well-defined poses and timing, we transitioned into splining and polishing.

Below, you can watch a good example showcasing this process.


VFX BREAKDOWN:

The following video provides a breakdown of our processes.


PRODUCTION MANAGEMENT:

'Sweet Heart' was managed using both ShotGrid and Google Sheets.

Please see below for all the software and documents used.

Shotgrid:

Everything was in one place and well connected, work was visually assigned and easily readable, artists were receiving notifications via email and the overall progress tracking was very efficient.


Production Schedule:

This calendar format schedule displays the main tasks with deadlines, status indicators, and progress bars, providing the production team with a constant, clear overview of the overall progress and important milestones.


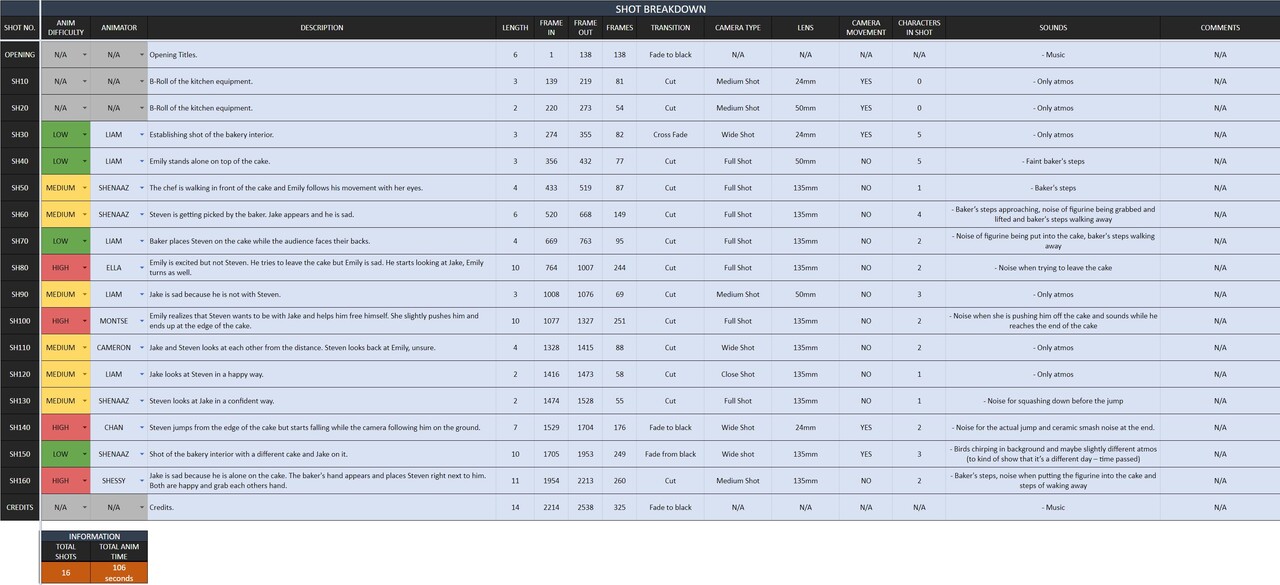
Shot Breakdown:

Primarily utilized during pre-production, this document comprehensively breaks down all shots and presents essential data such as shot numbers, brief descriptions, durations, frame in/out points, transitions, shot types, sound effects etc.


Shot Plan:

Arguably the most crucial document utilized throughout this production. It effectively tracked all shots during animation, 2D and 3D work, lighting, rendering, and compositing stages. This document was color-coded, ensuring ease of readability, and included assignees, status updates for each task, progress bars.


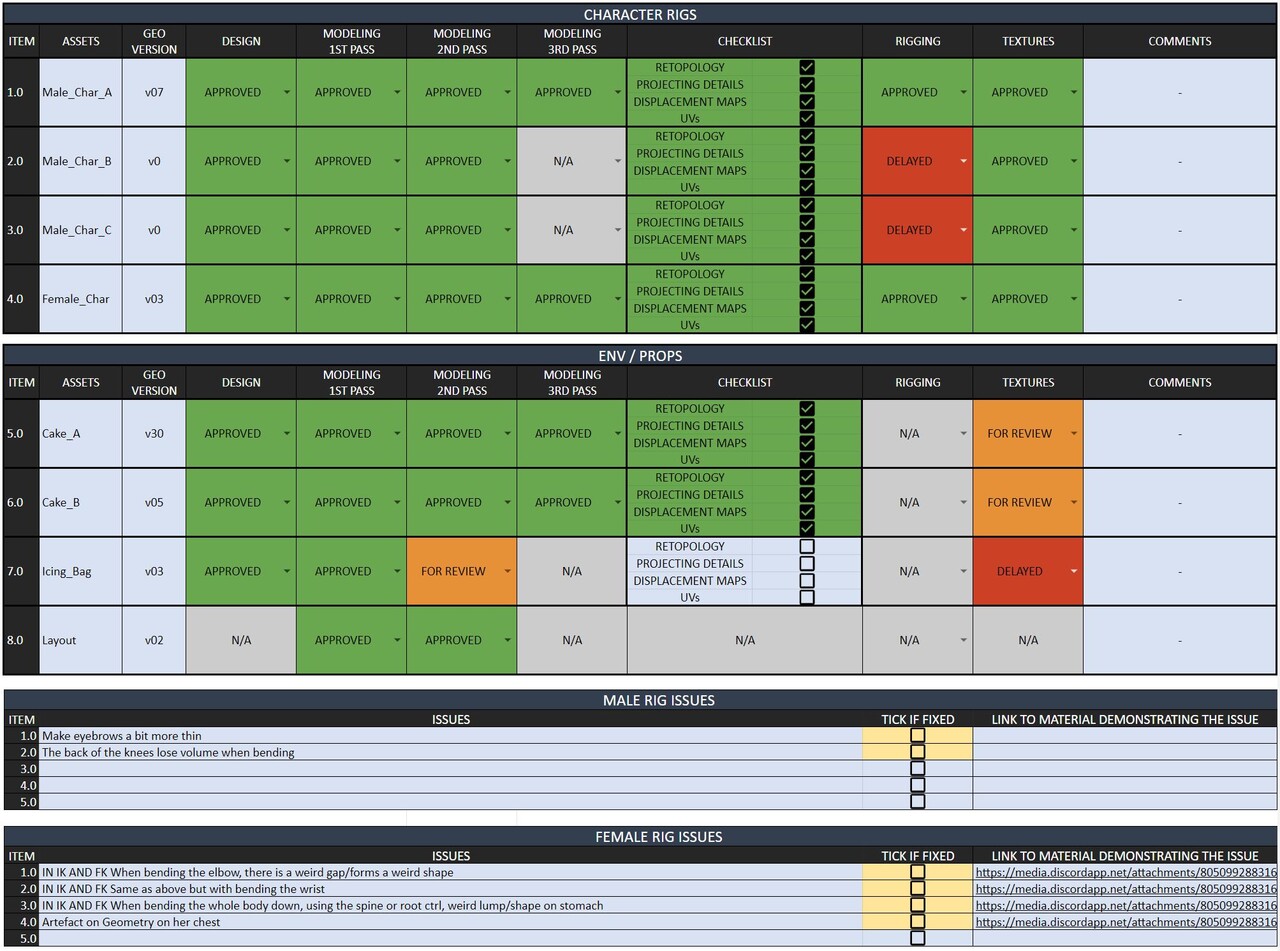
Asset Tracker:

Throughout all stages, this document helped us monitor the progress of our characters, environments, and individual items. We allocated a dedicated section at the bottom of the document for the team to report any issues or bugs encountered along the way.


PERSONAL REFLECTION:

-    VFX Pipeline:
After having successfully produced 'Sweet Heart'', I'm now more confident in managing a VFX pipeline and integrating CG into live action plates. Throughout the process, I gained solid knowledge on various aspects such as preparing for a shoot, including booking a location, renting the equipment, and filling all necessary paperwork. Also, I learned how to handle 4k/8k professional shooting equipment, performing photogrammetry, and enhanced my understanding of clean-ups, rotos, and 2D/3D tracking.

-    Effective communication between departments:
As the production lead, I managed all aspects of production. From planning, scheduling, and tracking shots and assets to coordinating all internal and external staff including leads and heads of departments. The team consisted of 25 people, which was a very exciting challenge for me! Establishing effective communication, fostering a positive atmosphere, and building trust were pivotal in creating a healthy work environment and promoting efficient collaboration. At times, I encountered the need to make difficult decisions, yet my role as a producer required me to prioritize the bigger picture of the project, making sure we finish on time and within budget. These experiences have proven invaluable, as they have helped me develop skills in diplomacy and strategic decision-making.


TEAM:

Director: Liam Mann
Co-director: Shenaaz Suliman 
Producer: Emmanouil Zervoudakis
Writer: Liam Mann 
Storyboarding: Chanakan Jeffries 
Concept Art: Montse Larqué Ferrer, Shessy Idowu, Chanakan Jeffries 
Colour Script: Ella Grunberger 
Director of Photography: Clement Gharini 
Rigging: Molly McCabe 
Animation Lead: Montse Larqué Ferrer 
Animation: Liam Mann, Shenaaz Suliman, Ella Grunberger, Chanakan Jeffries, Shessy Idowu, Cameron Haley 
3D Lead: Efthymis Bairaktaris 
Modelling: Recep Atalmis, Frankie Elliott, Reece Roberts, Daniella Benfield 
MatchMove: Efthymis Bairaktaris 
Texturing: Efthymis Bairaktaris, Frankie Elliott, Reece Roberts 
Lighting: Shessy Idowu 
Render TD: Efthymis Bairaktaris 
2D Lead: Autul Sikdar 
Compositing: Andrea Tomas, Jack Carine, Rahul Karavadra 
Graphic Design: Daniella Benfield  
Music: Maria Cortes-Monroy 
Sound Design: Mihail Sustov 
Editing: Emmanouil Zervoudakis
Actor: Efthymis Bairaktaris


Report

Producing 'Candle Wick' | Breakdown

Making Of / 20 May 2021

ABOUT:

'Candle Wick' is an award winning, 3D animated short film which is written by Oliver Gallagher, directed by Shauna Ludgate and produced by Manos Zervoudakis, within six weeks, entirely remotely at Escape Studios in London. In the below blog I will share my experience as a Producer and a breakdown of the production process. 


SHORT FILM:

The story is about an adventurous candle living inside the walls of an old house. When a water pipe inside his den started leaking, he found himself needing to go outside and find an item to block it. Being so small, every journey is a danger, even the smallest of steps, but he must risk it all when it comes to saving his home.


STORYBOARDING:

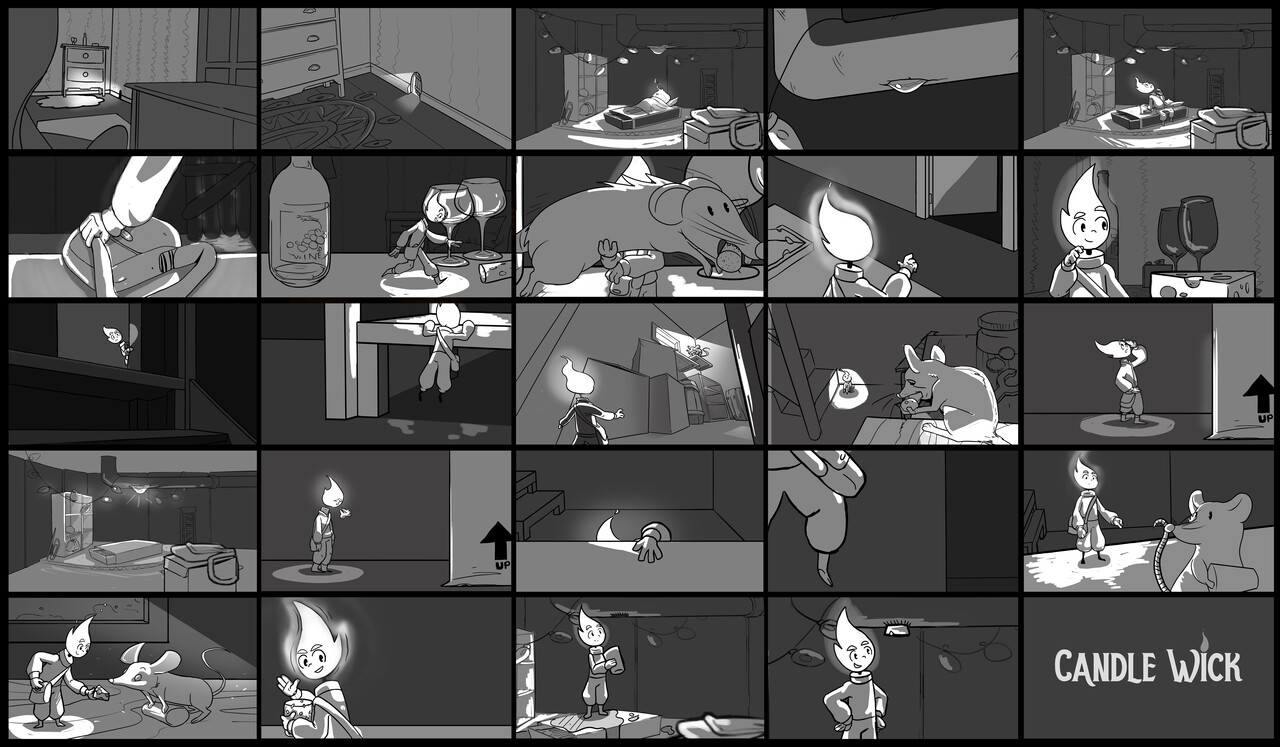
During the first two weeks, our writers and storyboarding team focused on revising the story and panels, making any necessary changes to establish a solid story before entering the production phase. By addressing any potential issues early on, we minimized the need for significant changes during later stages of production.

See the image below for our main 2D animatic panels.


COLOUR SCRIPT:

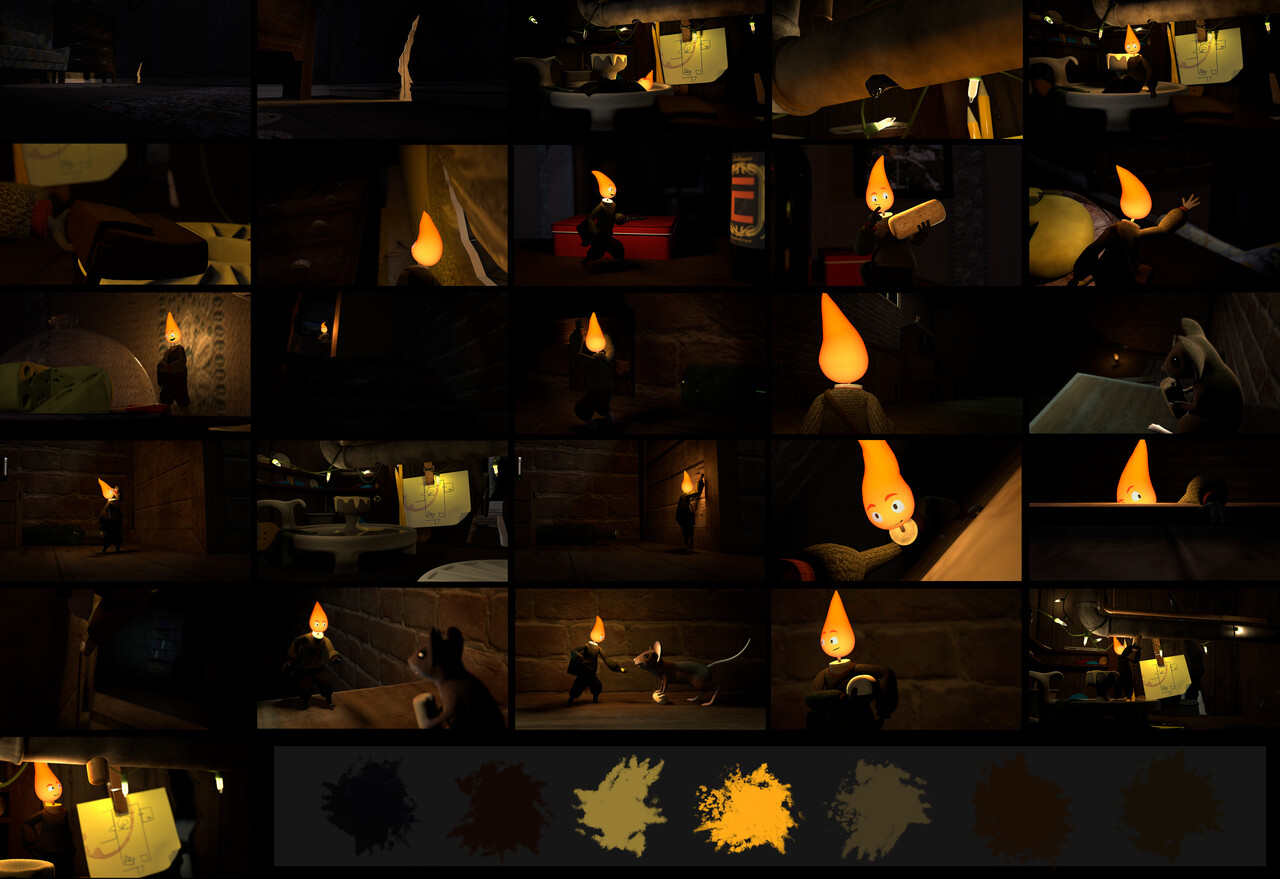
Our Art Director, Tsvetelina Kumanova, decided to go with colours like purple for the hallway to express the feeling of the unknown, orange and red for Wick's den to show the warmth of his home and finally dark bluish for the basement for its cold and dangerous environment setting.

Check out the images below to see our colour script.


CHARACTER DESIGN:

Oliver Gallagher, the Director of the short, designed Wick with the vision to have a protagonist who looked strong enough and capable of going on adventures but had an easily defined weakness. In our case he is was small, lit candle, who is totally afraid of water. He chose warm colours for his clothes like orange and yellow to push the fire aesthetic but also some grey for his hands and feet to make some body parts more distinguishable.

Click out the video below to see Wick's colour aesthetic.


MODELLING & RIGGING:

Wick was entirely modelled and rigged by Tom Perry. Creating a lit candle proved to be more challenging than initially anticipated. Tom had to explore and implement multiple techniques to provide the animators with maximum control over the character. To achieve this, he employed a set of key drivers that influenced the blend shapes of Wick's body. Additionally, he incorporated a series of optional, more advanced controls to address minute details in both the face and body.

Click the video below to see a full character turnaround in different stages.


3D LAYOUT:

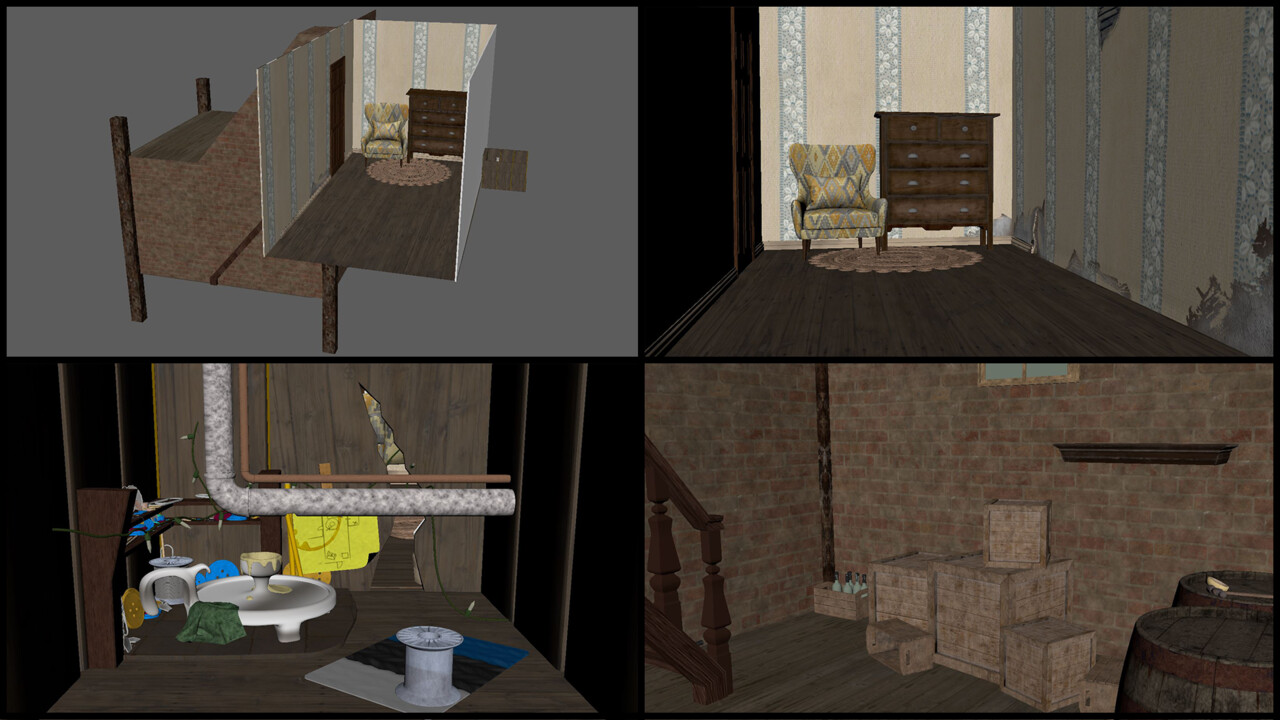
Shauna Ludgate, our 3D Supervisor, undertook the task of creating the 3D Layout. This involved constructing three distinct environments: Wick's den, the hallway, and the basement, all of which she completed within the initial two weeks of the project. During the third week, she delegated the responsibility of daily maintenance, future adjustments, and troubleshooting to our modeller & rigger, Tom Perry, while she focused on supervising animation and conducting lighting tests.

Check out the below 3D Layout pictures for multiple views.


REFERENCES:

Knowing the importance of references when animating, the whole team spent a good amount of time researching examples of detailed material, as well as acting out their scenes and recording themselves for their animation.

Check the two videos below for some examples of the references we used.


ANIMATION BREAKDOWN:

To achieve a polished final result, we followed the industry-standard workflow, ensuring that all animators followed the correct steps. This involved initiating the process by blocking out the shot, then progressing to splining, and concluding with polishing.

Check out the video below to see the differences in animation between each step, from previz to the final render.


LIGHTING & RENDERING:

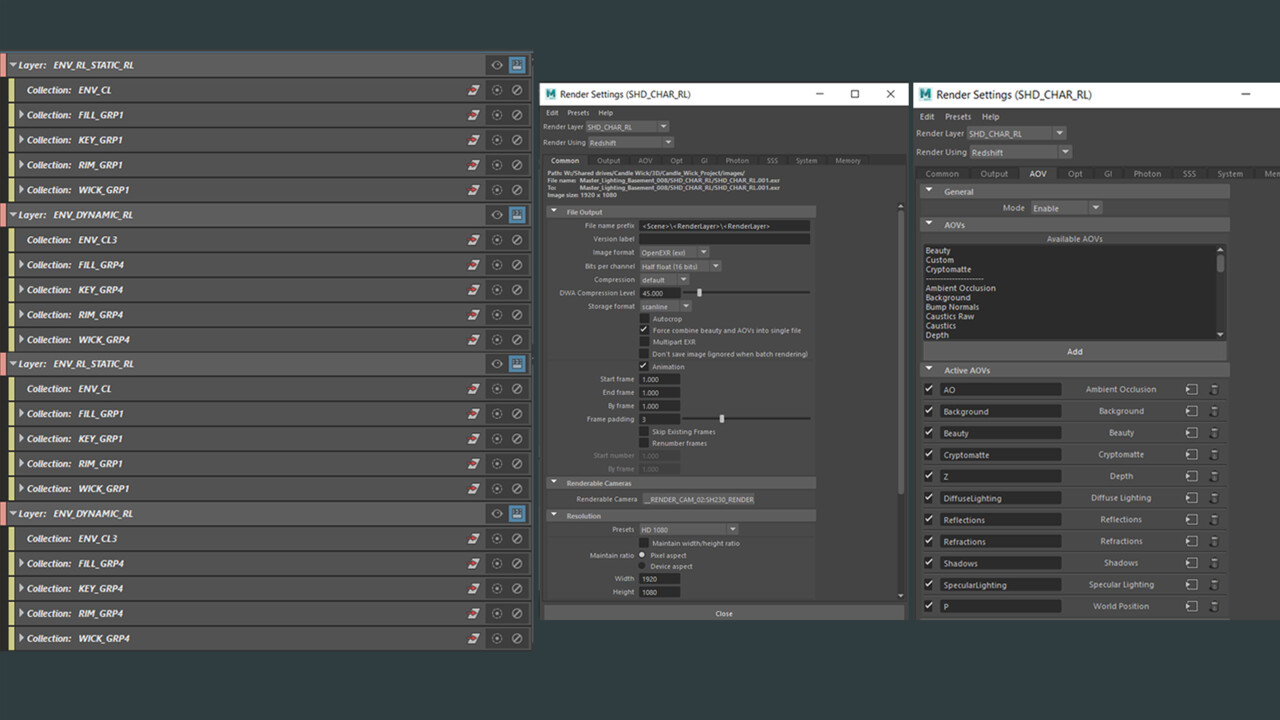
Shauna Ludgate, our one-woman army, was also responsible for lighting and setting up all the renders.  We implemented an alembic workflow to transfer animation into the master lighting scenes which included multiple shot setups with the same environments for time efficiency. She also set up all the render layers + specific AOVs, using RedShift, which allowed us to render the backgrounds on their own while waiting for the animation to be finalized. This way we did not only save time on rendering but also gave us the power to manipulate the look of things during compositing.

See the two images below for a quick look at our lighting continuity and our render layers/settings.


COMPOSITING:

NukeX was our preferred software choice for achieving the desired results. By utilizing appropriate render layers and AOVs, we gained several technical and aesthetic advantages, including the following:

1) Allowing us to adjust the colour gradient of specific items in the environment by using crypto.

2) Manage smooth focus pulls with the Defocus node by using the Z pass.

3) Troubleshoot any issues with shadows using rotos. 

You can watch the video below to see an example of a frame from Maya and then composited in Nuke.


2D FLAME PASS:

Having a realistic look for the 3D flame was very challenging so we we incorporated a 2D pass of the flame in After Effects, overlaying it onto the 3D mesh. This technique enhanced the natural deformation of the flame's edges, resulting in a more authentic look.

Check out the video below to see one of the shots in black and white, combined with the 2D flame pass.


PRODUCTION:

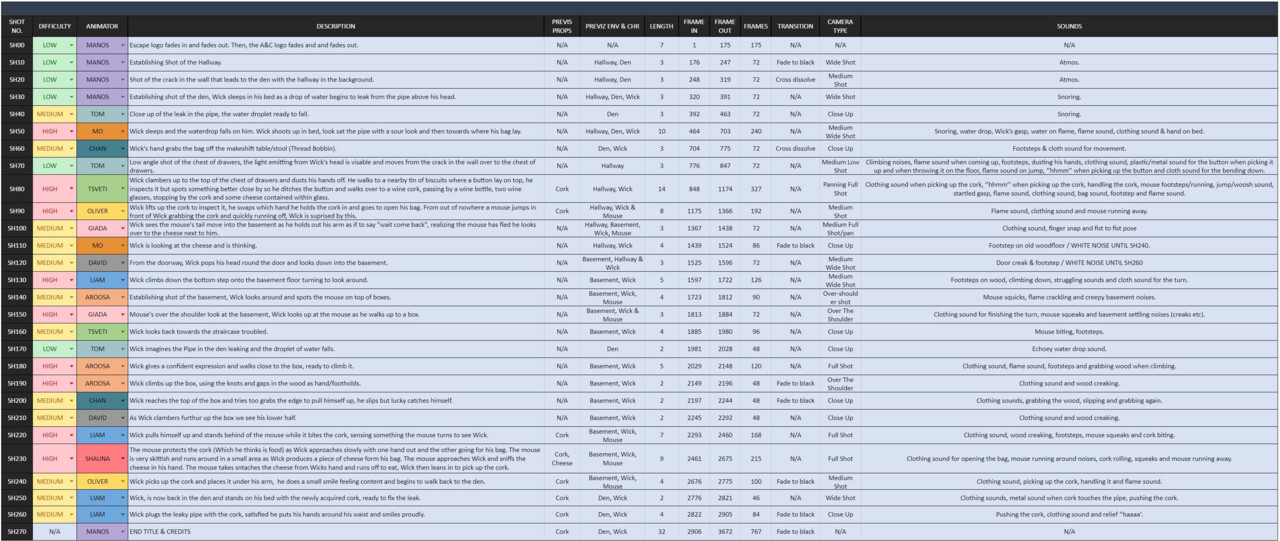
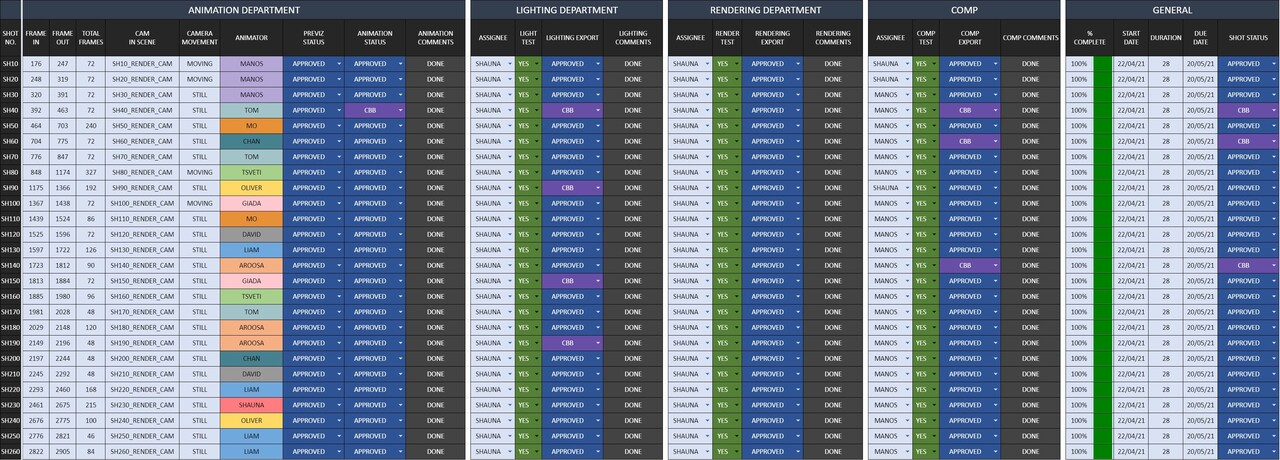
We mainly used Excel for production planning, scheduling and progress tracking throughout the short and had to create bespoke documents for efficient visual production management. 

See the three images below for the key planning docs we used.


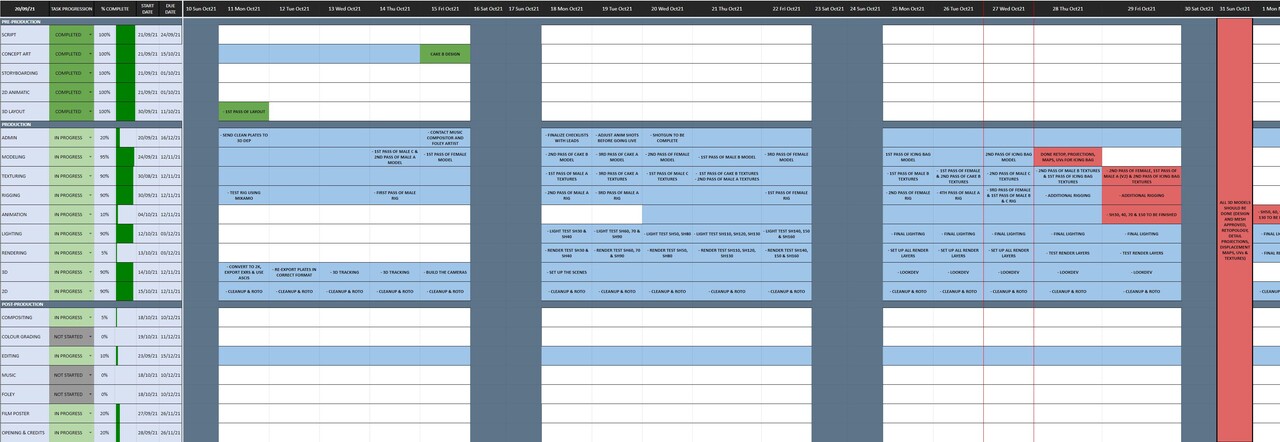
Production Schedule:

The Production Schedule displays all big tasks set with assignees, deadlines, and progress bars in a form of a calendar. This helped the whole team know at glance the stage of production and any pending activity.


Shot Breakdown:

This is a detailed document displaying the different shot numbers, descriptions/script, frame numbers, camera type, transitions, sounds and voiceovers. It assisted the team in different stages of pre-production such as script, storyboarding and 2D animatic.


Shot Plan:

This doc helped us manage all the different stages of production for each shot, from previz to comp. It contained automated drop lists and different status and for each step and was also colour coded to make it easily readable.


PERSONAL REFLECTION:

'Candle Wick' was very challenging and required technical knowledge to manage it. Wick was a moving light source so we needed to be proactive with our rigging process so we don't encounter too many surprises during lighting and rendering. We also dealt with internal conflict throughout the project which was very difficult to handle, especially when we entered production. By successfully producing this film, I learned how to confidently manage a difficult project when it's out of my comfort zone and how to effectively communicate throughout a project when disagreement is more common than agreement. It provided me with great experiences, technical practice and lessons which I will definitely carry over to the next project.


TEAM:

Writer & Director: Oliver Gallagher
Co-director: Shauna Ludgate
Producer: Emmanouil Zervoudakis
Art Director: Tsvetelina Kumanova
Storyboarding: Oliver Gallagher, Chanakan Jeffries, Tsvetelina Kumanova & Aroosa Qureshi
Colour Script: Tsvetelina Kumanova
3D Layout: Shauna Ludgate
Modelling & Texturing: Tom Perry & Shauna Ludgate
Rigging: Tom Perry
2D Artists: Tsvetelina Kumanova, Liam MartinChanakan Jeffries
Animation: Muhammed Mansoor, Tsvetelina Kumanova, Liam Martin, Oliver Gallagher, Shauna Ludgate, Aroosa Qureshi, Chanakan Jeffries, David Akinyose, Tom Perry, Emmanouil ZervoudakisGiada Carnevaletti
Lighting & Rendering: Shauna Ludgate
Compositing: Emmanouil Zervoudakis & Shauna Ludgate
Music: Maria Cortes-Monroy
Sound Design: Mihail Sustov
Editing: Emmanouil Zervoudakis
Voice Actress: Ellie Wills


Report

Producing 'Pet Shop' | Breakdown

Making Of / 25 March 2021

ABOUT:

'Pet Shop' is an award winning 3D animated TV series trailer which is written & directed by Shauna Ludgate and produced by Manos Zervoudakis, within six weeks, entirely remotely at Escape Studios in London. It is In the below blog I will share my experience as a Producer and a breakdown of the production process.


SHORT FILM:

The story is about the daily life of 4 furry friends waiting to be adopted. Duke is new in the shop and brings hope to the other pets that they will find a home, whilst finding a family within each other. The main story arc of the series is getting the characters adopted whilst causing chaos and making friends.


STORYBOARDING:

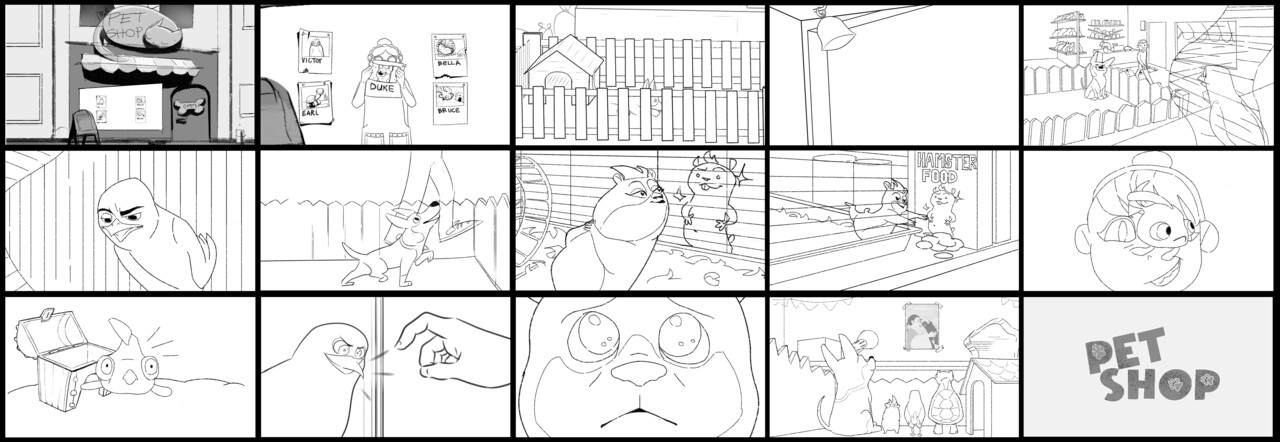
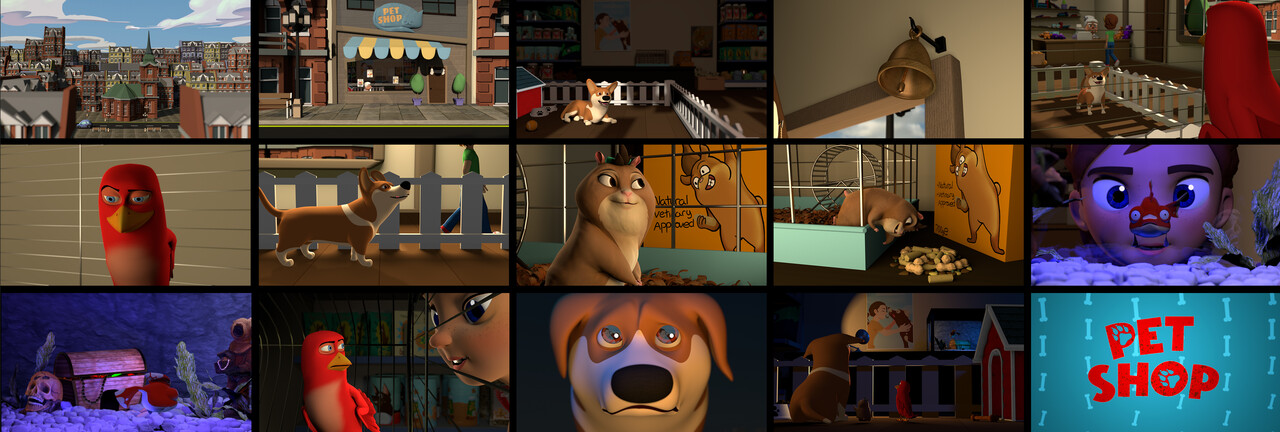
For the first two weeks, our director, Shauna Ludgate, collaborated closely with the storyboarding team to refine the script and shots. Their primary focus was on planning camera angles and creating the 2D panels. This stage was really important for the team to feel confident that we are moving into Previz with a story that works well.


COLOUR SCRIPT:

Our Art Director, Tsvetelina Kumanova, made the deliberate choice to utilize warm colours such as orange and yellow for the day-time shots, while opting for cooler, bluish tones for the night-time shots.

Check out the images below to see our colour script and lighting moodboard.


CHARACTER DESIGN:

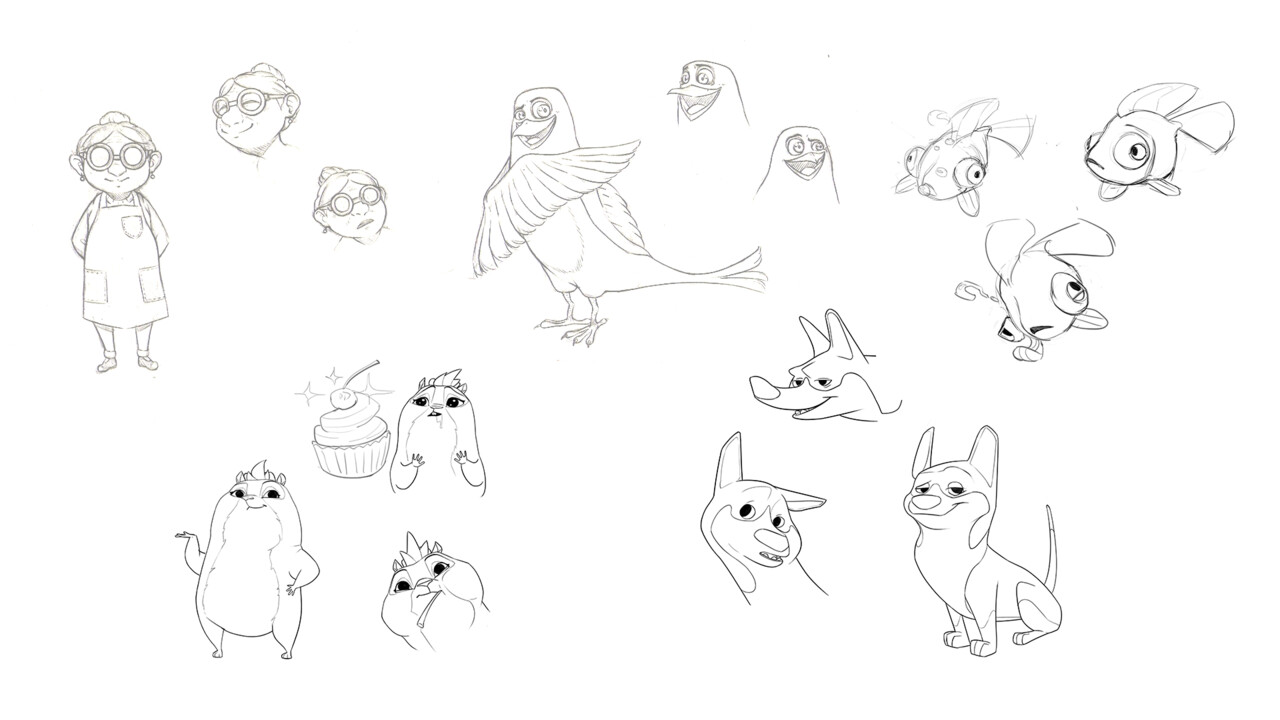
Due to the limited timeframe of only 6 weeks for this project, we made the decision to utilize pre-existing rigs for most elements, with the exception of one character, Bruce the fish. After going through numerous fish references, we went for a straightforward design that incorporated warm colours, emphasizing his calm personality.

Check out the video below to see Bruce's different design stages.


CHARACTER EXPRESSION SHEET:

In addition, we collaborated with the storyboarding team to develop a character expression sheet. This sheet served the purpose of not only showcasing each character's personality but also providing our rigger with an understanding of the full range of facial movements required.


MODELLING & RIGGING:

Bruce was entirely modelled and rigged by us. To create the illusion of being underwater, we employed a combination of blend shapes and nCloth simulations. By utilizing this approach, the simulation engine took care of generating the desired wavy movements for the fins which allowed the animators to concentrate more on Bruce's facial expressions and overall body movements.

Click the video below to see a full character turnaround in different stages.


3D LAYOUT:

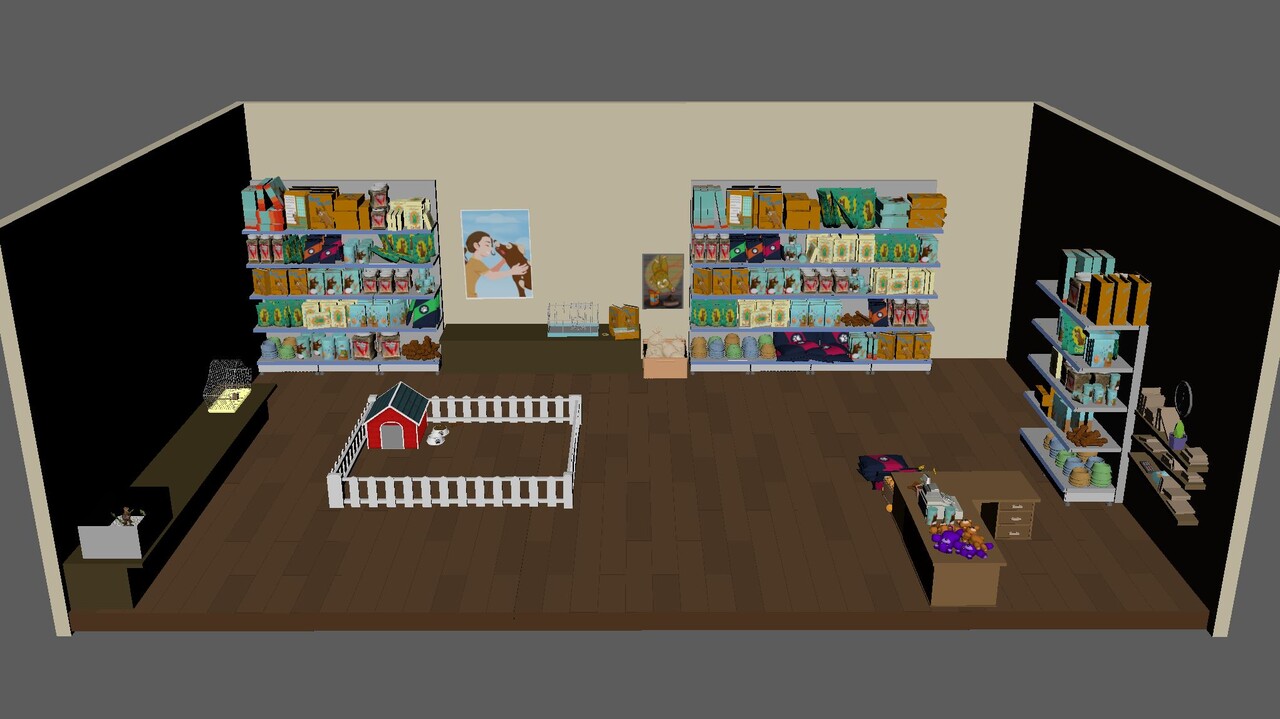
Following that, we initiated the process of establishing the basics for the layout of our pet shop. Once again, considering the limitations of time, we made the decision to model only a select number of items. However, it's worth noting that most textures for the items in the shop are original.


REFERENCES:

References were an important part of our production process and helped us massively during animation. The team used a mixture of animal references for natural creature behaviours, and live action filmed references for lip syncing and human actions.

Check the two videos below for examples of the references we used during an early stage of animation.


ANIMATION BREAKDOWN:

Following a proper animation workflow was key, so we made sure that all animators started from blocking out their shots, then moving to splining and then polishing them as a final step. By doing that we managed to improve the overall quality of animation for the project.

Check out the video below to see the differences in animation between each step, from previz to the final render.


LIGHTING:

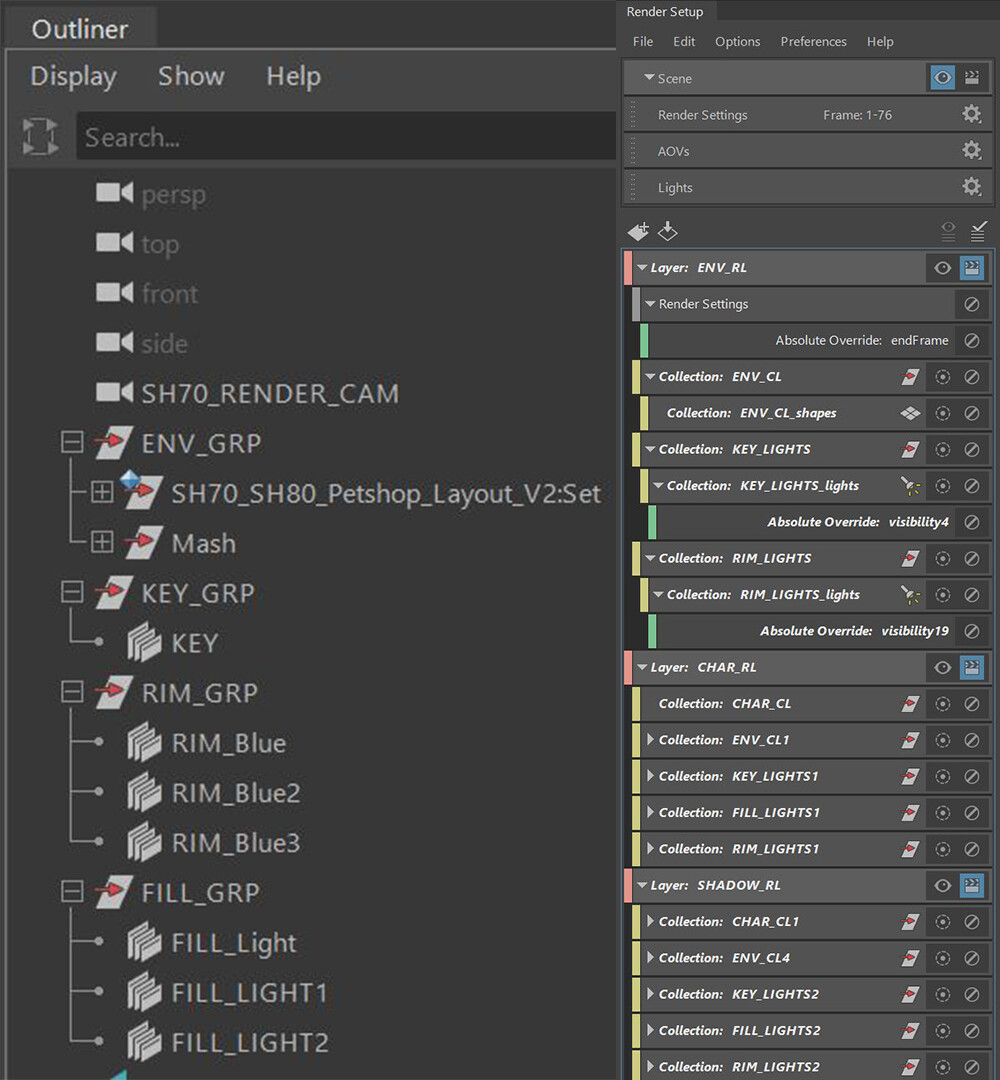
We employed a traditional three-point lighting setup, incorporating a key light, a fill light, and a rim light. Additionally, we utilized light linking, which enabled us to introduce additional lights that were specifically assigned to illuminate particular objects rather than the entire environment.


RENDERING:

We constructed a rendering layer system with AOV's, allowing us to render backgrounds, shadows and characters separately. These technical applications didn't only help us be more efficient with our setups and renders but also be proactive and plan our composition in NukeX.

Check out the image below for our render layers and settings.


COMPOSITING:

The final renders were composed collectively in NukeX, utilizing all the different render layers and AOVs. This allowed us to control the light exposure to maintain consistency across shots, modify the colour gradient of specific elements within the environment or characters, and address any shadow-related issues.

To streamline the process, we employed a master comp script that encompassed all twelve shots within a single project file. This was possible due to the relative simplicity and lightweight nature of our scripts. Key nodes utilized in the composition workflow included shuffles, merges, Zdefocus, and grades.

Furthermore, we incorporated 2D drawings of clouds into our initial shot. These drawings were initially created in After Effects, after which they were composited and tracked within Nukex.

Check out the below video to see all the different visuals between stages.


PRODUCTION:

We mainly used Excel to create the production schedule and some other documents to help us track the progress of the different stages of each shot, as well as managing all our assets and calculating our render times.

See the three images below for the key planning tools we used.


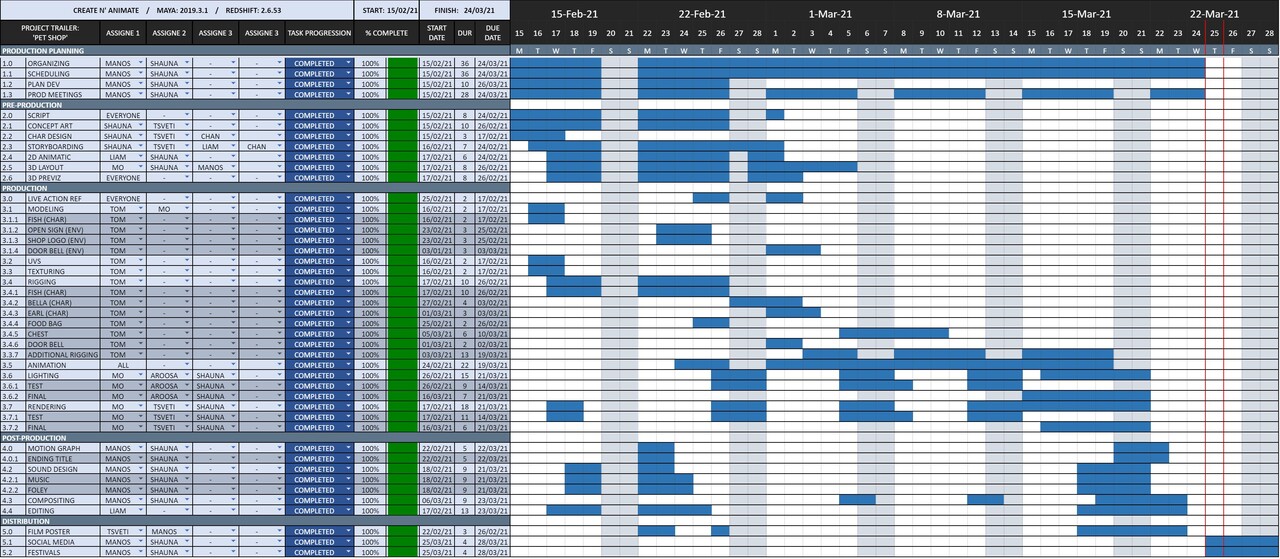
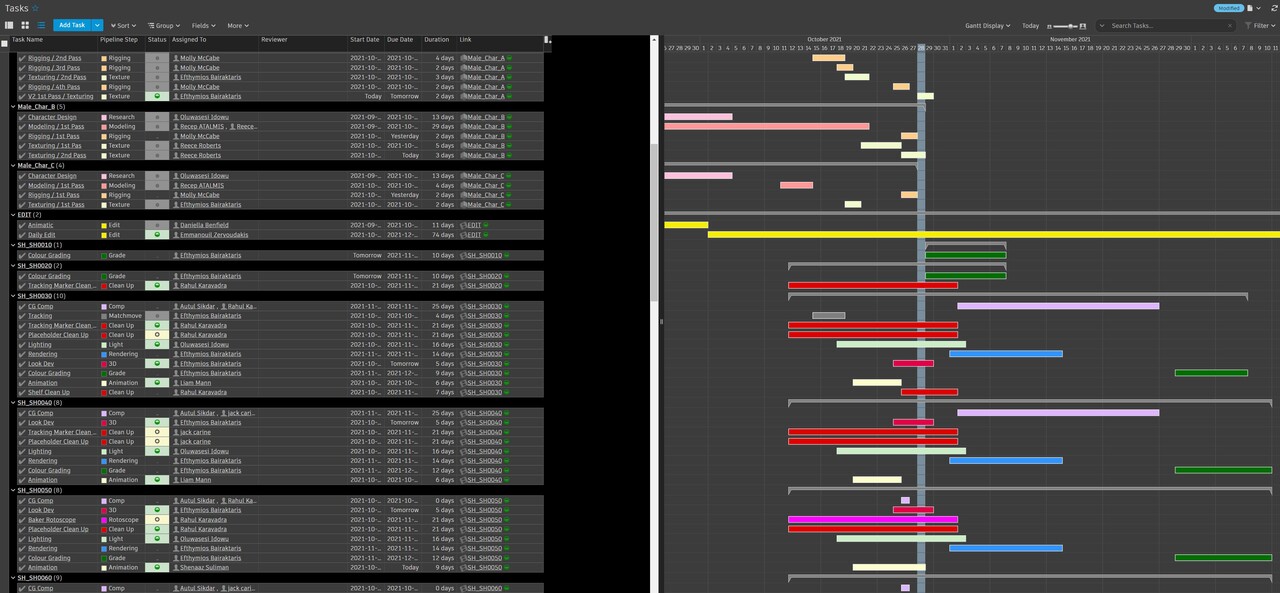
Image 1 - Production Schedule:

The Production Schedule helped the team have a general overview of each task, duration, and progress. All the tasks from the left side of the schedule are displayed on the right side in a form of calendar, known as Gantt Chart, with the working days marked as blue blocks.


Image 2 - Shot Plan:

The Shot Plan helped us track the progress of each shot, which means tracking the whole process of animation, lighting, rendering and comp. It displayed all the shots, the frame range of each shot, approved cameras, status of the actual animation, lighting etc. Also, it allowed each department to pass on their work to the next one by simply choosing the right action from the drop-down lists.


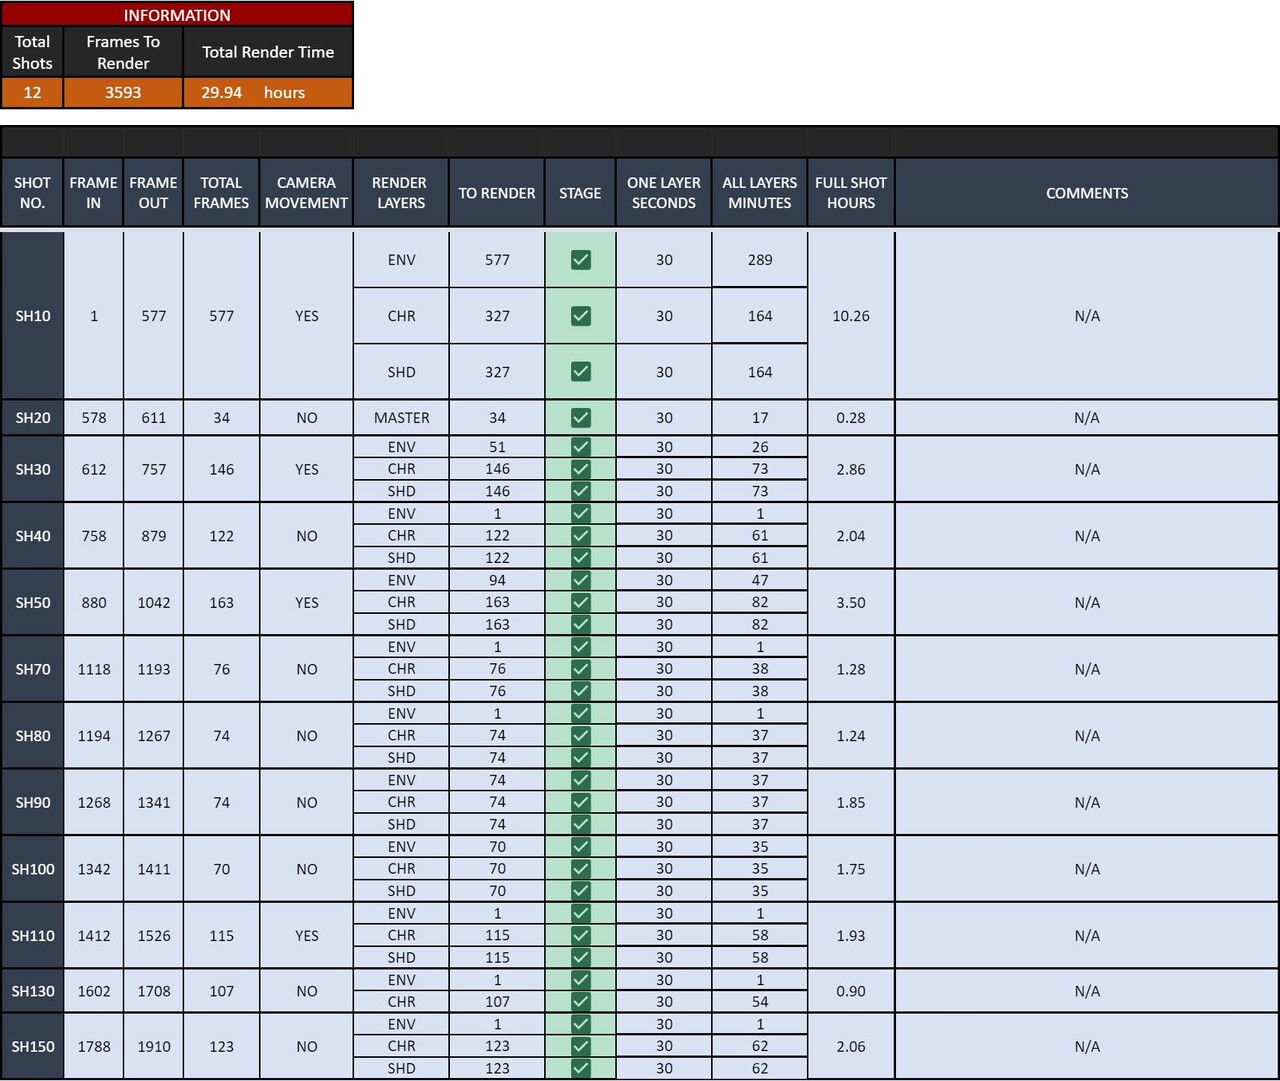
Image 3 - Render Stats:

The Render Stats displayed rendering data which helped the relevant person understand how long it will take them to render each render layer, each frame, each shot etc. This document took most of its data from the Shot Plan so when animators were updating their shots, this was getting updated automatically as well.


PERSONAL REFLECTION:

'Pet Shop' is my second group project and it was a blast! I had the opportunity to work with some really talented people who showed great spirit and dedication during those 6 weeks. it was challenging but very rewarding. The biggest learning for me, beyond technical skills, was that teamwork and accountability are critical to ensure a successful project! 


THE TEAM:

Writer & Director: Shauna Ludgate
Producer: Emmanouil Zervoudakis
Art Director: Tsvetelina Kumanova
Storyboarding: Shauna Ludgate, Oliver Gallagher, Chanakan Jeffries, Tsvetelina Kumanova & Aroosa Qureshi
Colour Script: Tsvetelina Kumanova
3D Layout: Muhammed Mansoor & Shauna Ludgate
Modelling & Texturing: Tom Perry & Oliver Gallagher
Rigging: Tom Perry
Animation: Muhammed Mansoor, Tsvetelina Kumanova, Liam Martin, Oliver Gallagher, Shauna Ludgate, Aroosa Qureshi, Chanakan Jeffries, David Akinyose, Tom Perry & Derek Fead
Lighting & Rendering: Shauna Ludgate & Muhammed Mansoor
Compositing: Shauna Ludgate
Music: Maria Cortes-Monroy
Sound Design: Mihail Sustov
Motion Graphics: Alice McCall
Editing: Liam Martin & Emmanouil Zervoudakis
Voice Acting: Cameron Bier (Duke), Ellie Wills (Bella) & Muhammed Mansoor (Victor)


Report

Producing 'ALMA' | Breakdown

Making Of / 03 February 2021

ABOUT:

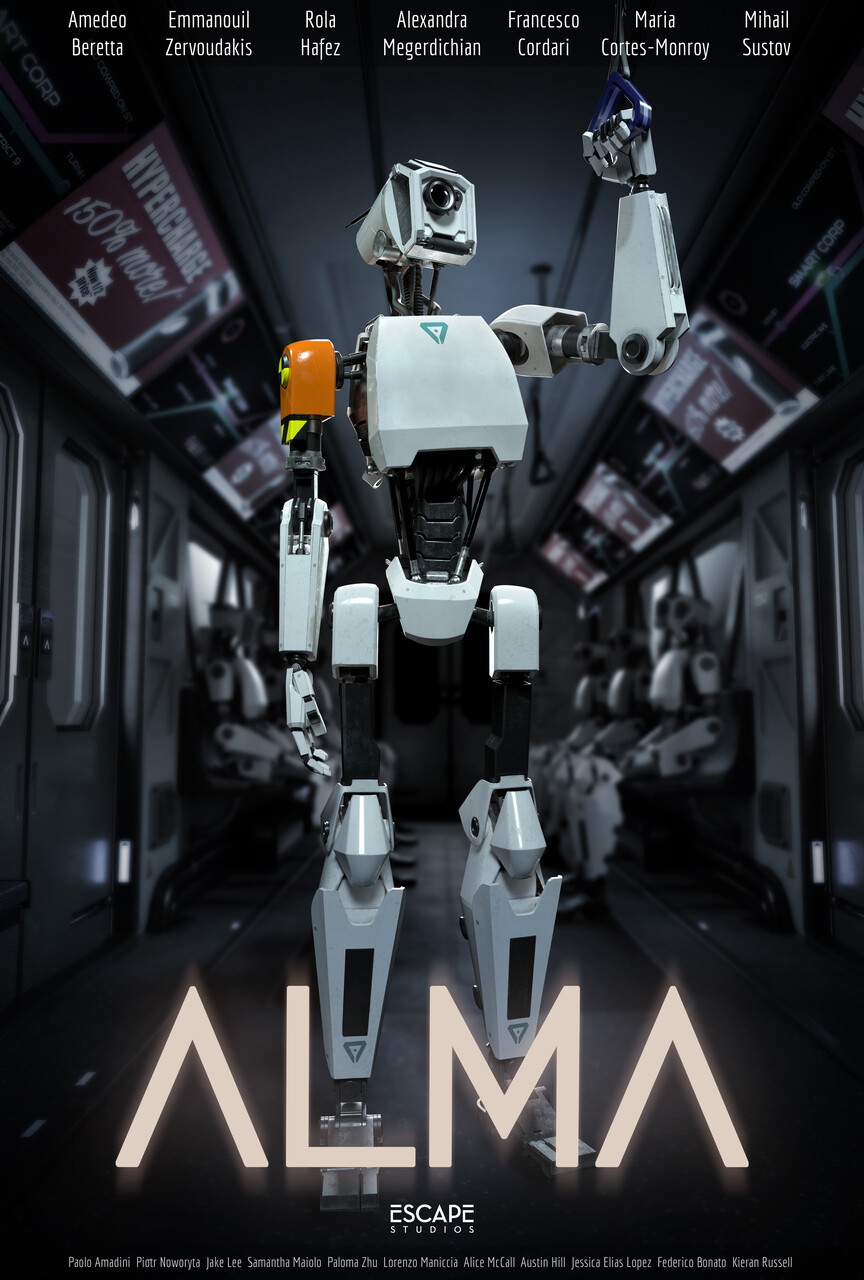
'ALMA' is an award winning, 3D animated short film which is written & directed by Rola Hafez and produced by Manos Zervoudakis, within eighteen weeks, entirely remotely, at Escape Studios in London. It is In the below blog I will share my experience as a Producer and a breakdown of the production process. 


SHORT FILM:

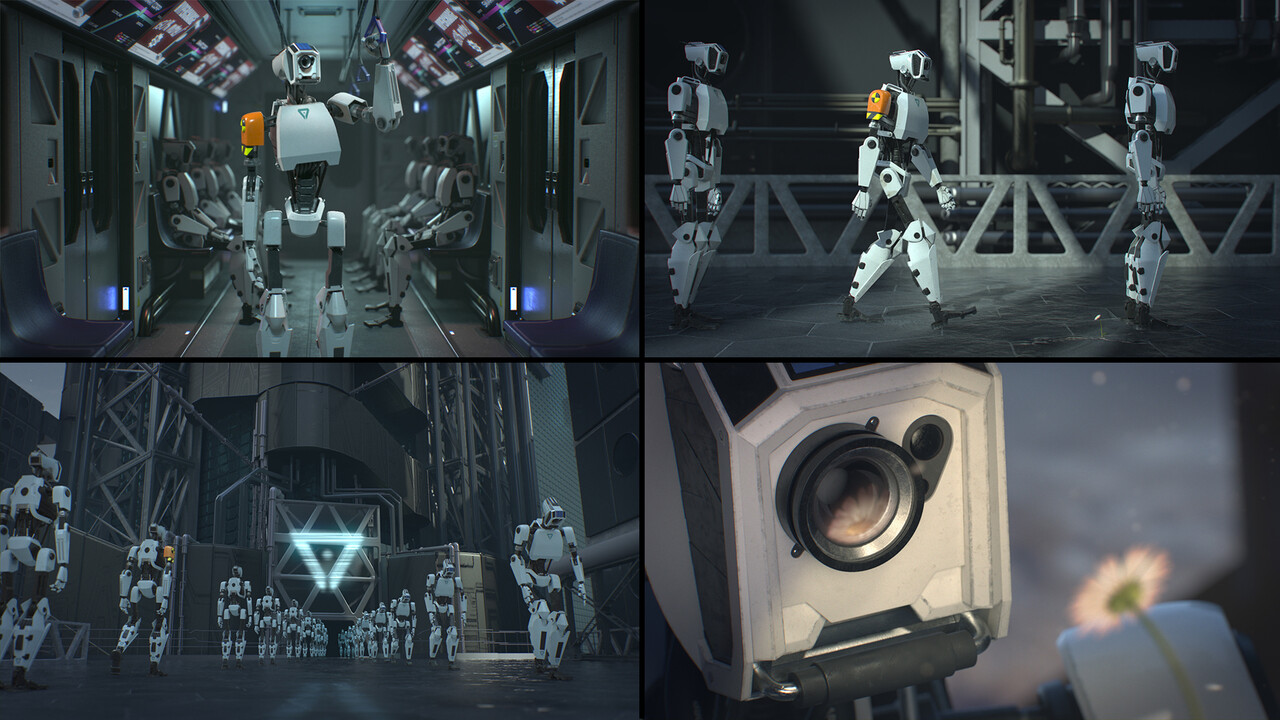
The story is about following a robot’s daily commute and routine to reflect on human life, aim and purpose.


CHARACTER DESIGN: 

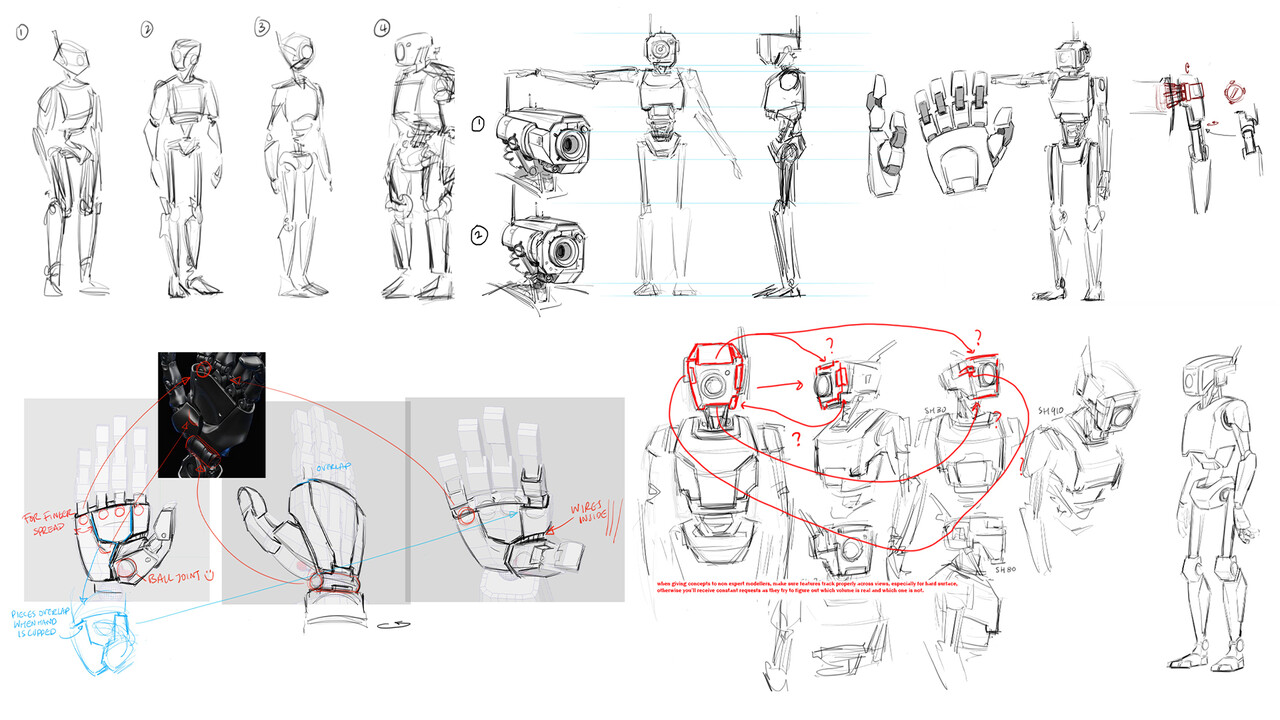
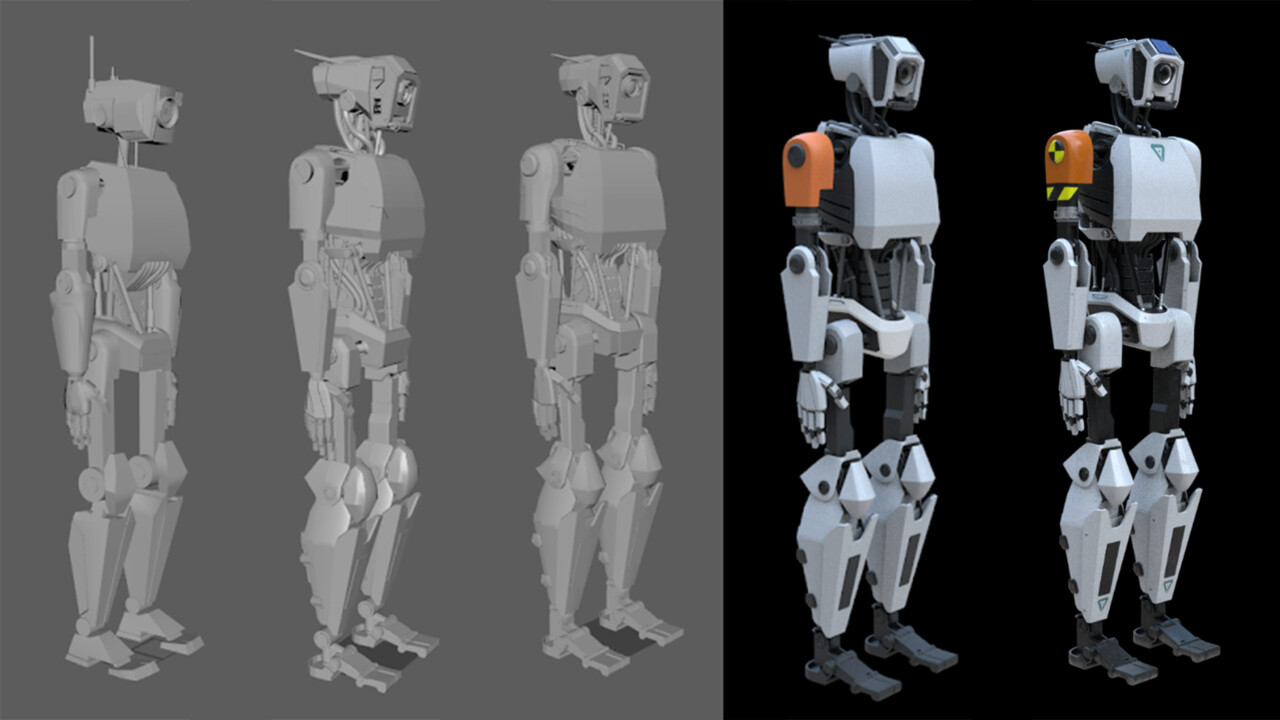
The designs required a high level of detail to provide us with a comprehensive understanding of the robot's technical equipment and its movement capabilities which both of them should look realistic.


MODELING:

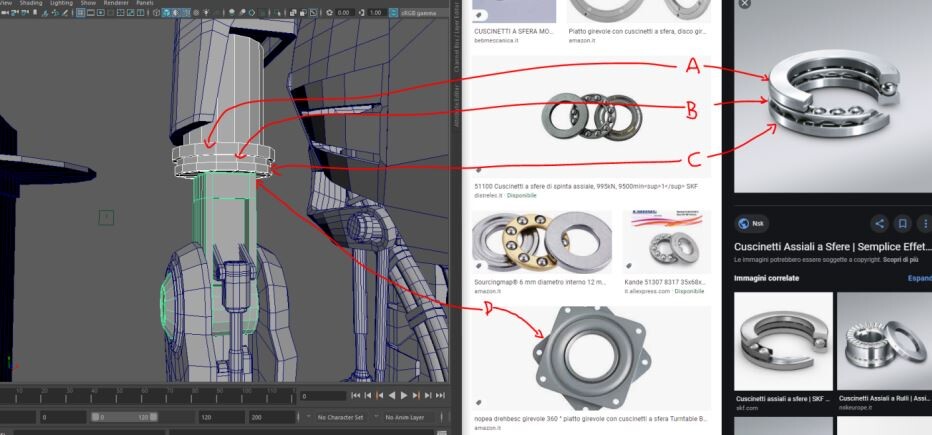
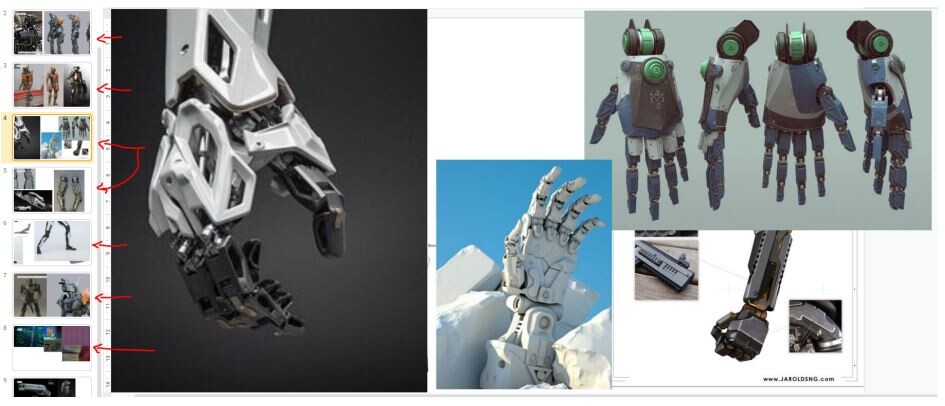
The key factor in achieving a clear development was the collection of real-life and CG references, which happened throughout many weeks.

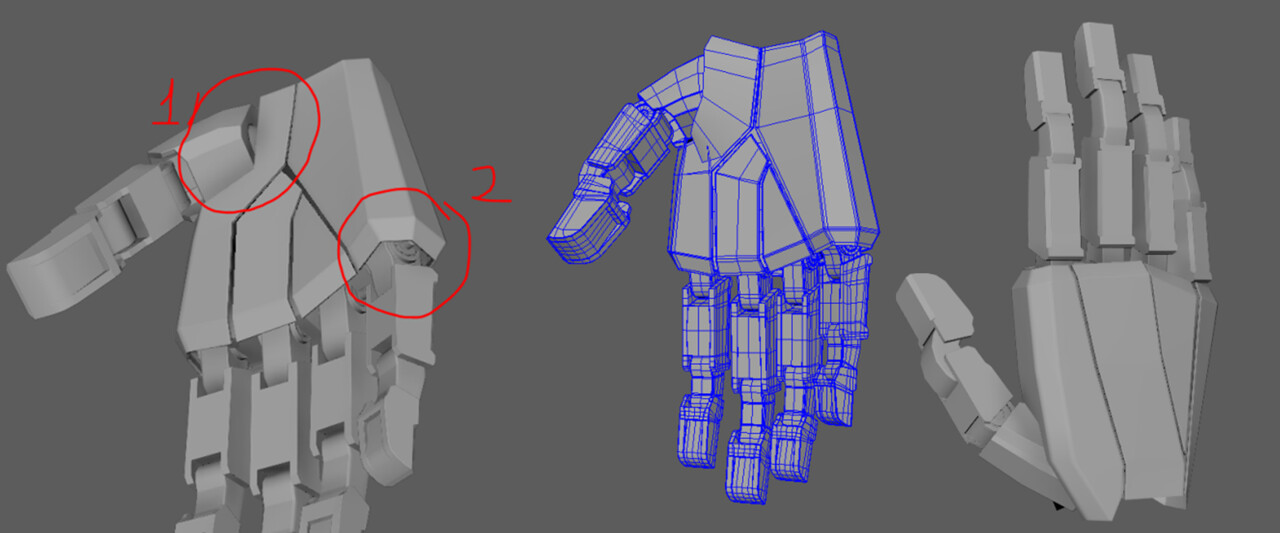
We focused on finalizing a low-res version of the robot so we can rig it, retarget the mocap data onto it and run animation tests. Once we finalized, we had to let go of the concept art and solve functionality problems. Modelling the limbs, especially the hands was a challenge. The problem was not necessarily the actual modeling, but to knowing how far the limbs can rotate or translate. In order to monitor this subject and avoid any intersections, our modeler and rigger was in close communication. The most troublesome areas were the connections between the base of the thumb and the palm (1) and the base of the pinkie finger (2).

You may be curious as to why the main character has an orange piece of metal for its shoulder compared to the rest of the robots. This choice originates from the background story wherein the robot had broken its original part. However, the primary purpose of incorporating the orange piece is to allow the audience to instantly spot the main character's identity.


MOTION CAPTURE:

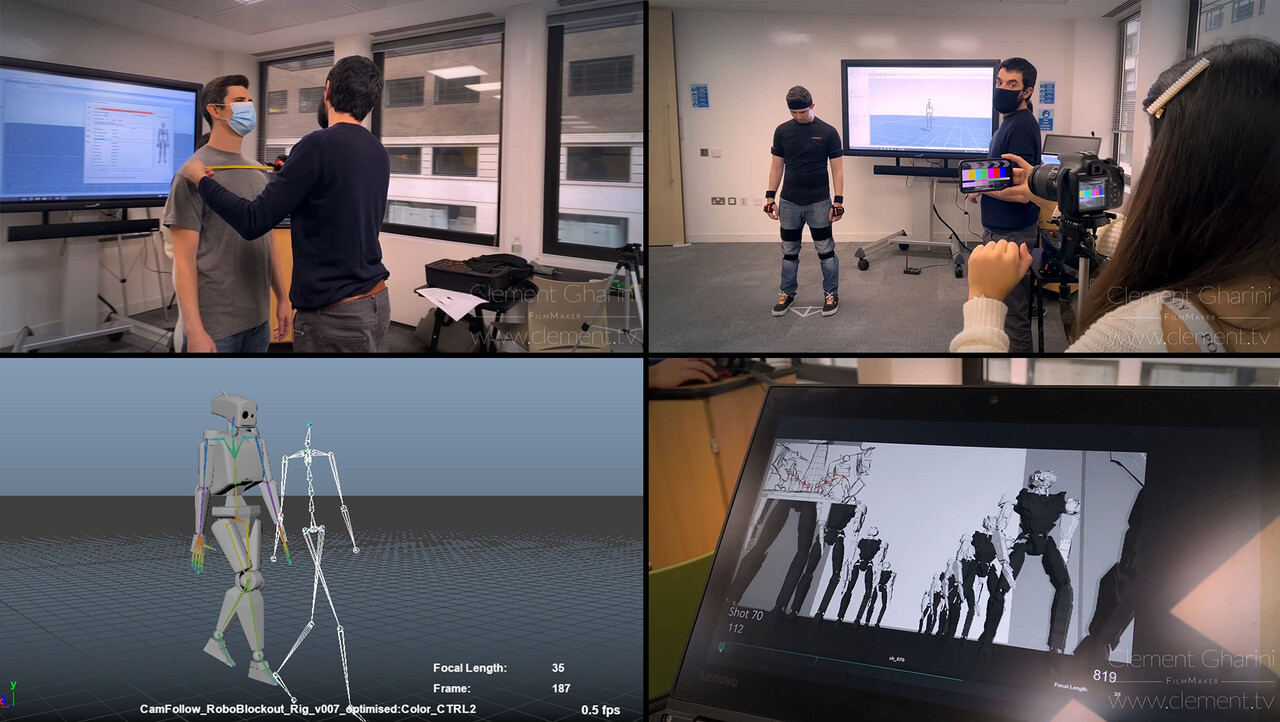
Mocap was used for the first time in Escape Studios for this project in order to provide the animators with a base animation for almost each shot. After that, animators built on top of that so they could keep their animation polished. Clement Gharini, a cinematography tutor at Escape Studios, was kind enough to supply the team with an Xsens Awinda MoCap suit (worn by Jake Lee, one of the animators in the team, see the pictures and video below).


COLOUR SCRIPT:

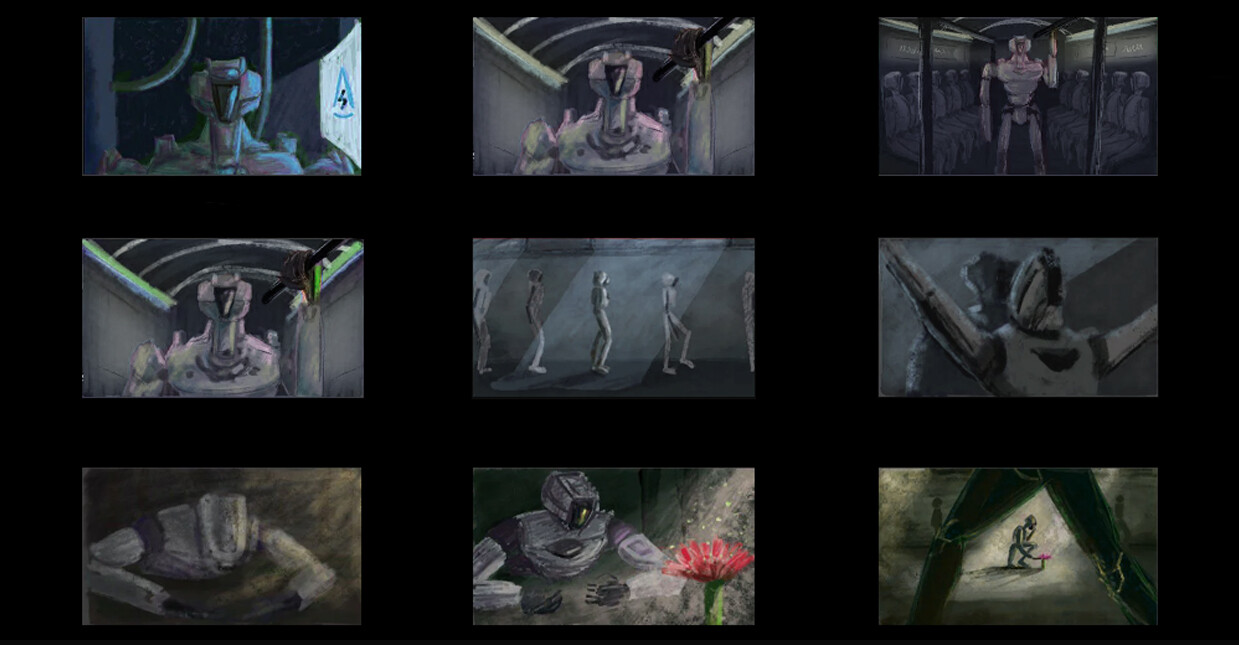
Colour script played a huge role in setting up the right lighting and accurate colour grading during comp.


CINEMATOGRAPHY:

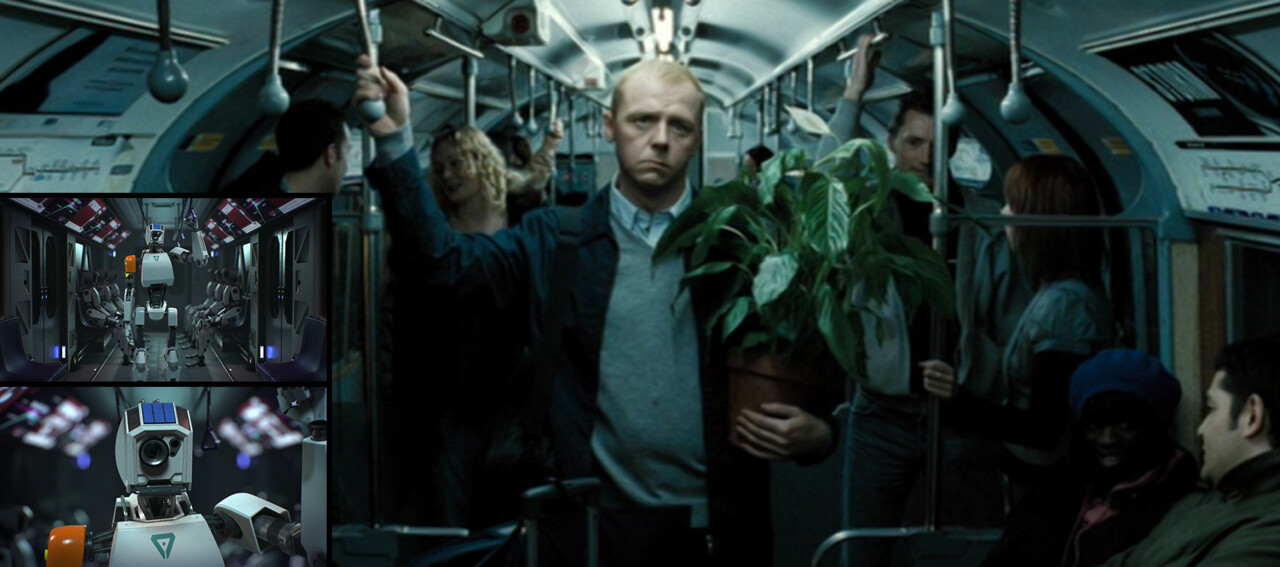
We wanted to portray the boring and tedious routine of our character as they commuted to work using the underground. To achieve this, we took inspiration from the film "Hot Fuzz" and carefully built the camera and lighting setup. Additionally, we utilized fast transitions and rapid cuts to push the portrayal even further.


LIGHTING:

For the most part, we relied on the traditional three-point lighting technique, consisting of a rim light, a key light, and a fill light. However, in certain shots, we opted for a four-point setup, as shown below. On the left side, we have the fill light, which utilizes a dome light with a flat colour. Next, the key light emanates from the screen positioned to the left of the robot. The third light serves as an additional fill light, contributing to colour variation. Finally, we incorporated a spotlight, although its intensity remains relatively low due to the ample lighting in the scene and the size of the environment.


PHOTOBASHES:

In this project, we extensively used paint-overs and photobashes. These techniques allowed us to quickly explore ideas and address many problems without investing excessive time in 3D space.


RENDERING:

To manage our rendering needs for the project, we utilized ''Zero Tier'' and ''AFANASY (CGRU)''. These tools proved to be a huge help in operating our online render farm. Essentially, an online render farm enables the creation of a network of workstations that collaboratively render the short movie. While it was my first experience working with such a system, I highly recommend it to others who are willing to invest in the necessary maintenance and support from a skilled "Renderfarm TD."

During the rendering phase, it is crucial to assign someone to continuously monitor the renders as they progress. This individual plays a huge role in quickly identifying any errors or mistakes that may occur. By quickly notifying the relevant person, rendering can be stopped, issues can be addressed, and the rendering process can be restarted, thus avoiding wasting time and resources on unusable renders. This practice is commonly referred to as "render rattling."

There is a wide range of choices available for renderers, such as Arnold, Renderman, Redshift, Octane, V-Ray, and more. Some users go for Arnold due to its realism, despite the trade-off of longer rendering times. However, we decided to utilize Redshift, which allowed us to maintain a high level of quality while significantly reducing rendering times, saving us weeks of valuable production time. It is crucial to determine your rendering software early in the production process and ensure that any other renderers in Maya are deactivated. Other renderers tend to store data in assets, which can be time-consuming to remove or convert, particularly during later stages of production.


MAKING OF:

Please see below for a quick breakdown of our processes.


COMMUNICATION:

While Discord is commonly perceived as a platform for gamers, it served as our primary communication tool. Discord is highly interactive and user-friendly, offering features that promote organization and efficiency for teams. It allows users to create customized servers and channels, both in text and voice format, which saved us time and effort. Additionally, it enables the assignment of specific roles to individuals, ensuring that artists can share their works in progress (WIPs) by tagging the relevant person without causing distractions to other team members. This facilitated fast communication and efficient sharing of documents within our team.

Besides Discord, we utilized Google Meet for our dailies and meetings. This platform enables us to effortlessly record and store videos directly on Google Drive, facilitating easy sharing with all participants. This streamlined our processes since we were already using Google Drive for file storage and sharing across all workstations. However, if you choose to create offline documents in Excel and later upload them to Google Drive, converting them into Google Sheets may pose some challenges. Specifically, certain actions like "merged cells" may not be compatible with the filtering option in Google Sheets.

Additionally, we made use of Google File Stream, which offered us the ability to seamlessly synchronize offline files with their online counterparts in real-time. This feature proved especially beneficial for our artists, as they could conveniently set their projects on the online shared drive, allowing their scenes to receive updates with just a click of a button. However, we did encounter a few challenges along the way. At times, Google File Stream unexpectedly vanished from our PCs or crashed, which required a reinstallation. 


DAILIES STRUCTURE:

As a producer, one of my main responsibilities involved effectively coordinating both internal and external team members to ensure progress tracking and adherence to deadlines.

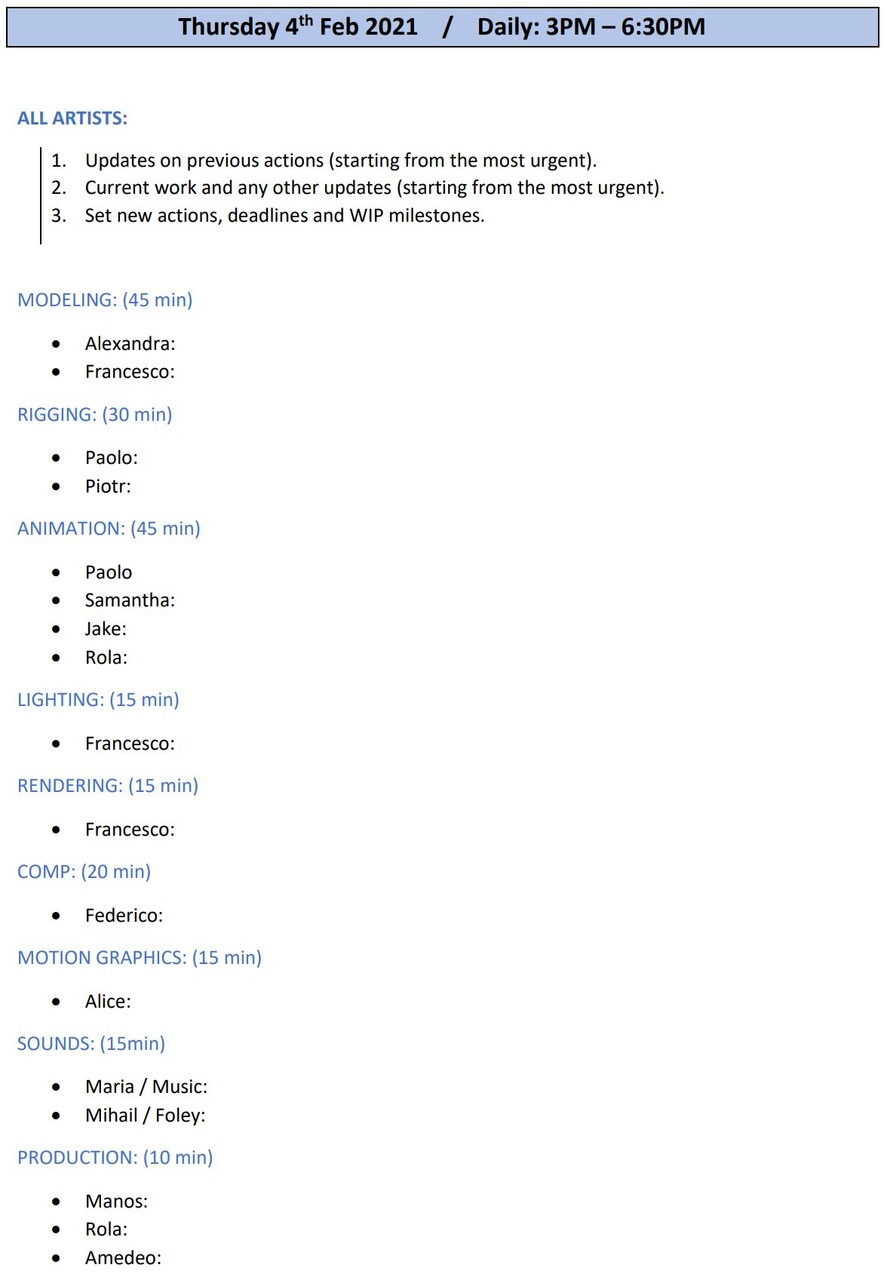
To accomplish this, I implemented a structured approach to our daily activities, considering priorities and the availability of individuals. I diligently maintained notes and action items from each meeting, guaranteeing that all artists were well-informed about their assigned tasks. Throughout the week, I followed up with team members to obtain updates on their progress. Prior to every meeting, I fine-tuned a template that I had developed, tailoring it to suit the specific requirements of the upcoming discussion. By allocating dedicated time slots for each department and artist, we minimized the duration of our calls, allowing everyone to maximize their productivity. Furthermore, we established a systematic approach to addressing feedback, ensuring that it was easily recorded and communicated to everyone.


TEAM BREAKDOWN:

Then, I created a ‘Team Breakdown’ document that provided quick access to essential information about team members, including their names, roles, email addresses, and Discord IDs. This document was important, particularly considering that the project was executed entirely remotely due to the COVID pandemic, which prevented face-to-face interactions and the opportunity for team bonding. When a new member joined the project, this resource played a big role in helping them swiftly understand the team's dynamics. As someone who has experienced the disorienting feeling of joining a new team, I'm sure you can appreciate the significance of such a document. Unfortunately, I cannot share the document itself due to the presence of private information.


PROGRESS TRACKER:

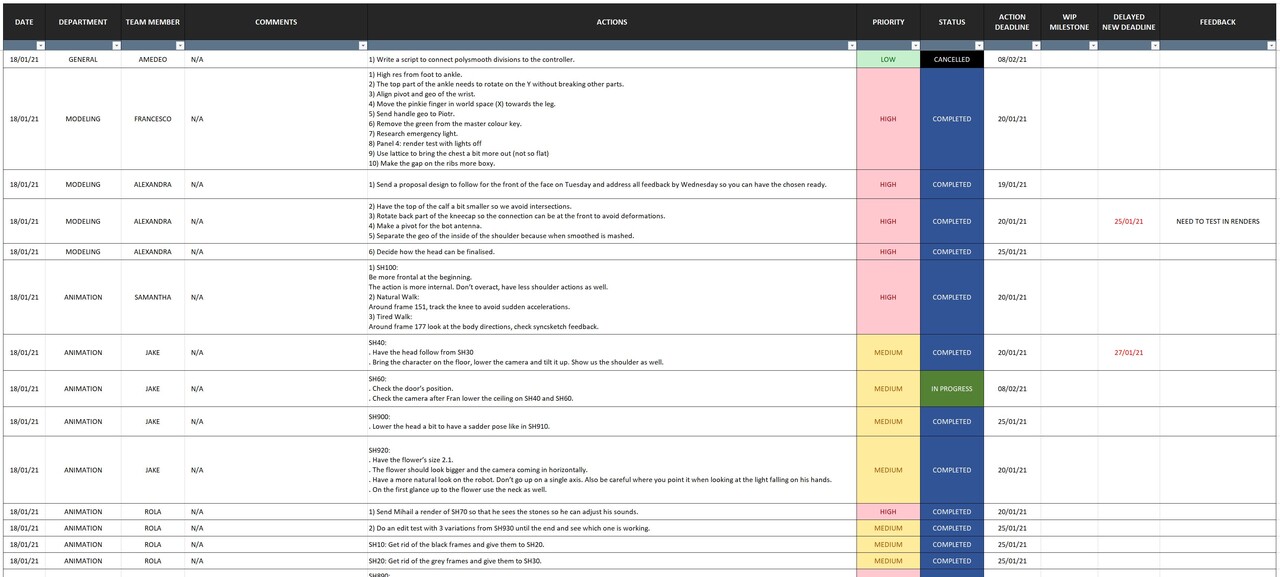
A key aspect of my role was to streamline all processes and optimize our workflow, primarily utilizing Excel. To achieve this, I developed a "Progress Tracker" document that served as a centralized hub for recording and monitoring all actions. This document provided several benefits, including the ability to utilize drop-down lists for data entry instead of manual typing. Additionally, artists could use filtering actions based on department, name, status, and other criteria, enabling them to quickly navigate to their pending tasks. This approach significantly helped us track progress and access relevant information.


PRODUCTION SCHEDULE:

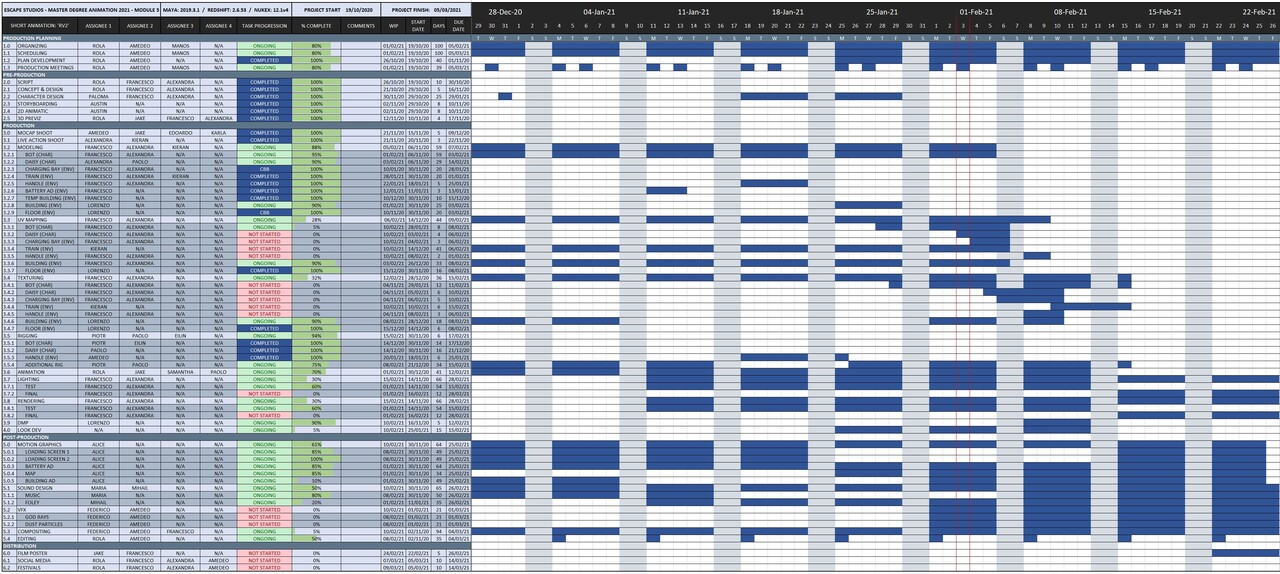
Following that, I proceeded to create a Production Schedule with the primary objective of visually presenting our production data. The document incorporated folders and sub-folders, providing users with the flexibility to choose the level of simplicity or complexity that suited their needs. This schedule aimed to assist the production team in obtaining a comprehensive overview of each task, including its duration and progress. To achieve this, I organized all tasks on the left side of the schedule, and on the right side, I implemented a calendar format known as a Gantt Chart. In this chart, working days were marked by blue blocks. 

Although the Production Schedule contained the right information, I did encounter occasional challenges in quickly understanding pending tasks. Therefore, I continued to experiment with visuals and kept refining it to ensure that everybody can understand it.


(Subfolders closed)


(Subfolders open)


SHOT PLAN:

Following that, I proceeded to develop a "Shot Plan" document, which served as a comprehensive tool for tracking the progress of each shot throughout the animation process, including ABC export, lighting, rendering, and compositing stages. This document displayed important information such as shot details, frame ranges, approved cameras, mocap versions, offsets, and animation status (e.g., Blocking, Splining).

It also allowed each department to pass on their work to the next one by simply choosing the right action from the drop-down lists. For example: If animation exported the ABC, the animator would select ''Pending Check'' and the lighting artist will choose ''In Progress''. If there is an issue with the ABC, the Lighting artist will change it to 'Blocked' and the ABC will turn into ''Re-Export''.

To foster effective communication and minimize errors during export, I incorporated comment boxes for each department, enabling them to exchange information and address potential concerns.


ASSET TRACKER:

Furthermore, I developed an "Asset Tracker" to monitor the progress of all our assets and ensure that artists consistently work with the latest geo and rigs. This document primarily focuses on asset versions, stages, and associated deadlines. It serves as a data source for the "Production Schedule," meaning that any changes made here automatically update the corresponding information in the other document. In many ways, this document acts as a bible for riggers and modelers, as even a single incorrect asset version can result in hours of troubleshooting. Once again, I organized the assets and shots into folders to provide users with the option of simplifying the view if they prefer. Within both assets and shots, I included the option for a "CBB" status, indicating "Could Be Better." This allows for a comment section where suggestions for improvement can be recorded. If we find ourselves with extra time towards the end of production, we can always revisit and address these areas for further refinement.


(Subfolders closed)


(Subfolders open)


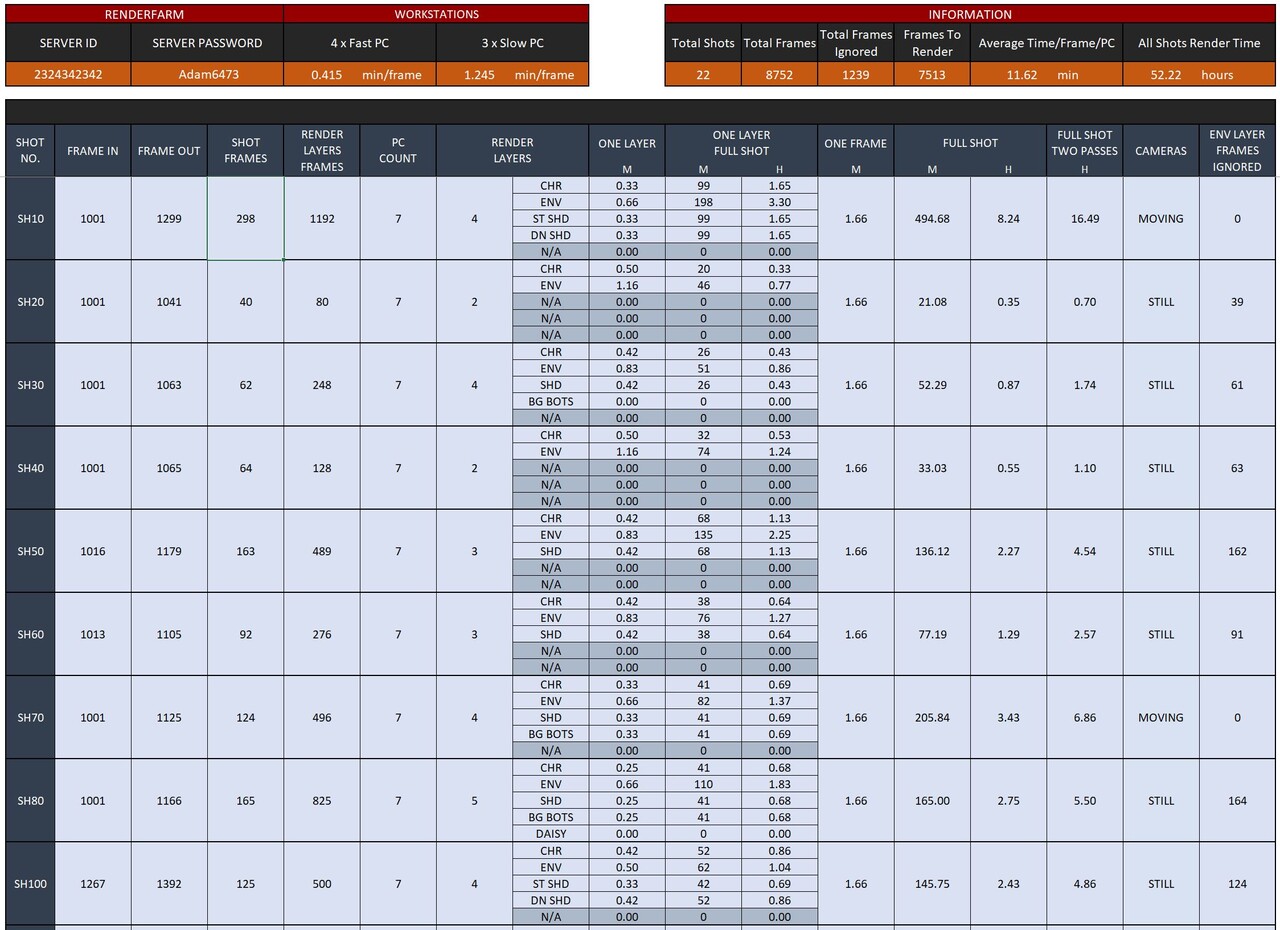
RENDER STATS:

As a final document, I created the "Render Stats" to provide rendering data, helping the people responsible for rendering in understanding the expected time required for each render layer, frame, and shot. This document draws most of its information from the "Shot Plan," meaning that as animators update their shots, the "Render Stats" document is automatically updated accordingly.

To enhance usability and efficiency, I designed the "Render Stats" document to be fully automated. This allows the renderer to modify input data and instantly obtain accurate results across all cells. For instance, if the "PC Count" is adjusted, all rendering times will adapt to the new number. The total render time, located in the top-right corner, currently indicates 52.22 hours for 7 machines rendering. If 2 machines are removed and there are only 5 remaining, the rendering time per frame, per shot, and the overall total time will be correctly adjusted.

(Please note: The placeholders used for the ID and password fields are merely substitutes.)


PERSONAL REFLECTIONS:

Overall, this experience has proven to be a great opportunity for personal growth and learning. Not only have I been able to expand my knowledge through hands-on involvement, but I have also had the privilege of learning from the department leads. As I reflect on this experience, three key insights and lessons stand out:

  1. Having a dedicated team is paramount to complete a project successfully. ''If you give a good idea to a mediocre team, they will screw it up. If you give a mediocre idea to a brilliant team, they will either fix it or throw it away and come up with something better.'' Ed Catmull (Creativity Inc). This project did not just have a great story, but It also had a great team. It would not have been possible without effective communication and dedication from everyone.
  2. To successfully support a project as a producer you must continue to improve your processes and adapt them as you go. I had to learn to continuously seek feedback from my team and executive producer regarding my work and how to best support them. This allowed me to create processes to keep track of all stages, actions and deadlines but most importantly to streamline work and reduce friction so the artists in the team could focus on their creative tasks.
  3. Make it visual, keep it simple and automate it as much as possible. As a producer I needed to ensure anyone could see the progress at glance and at any stage. Using colours in my trackers, graph and visual is definitely something I had to include and will continue to do going forward. The trackers and all processes also need to be simple and effective. The more complicated the less effective.

Finally, a massive thank you and congratulation to all who were part of this project! Originally this was a 3-people project, and it was so beautifully developed that 20+ people got involved. This wouldn't be possible without the help of all these people that supported with concept art, modelling, texturing, animation, comp, music, sound effects etc. Amedeo Beretta, Escape Studios tutor, supervised the project which also played a big part in its success. His guidance and hands-on leadership placed this project on a successful path.


PRODUCTION BREAKDOWN:


TEAM: 

Director & Writer / Rola HafezFrancesco Cordari & Alexandra Megerdichian 
Executive Producer & Animation Director / Amedeo Beretta 
Producer / Emmanouil Zervoudakis & Rola Hafez
Supervising TD / Francesco Cordari
Assistant TD / Paolo Amadini 
Concept Art / Paloma Zhu
Storyboarding / Austin Hill 
Colour Script / Jessica Elias LopezFrancesco Cordari
MoCap Performance / Jake Lee 
Modelling & Texturing / Francesco Cordari & Alexandra Megerdichian 
Rigging / Piotr Noworyta 
Animation / Rola Hafez, Samantha MaioloJake Lee & Paolo Amadini 
Lighting & Rendering / Francesco Cordari
Compositing / Amedeo Beretta
Original Music / Maria Cortes-Monroy 
Sound Design / Mihail Sustov 
Motion Graphics / Alice McCall 
Editing / Rola Hafez


Report