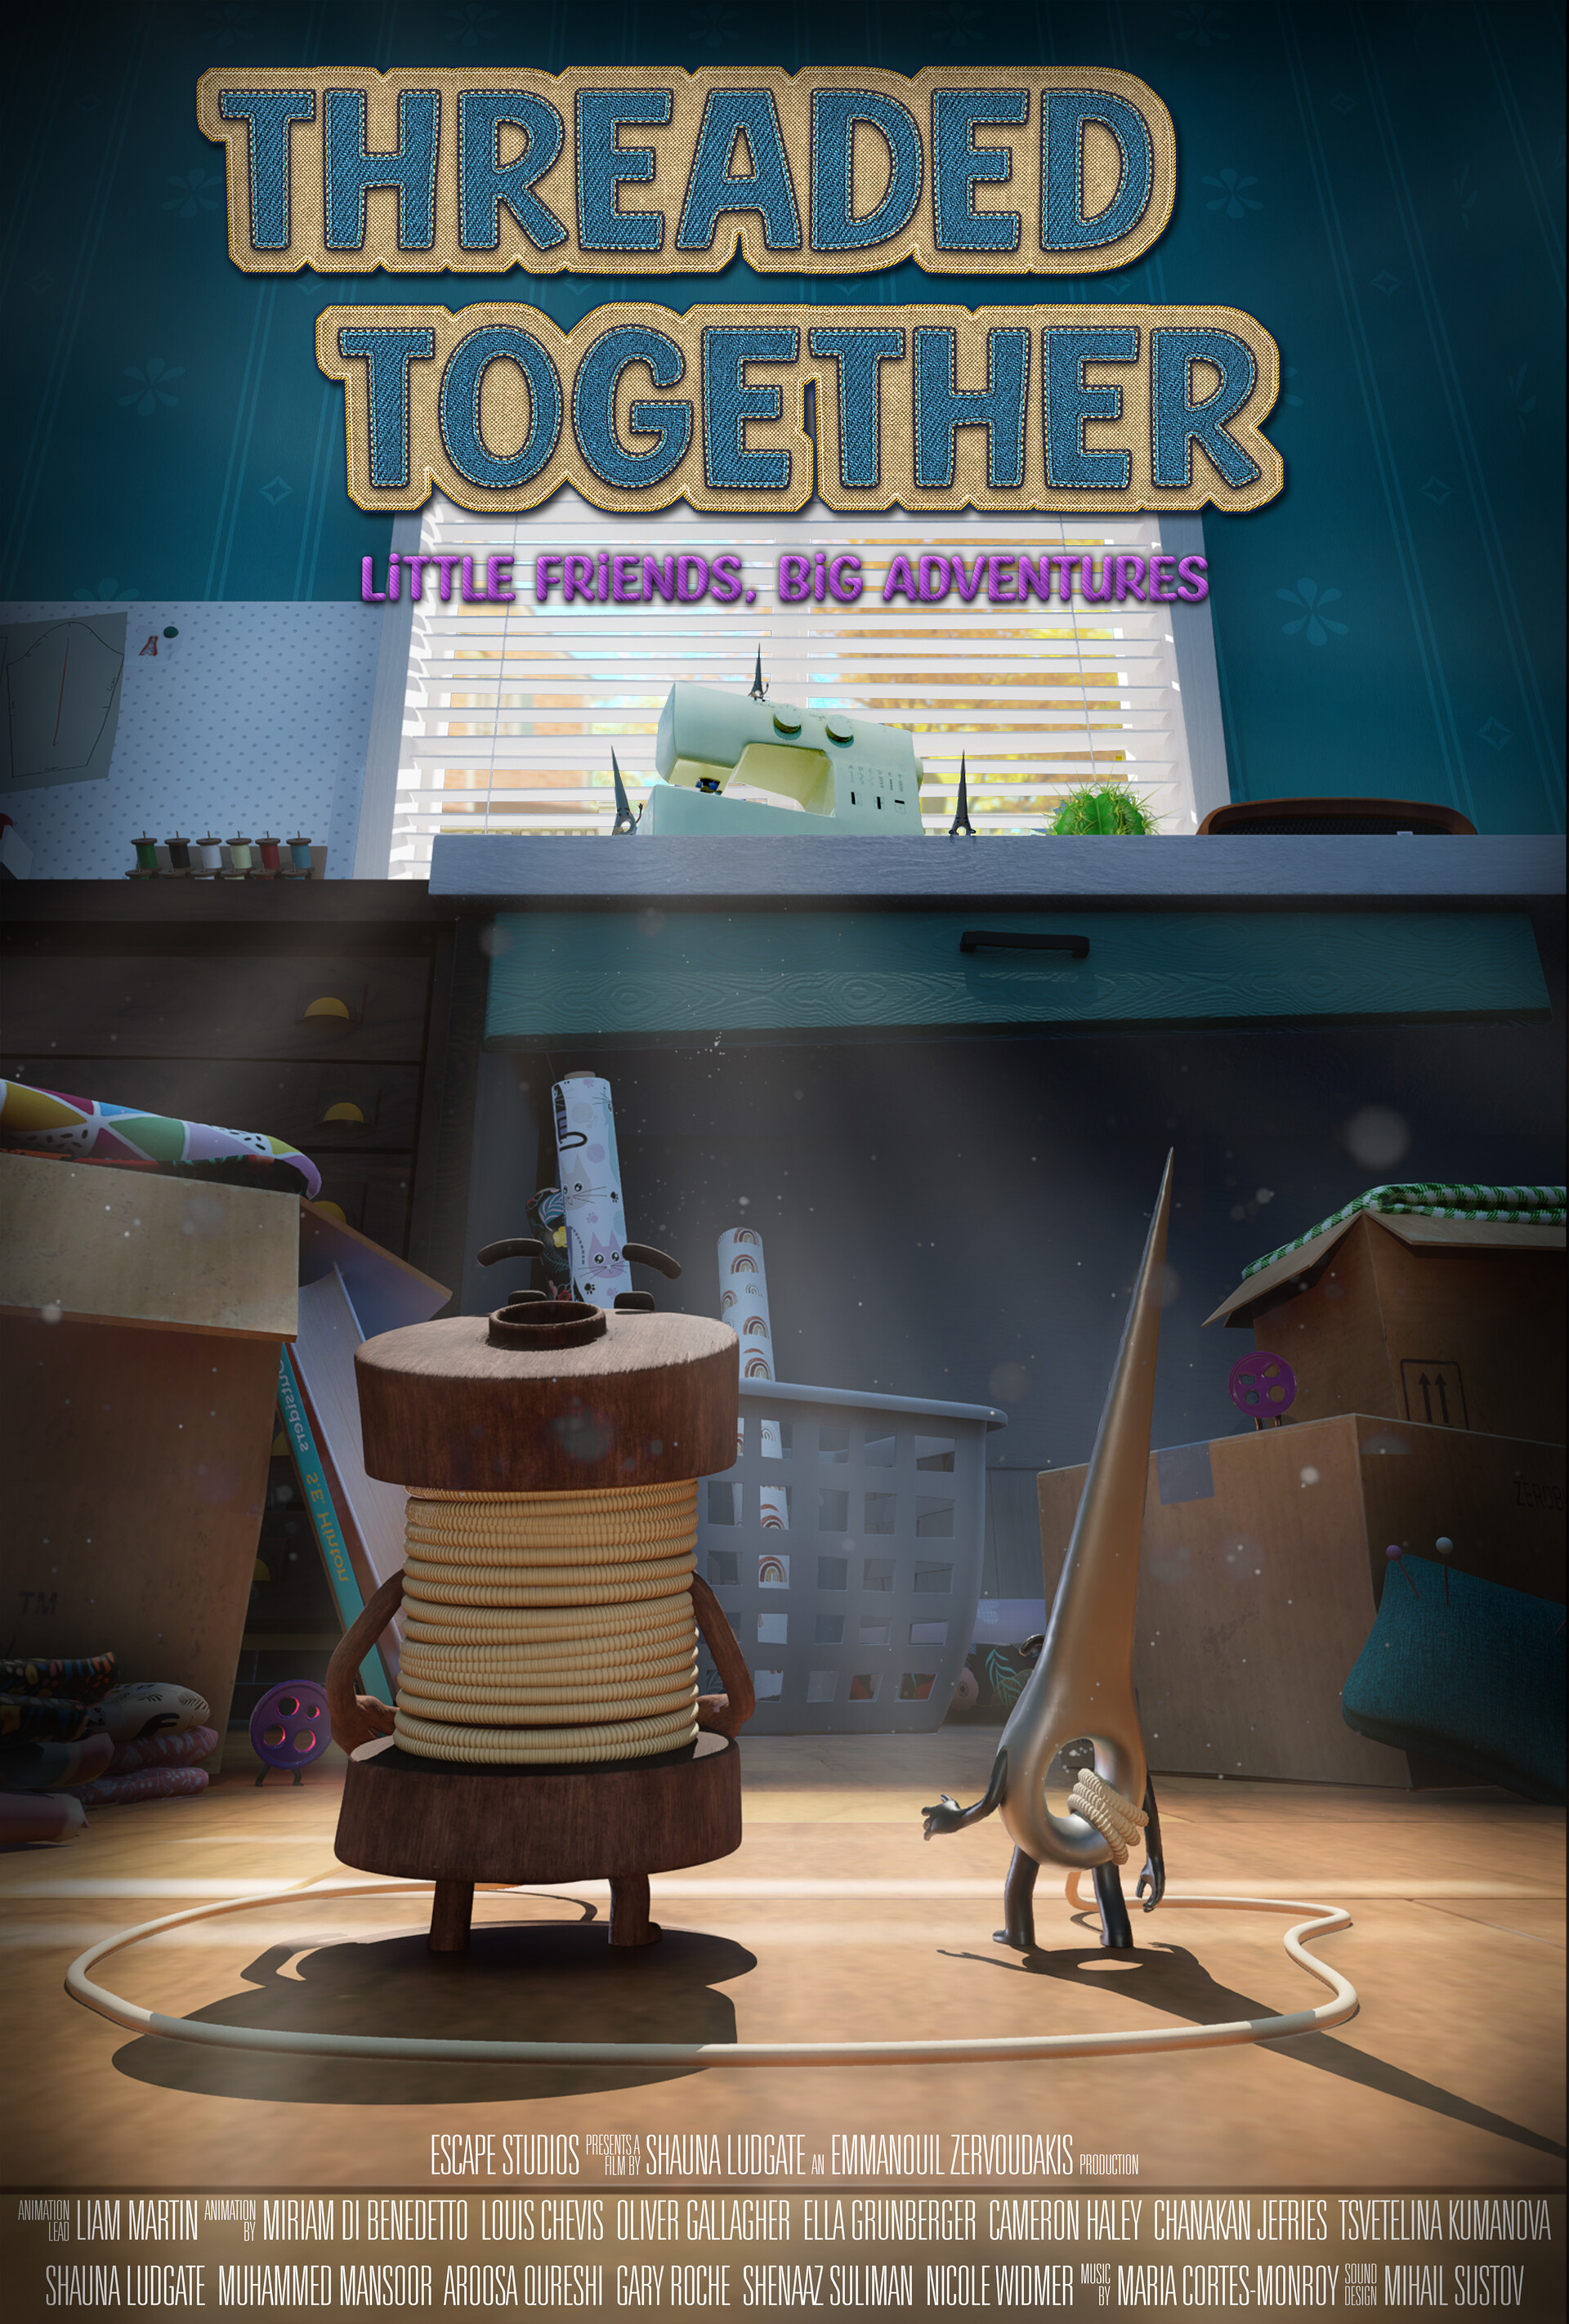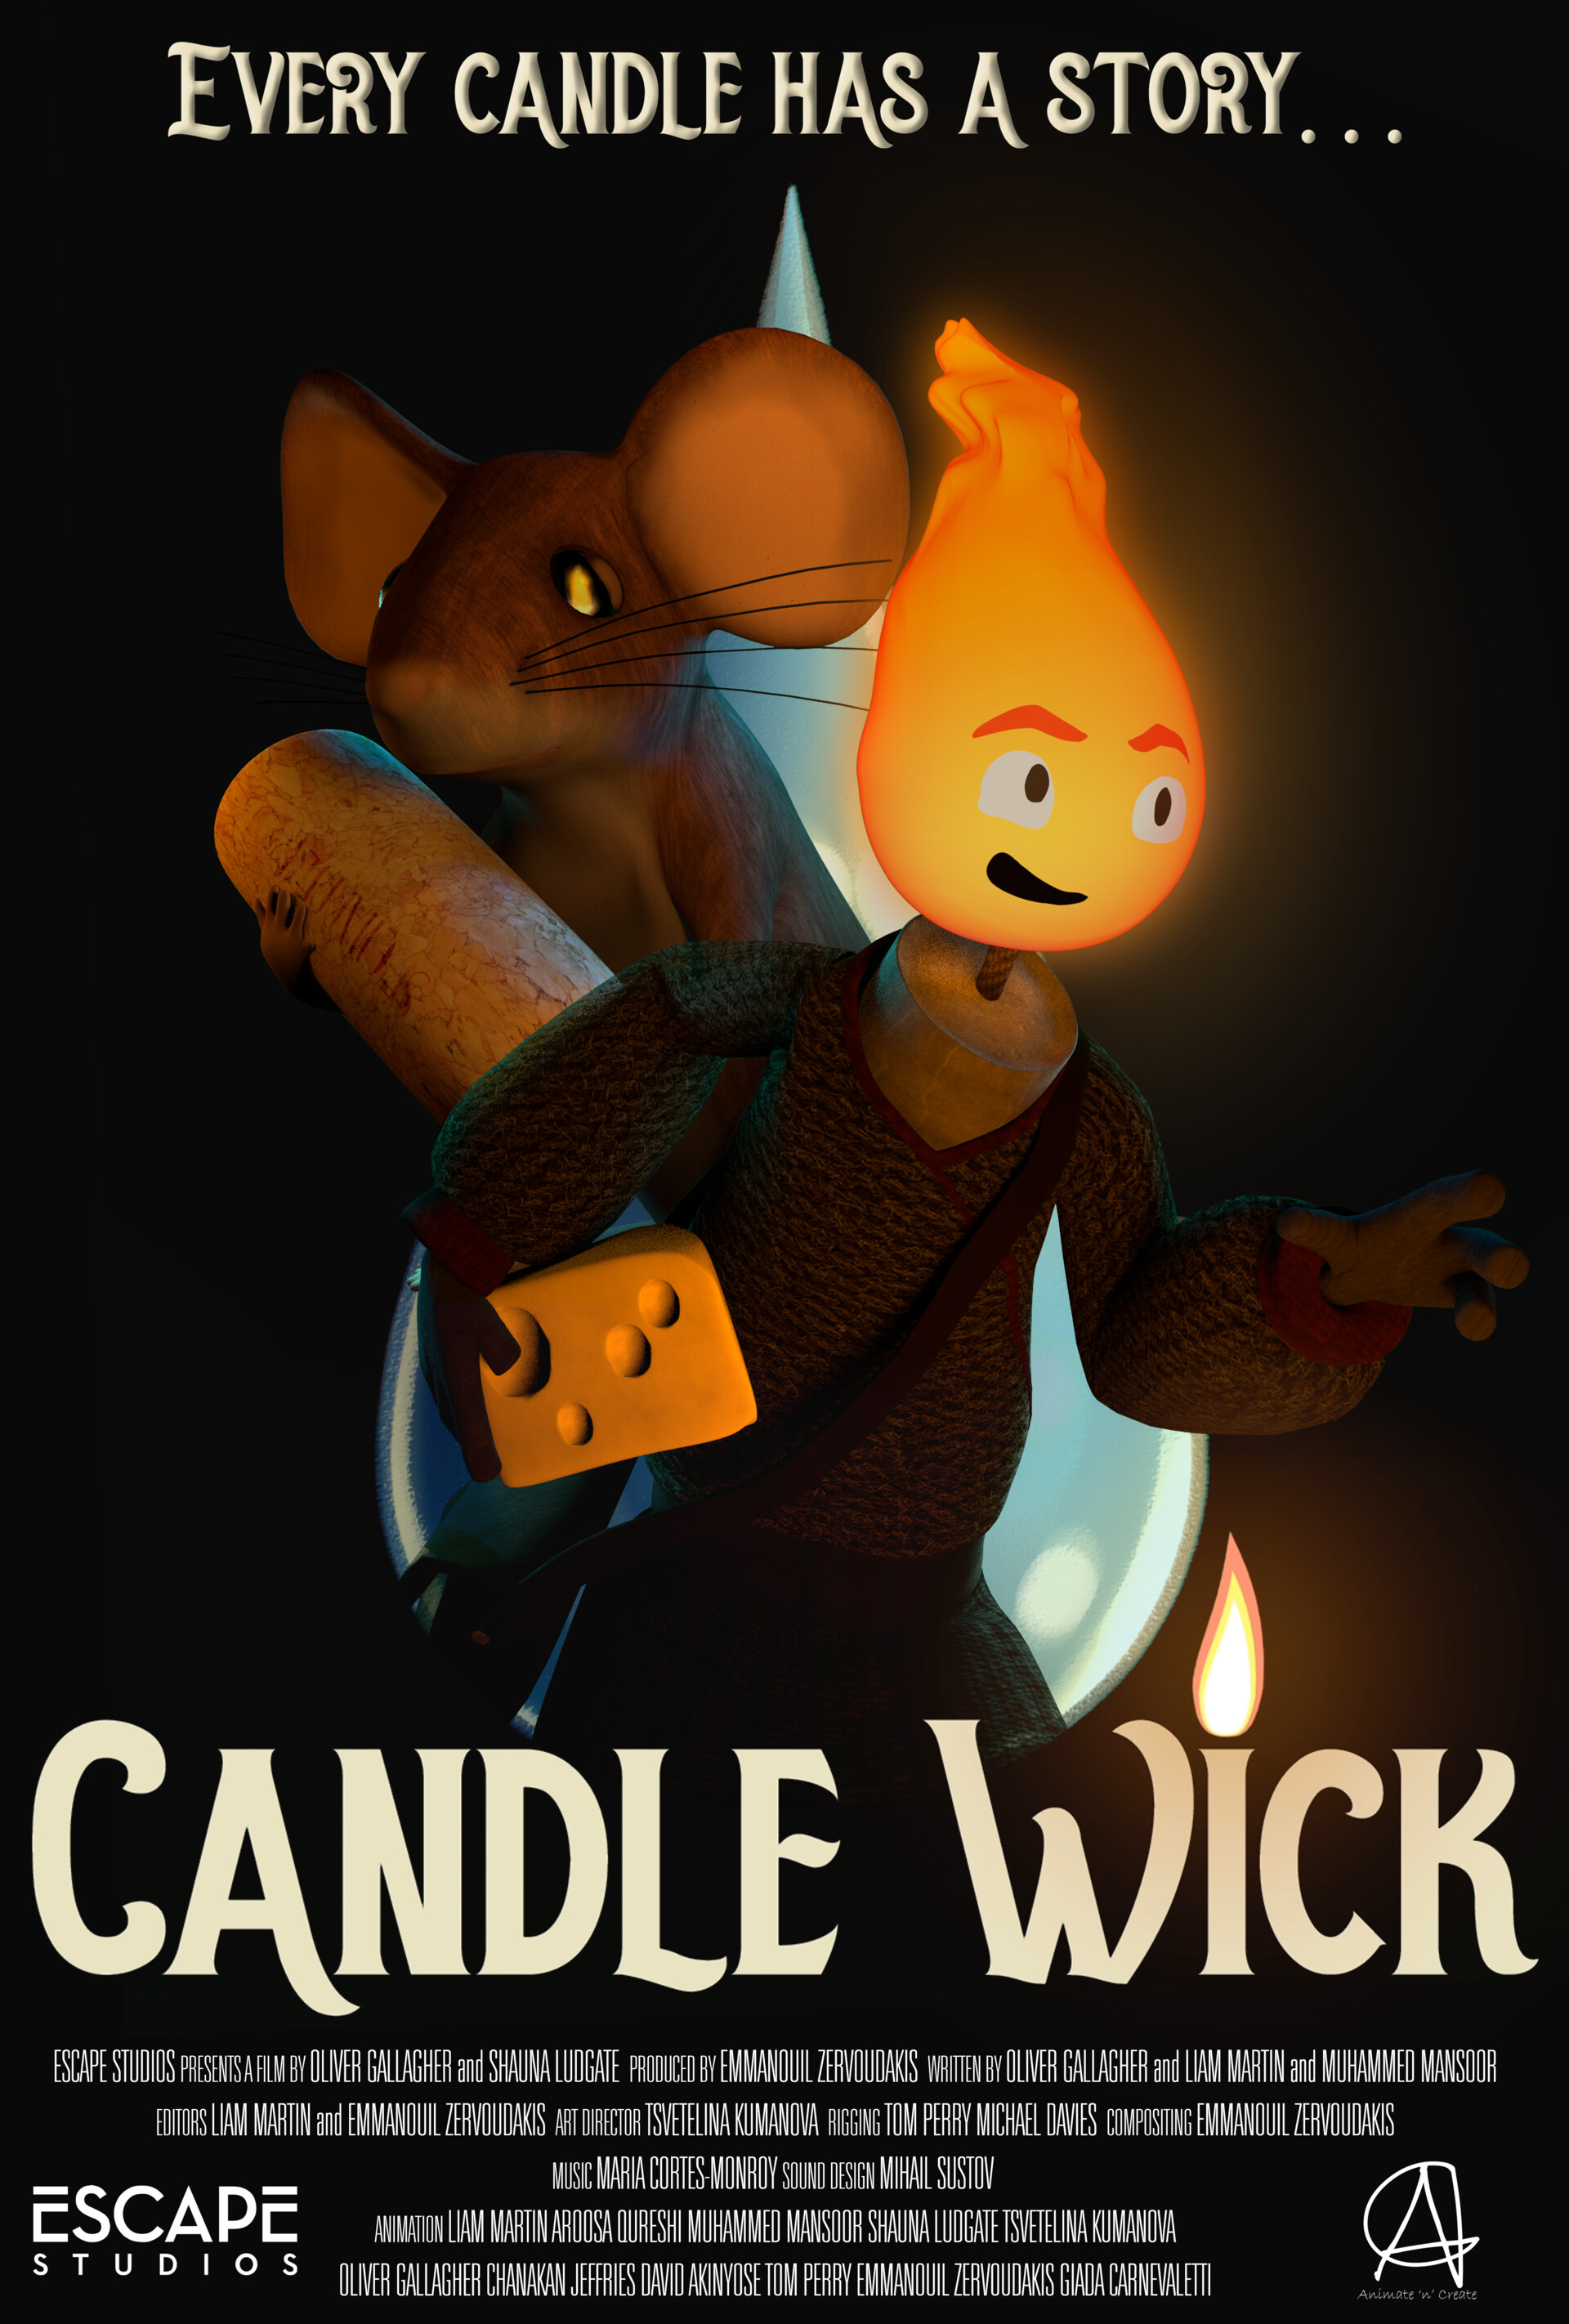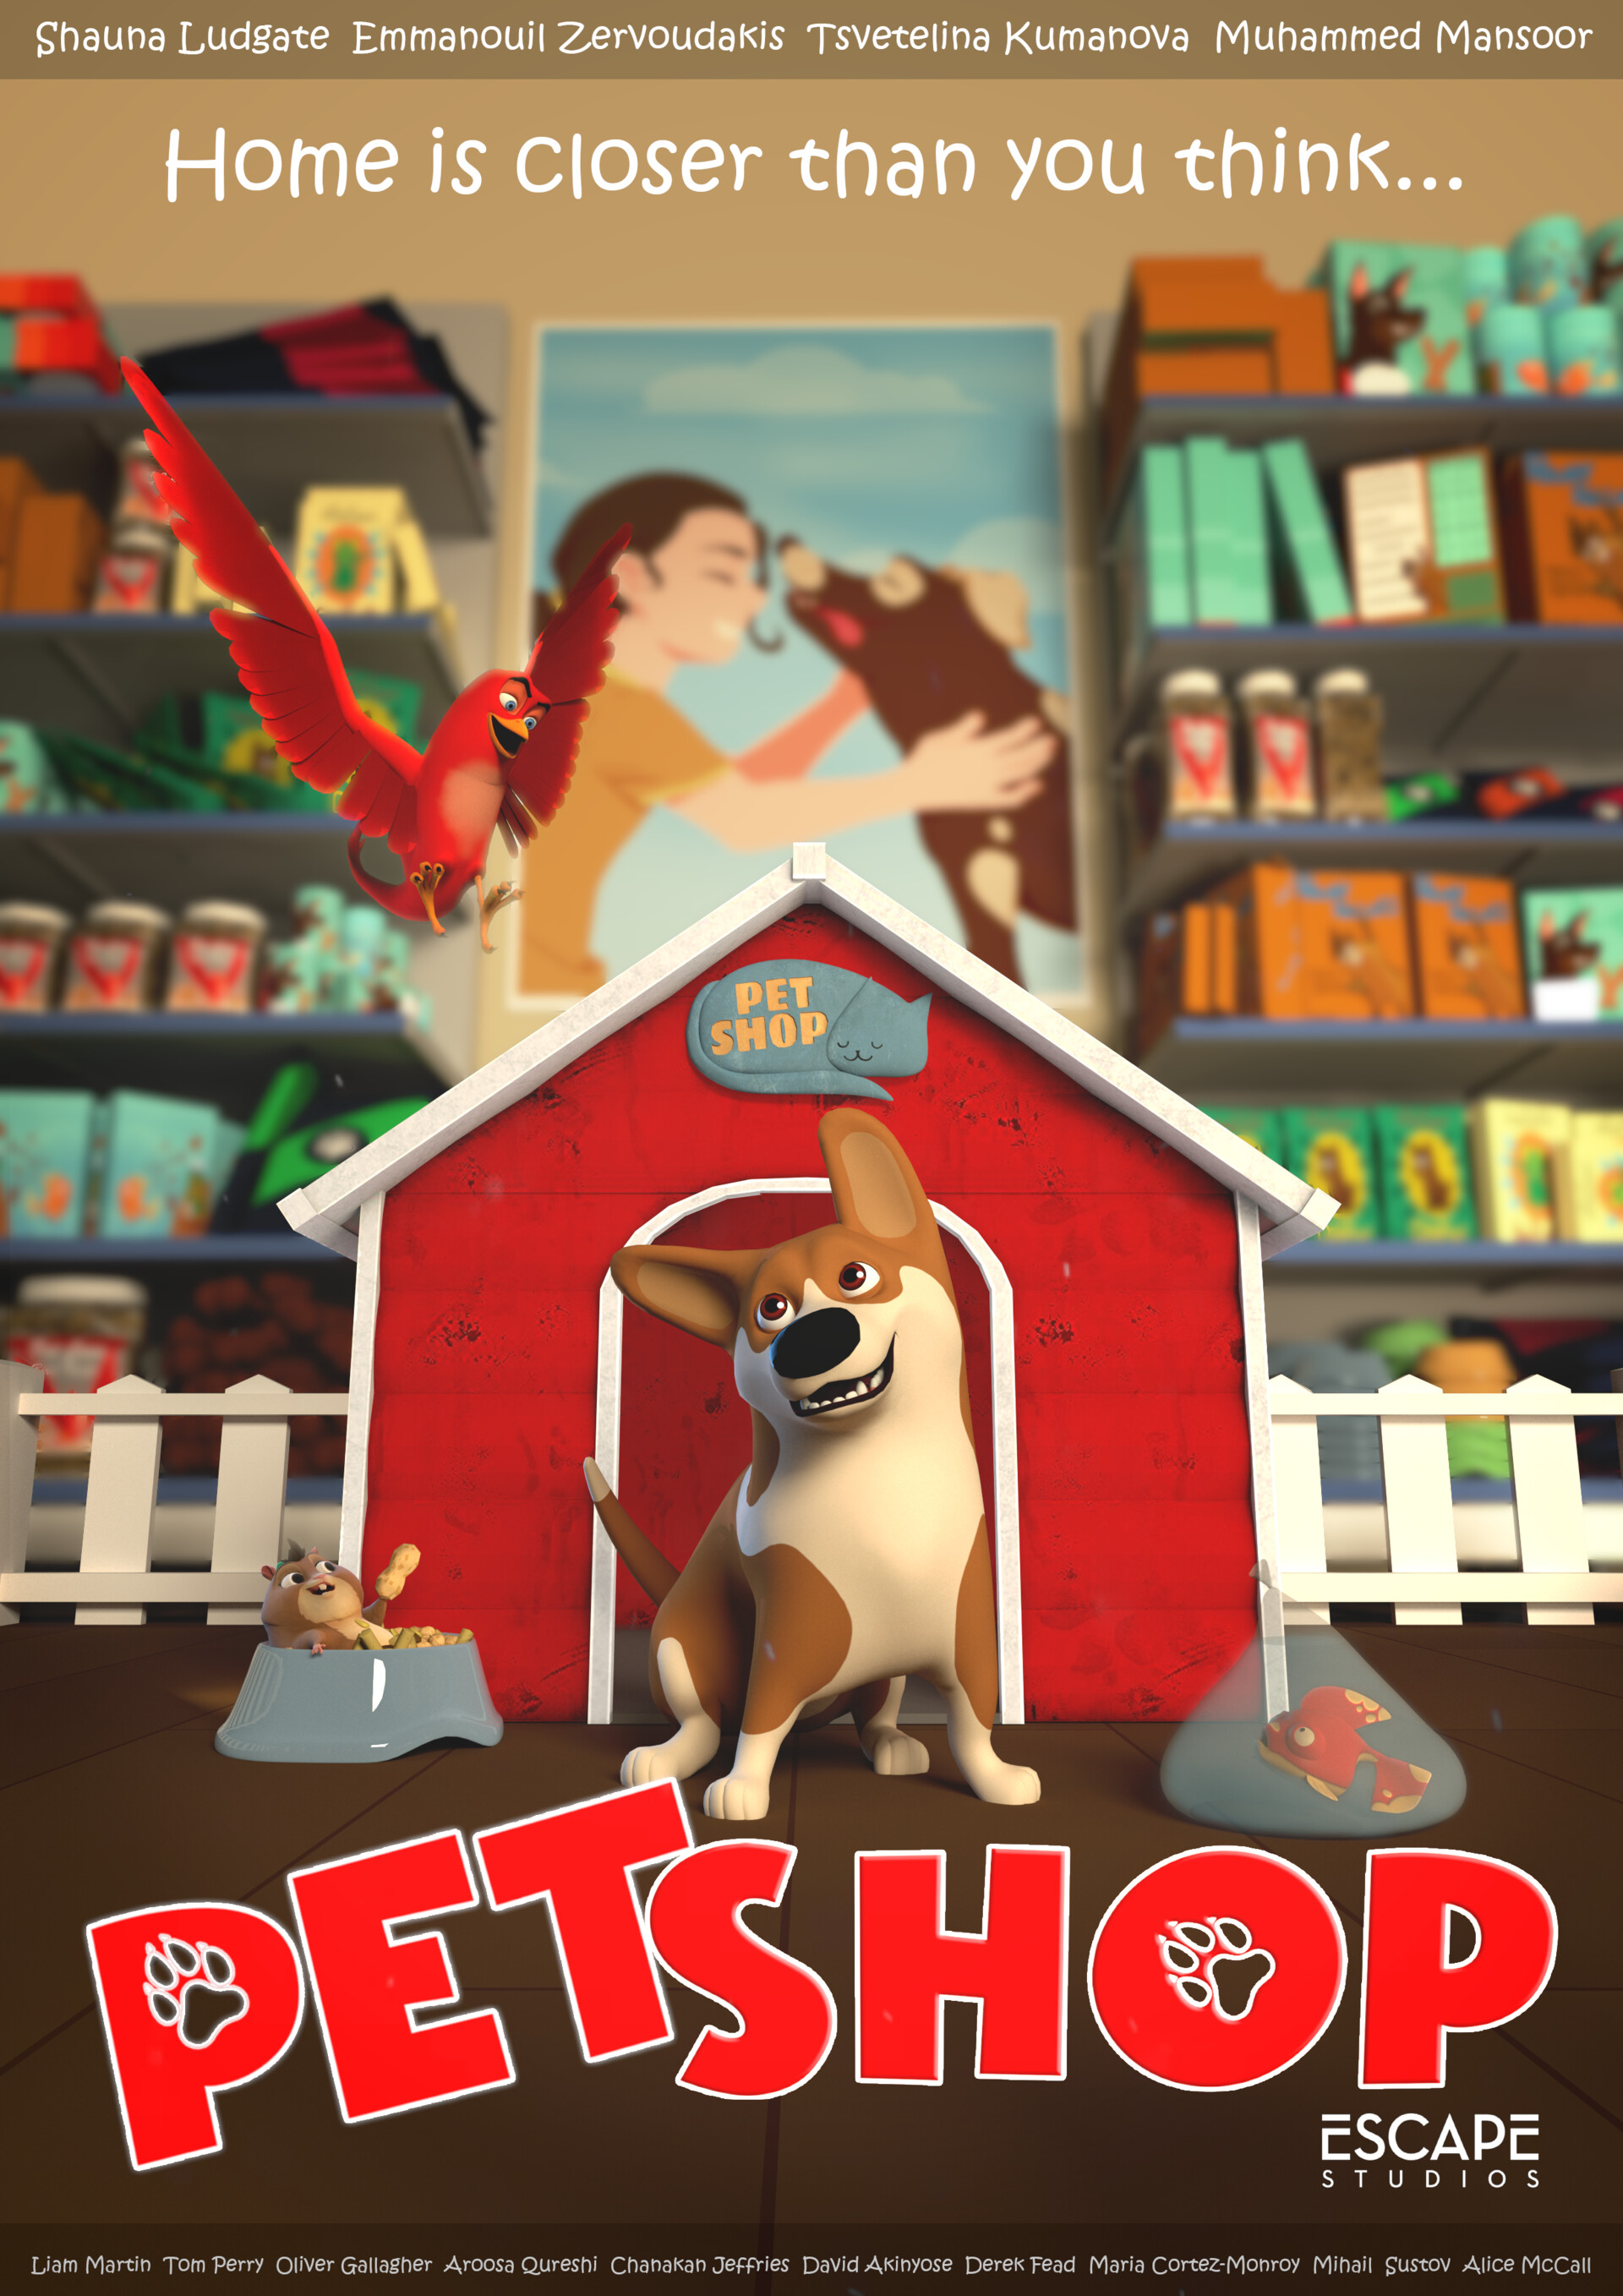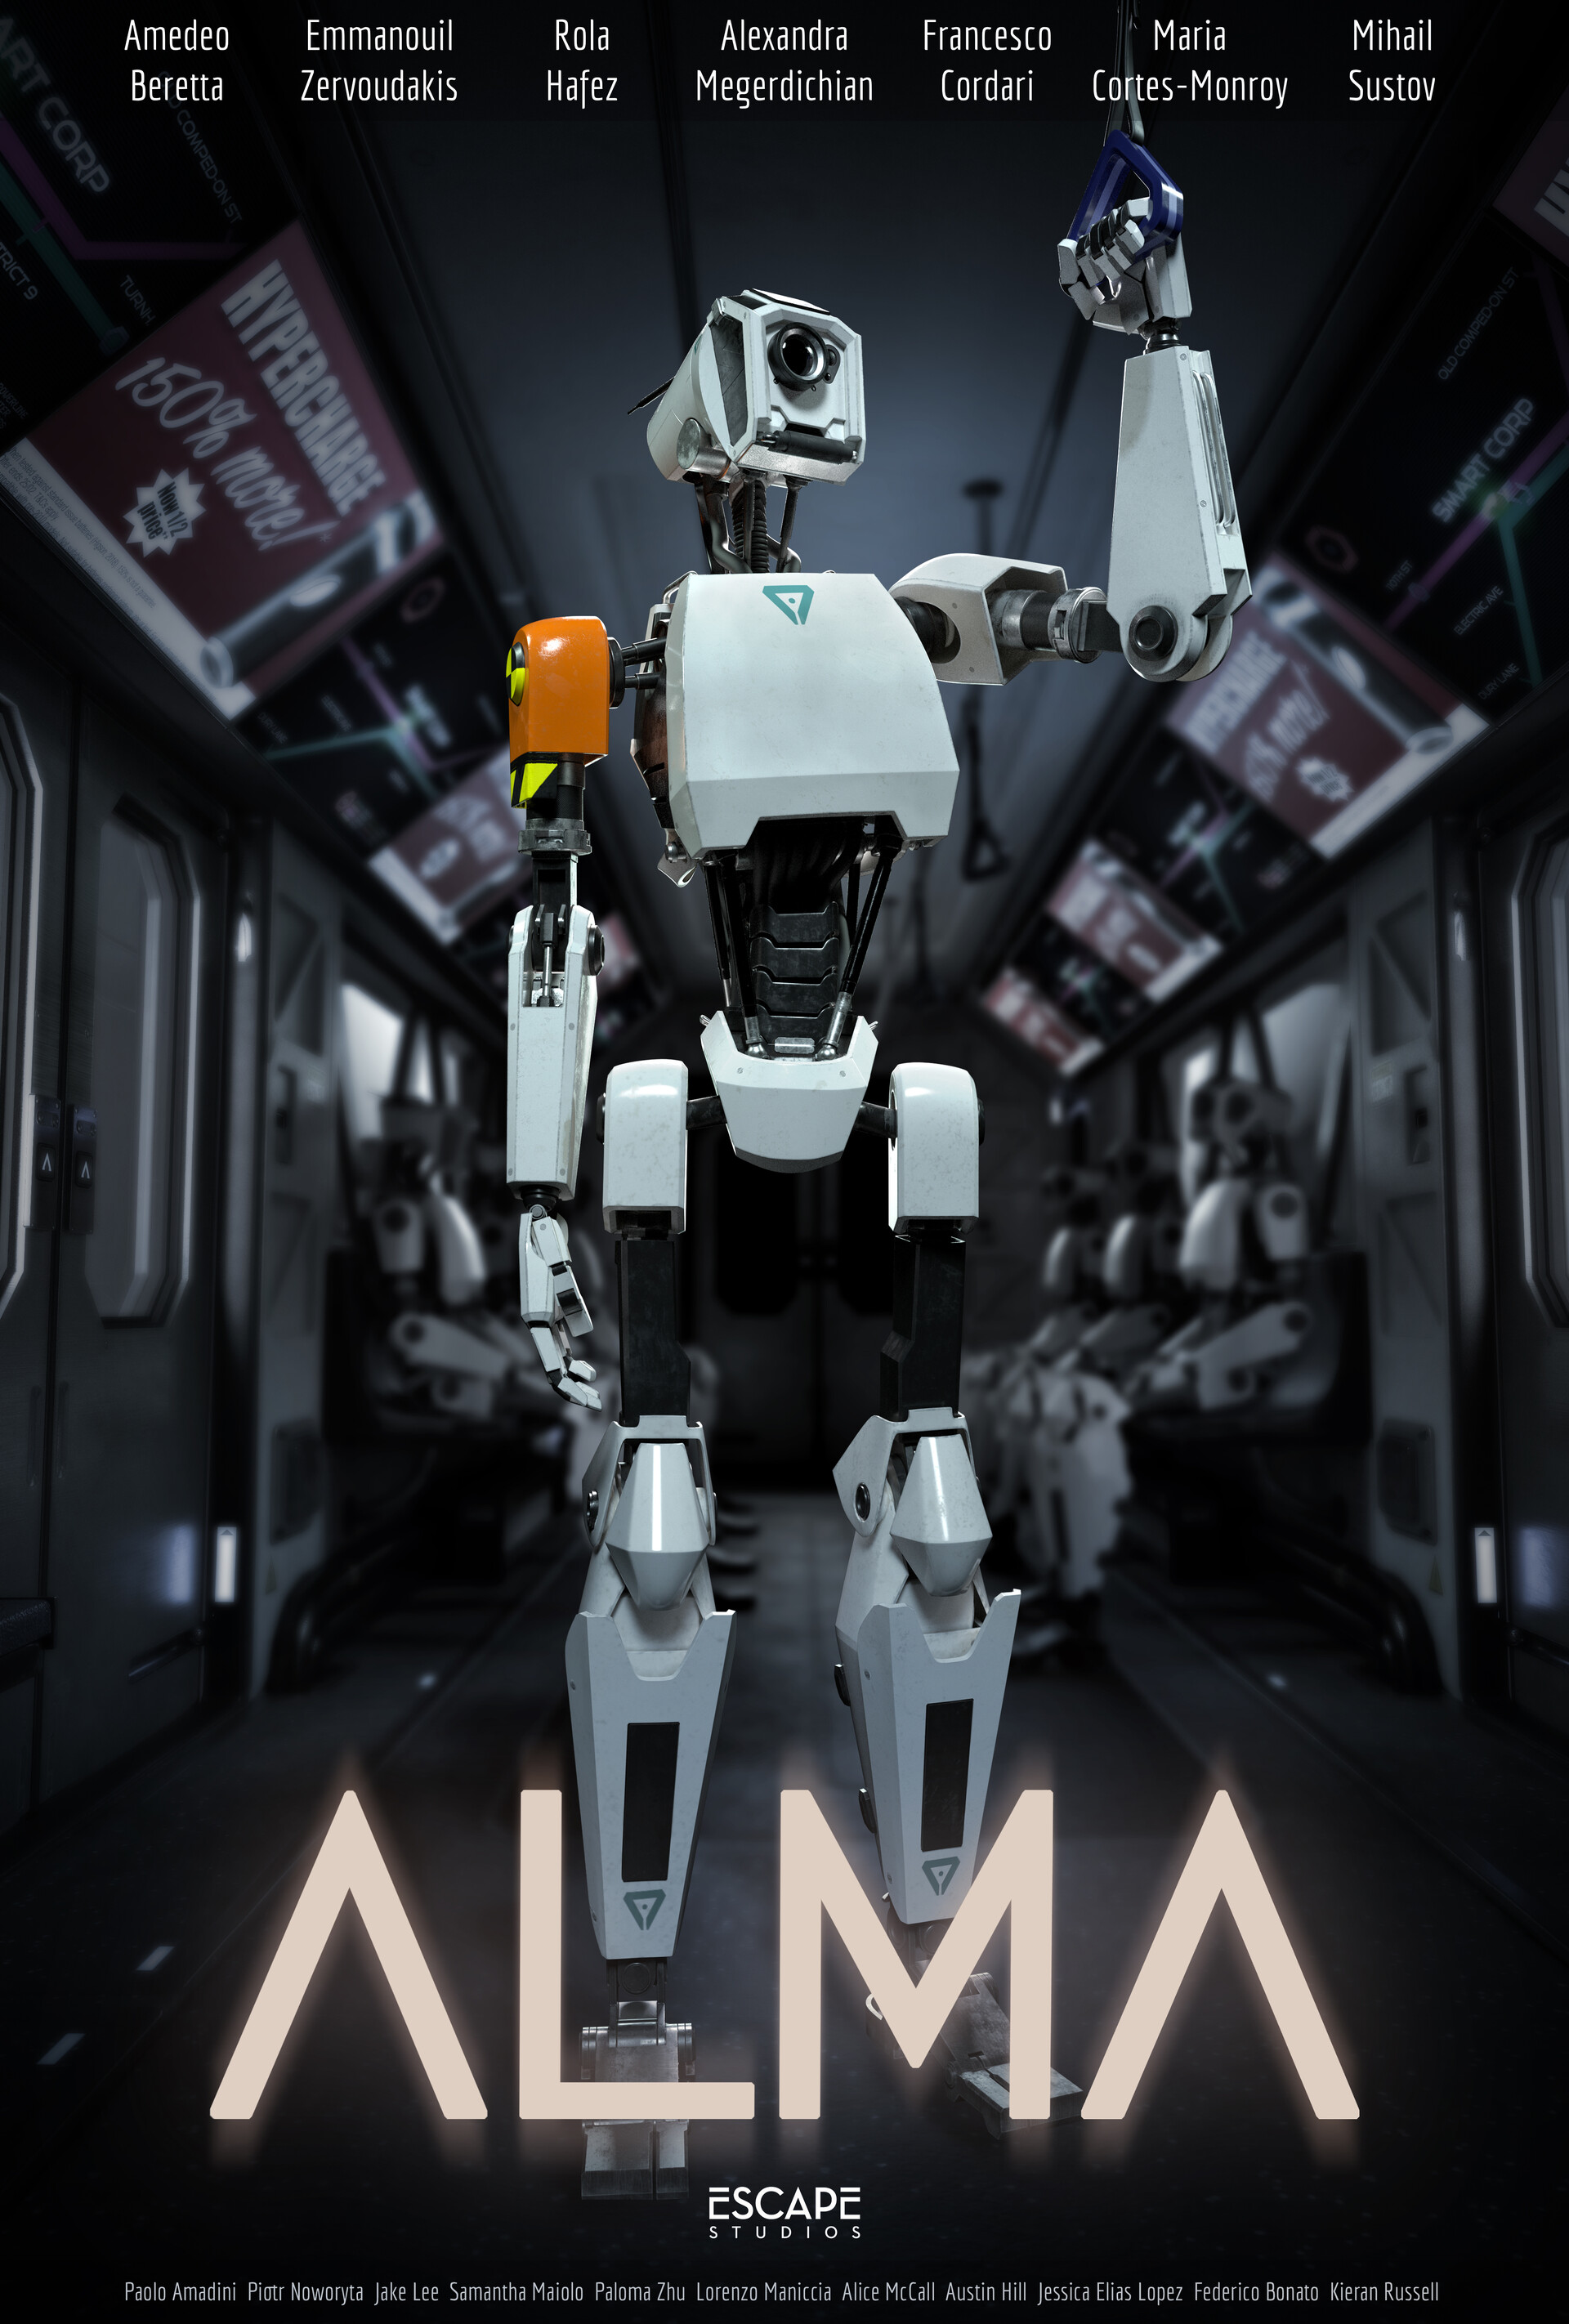
ABOUT:
“Threaded Together” is an award winning, 3D animated short film which is written & directed by Shauna Ludgate and produced by Manos Zervoudakis, within 16 weeks at Escape Studios in London.
SHORT FILM:
The story is about a Needle who got separated from his friends and embarks on a journey of friendship with an uncooperative Spool. Only there is one small issue, they’re attached! Their adventure leads them to dark and daunting places as they learn to work together, and find the very thing that tethers them, might be the answer to their problems!
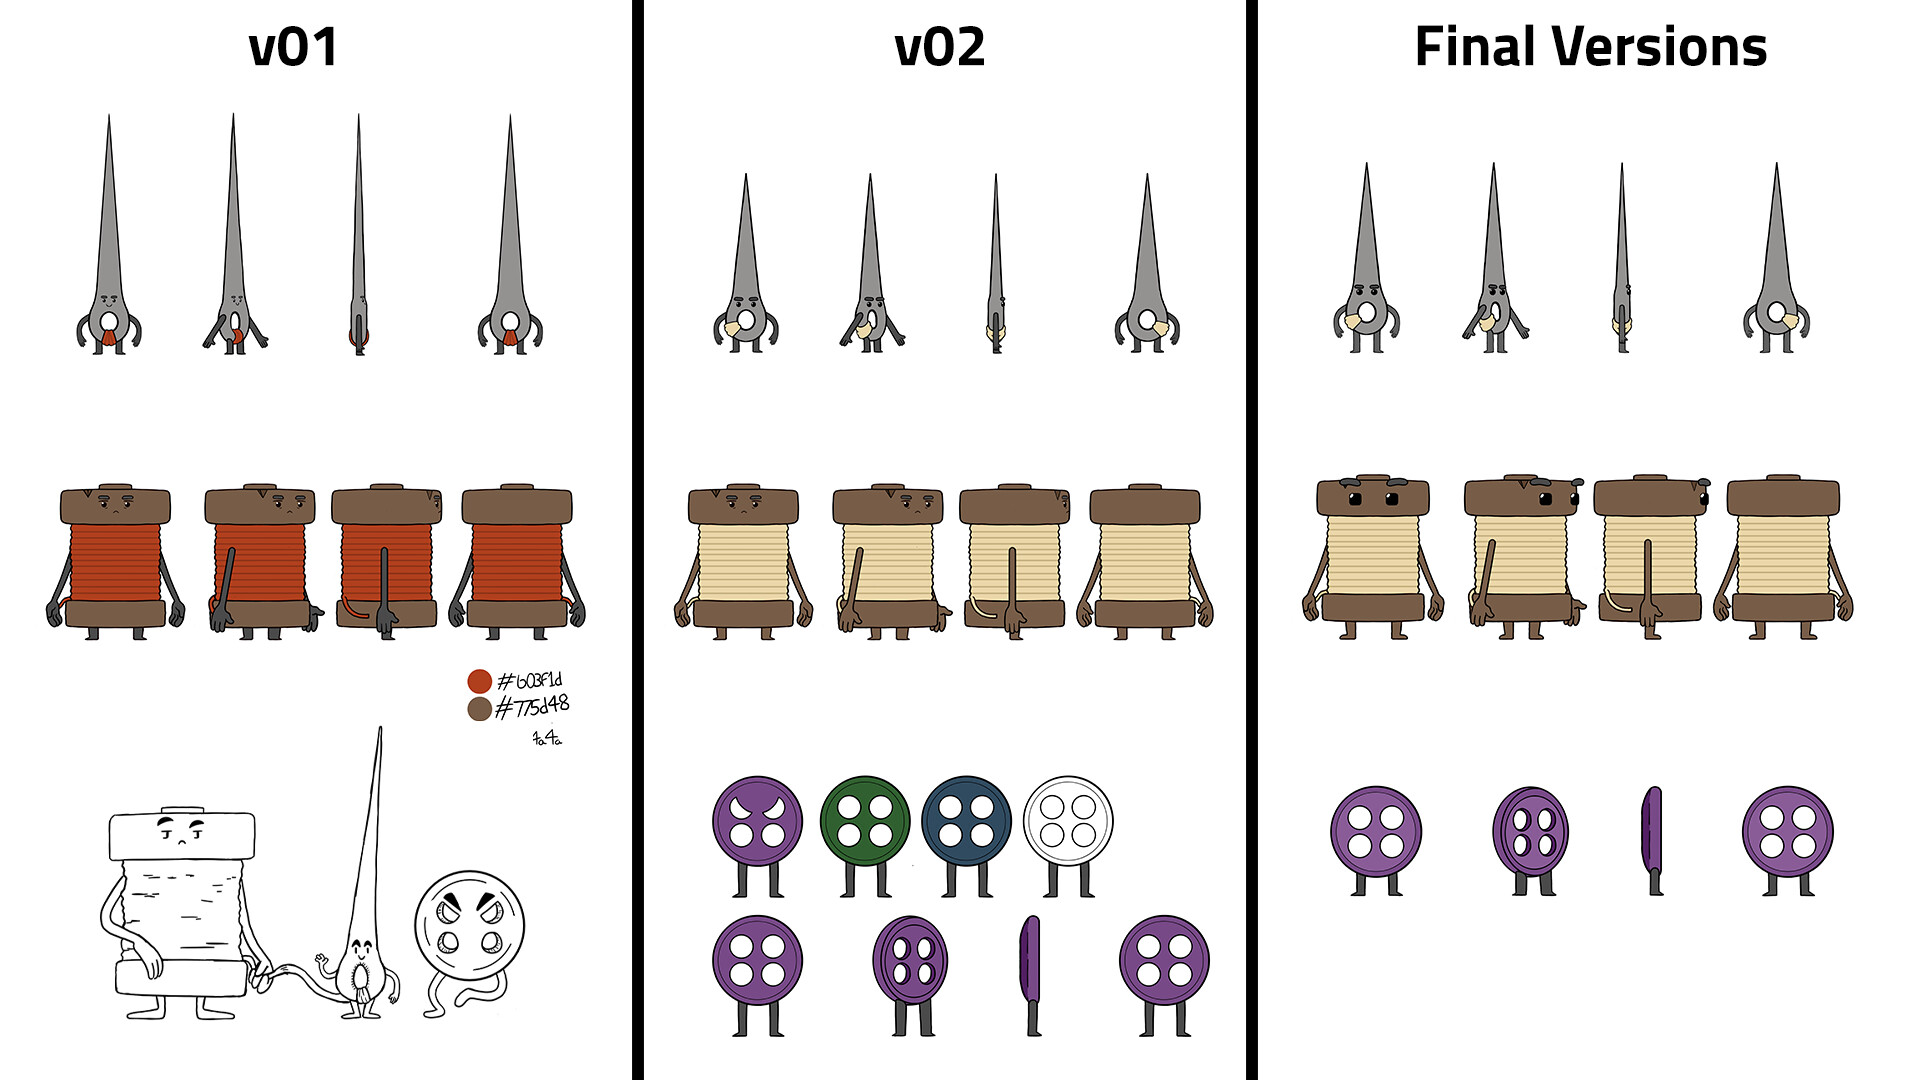
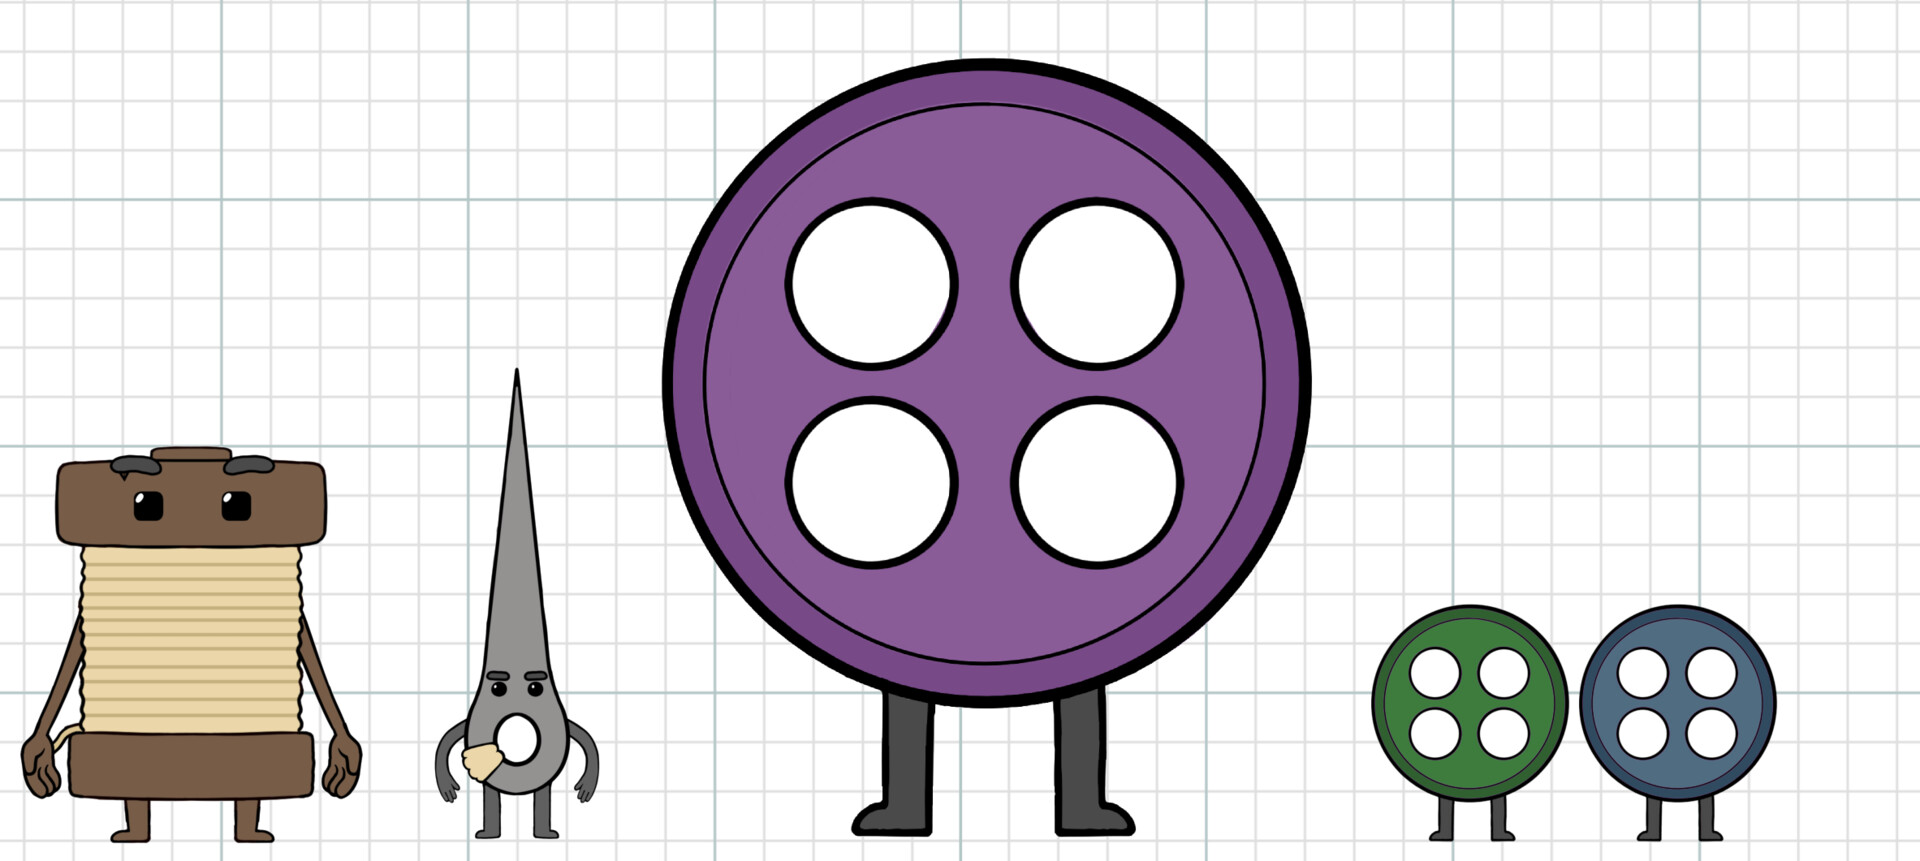
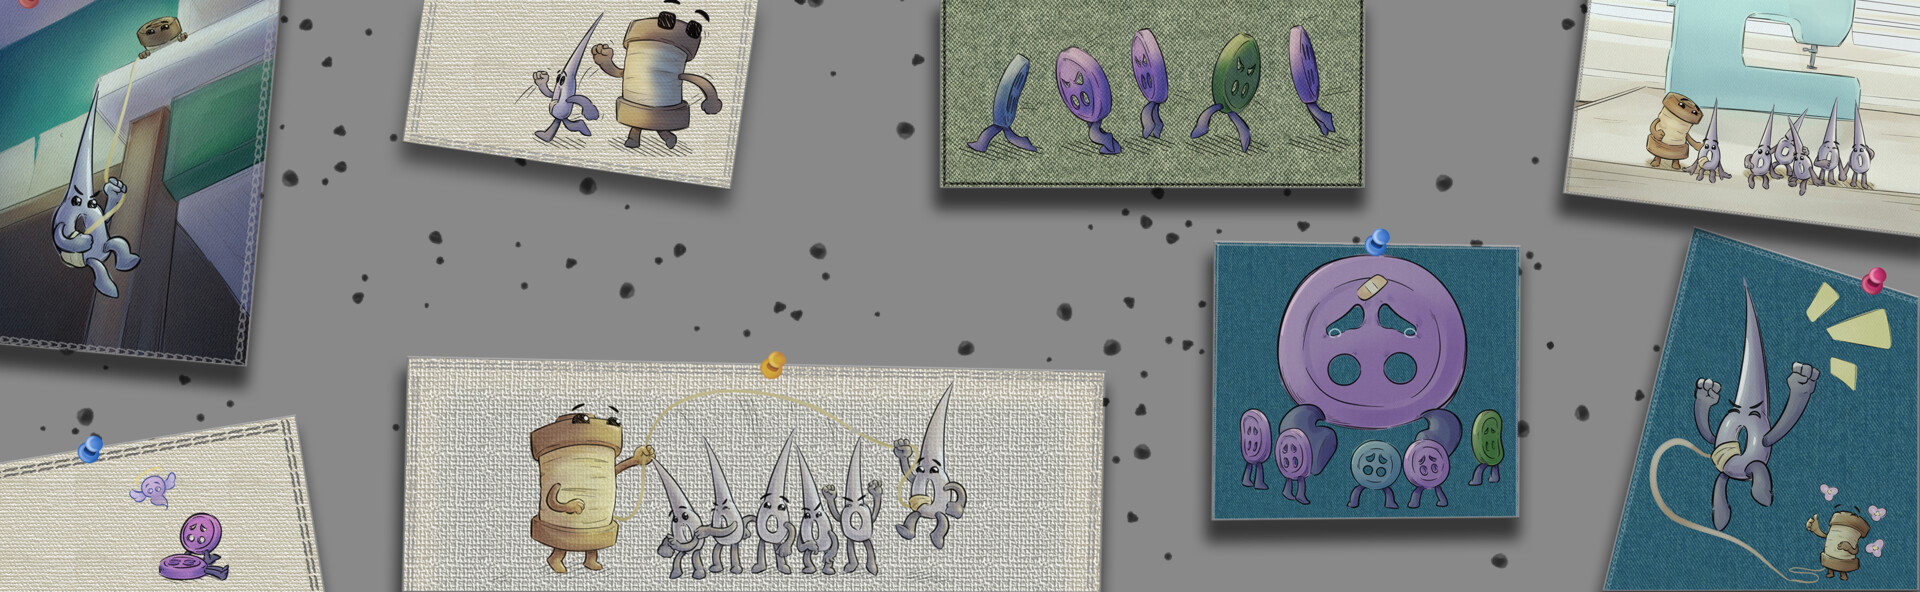
CHARACTER DESIGNS:
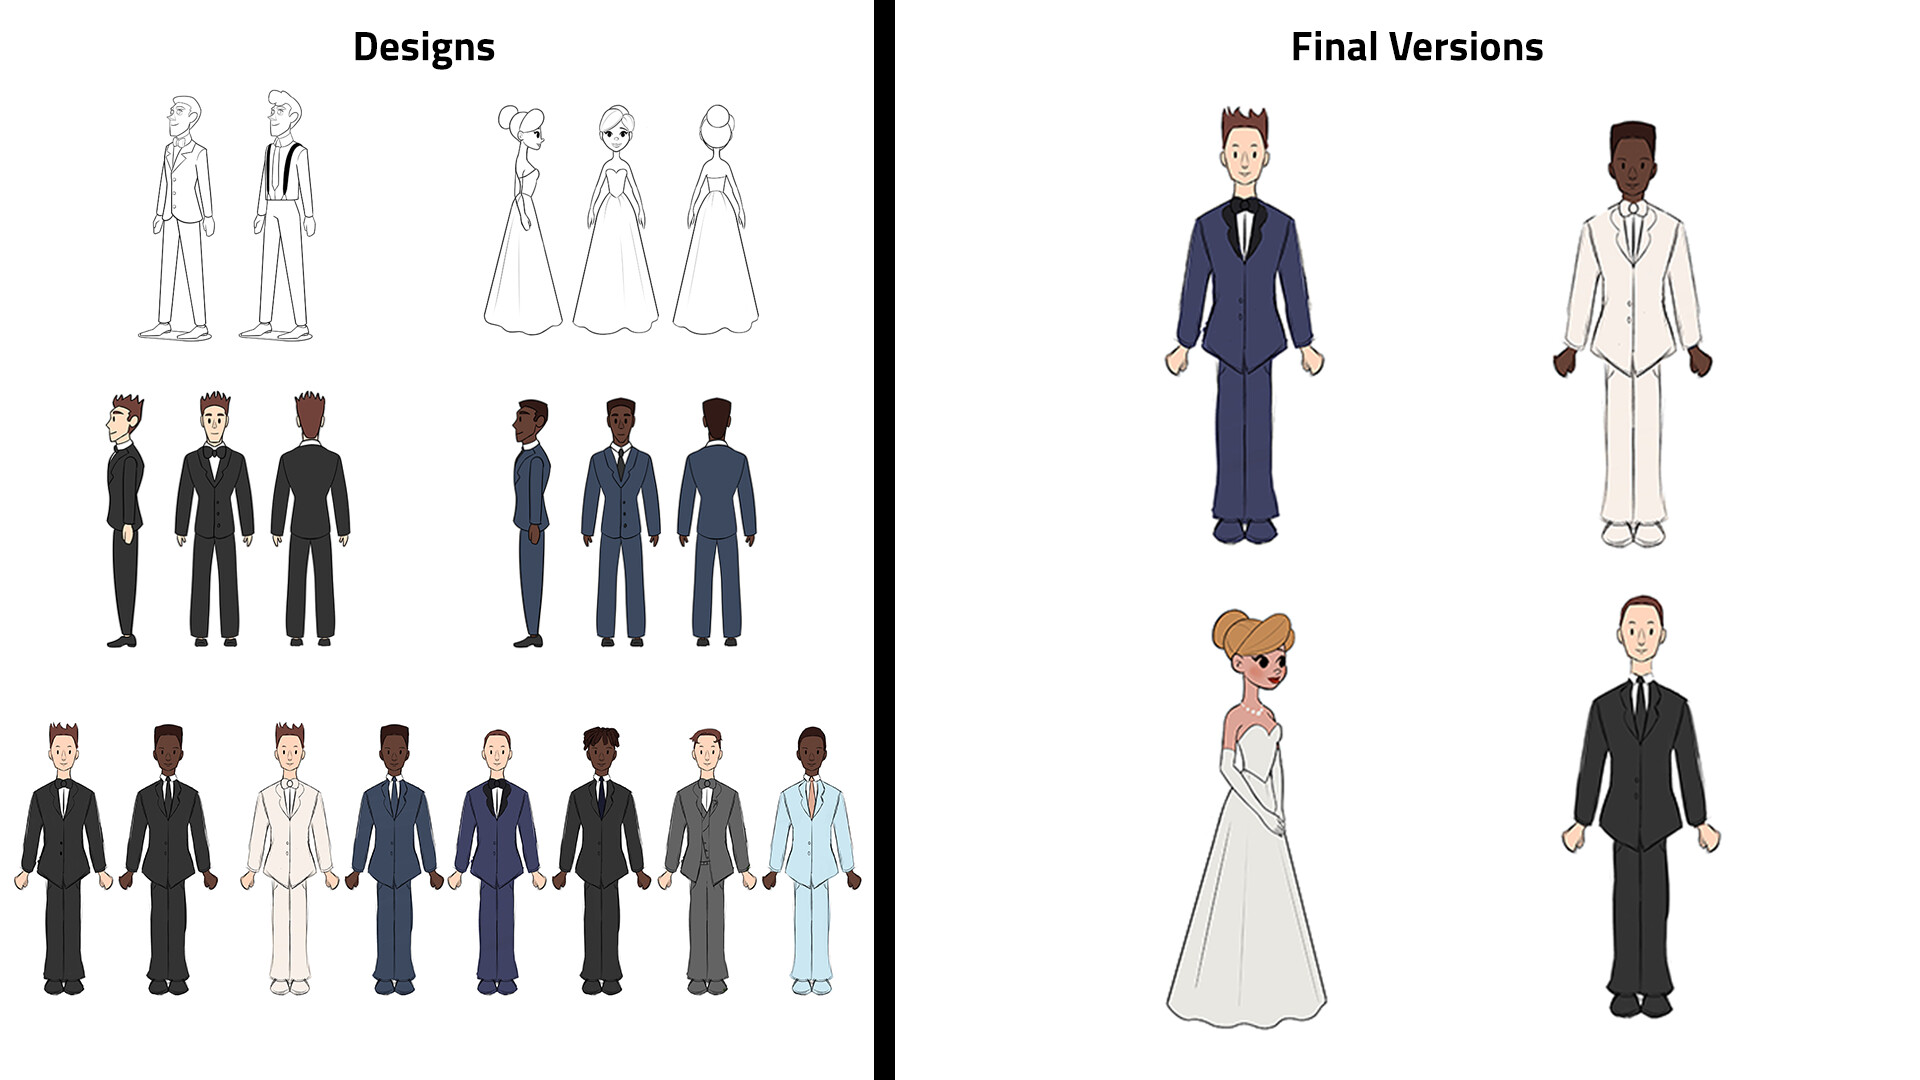
The vibrant personalities of Needle, Spool, and Buttons were brought to life through the process of creating their character designs, starting from initial sketches. After iterating through several versions, we finally settled on a combination of colours and facial features. Our primary goal was to ensure they look adorable, with large expressive eyes to convey their emotions effectively. In our creative decision-making, we intentionally chose not to include mouths, allowing us to emphasize the eyes and eyebrows during animation. This choice was also influenced by the fact that our short film would not have any dialogue.
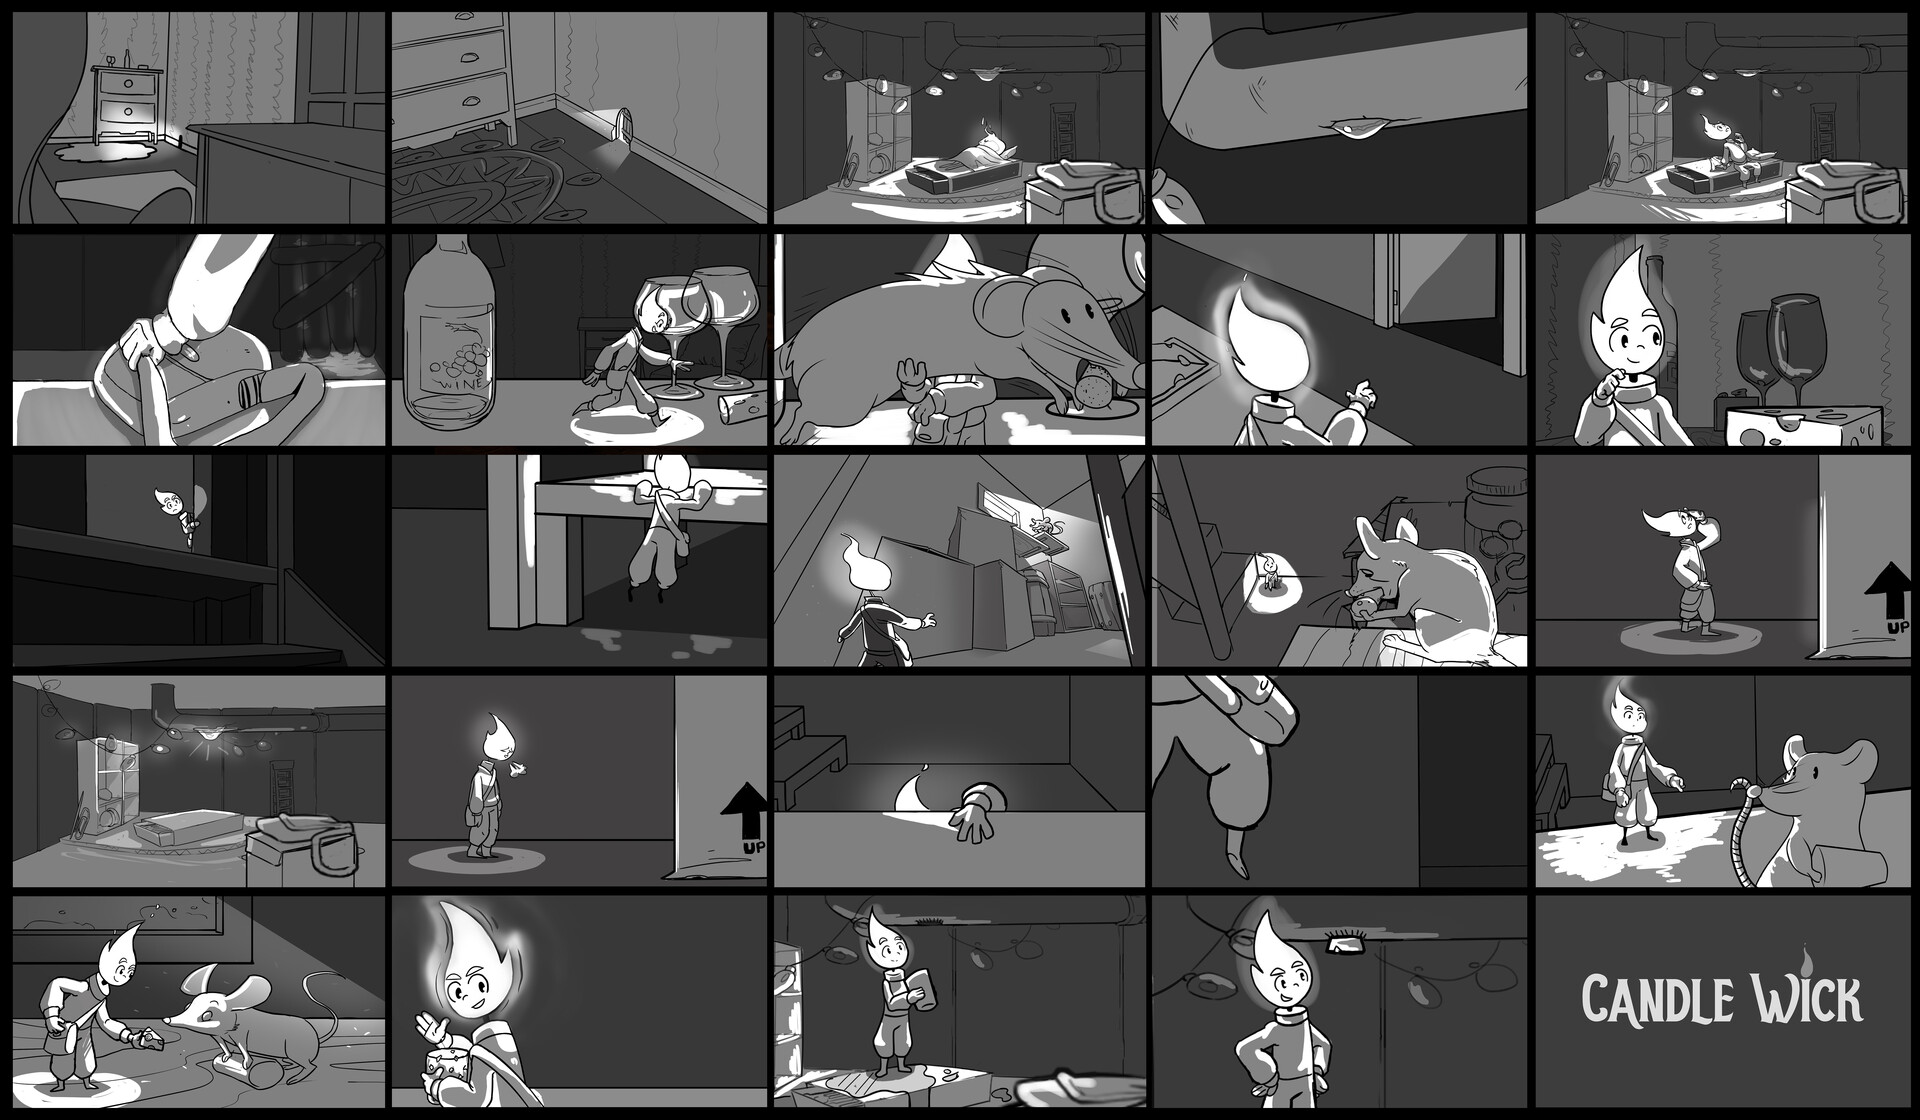
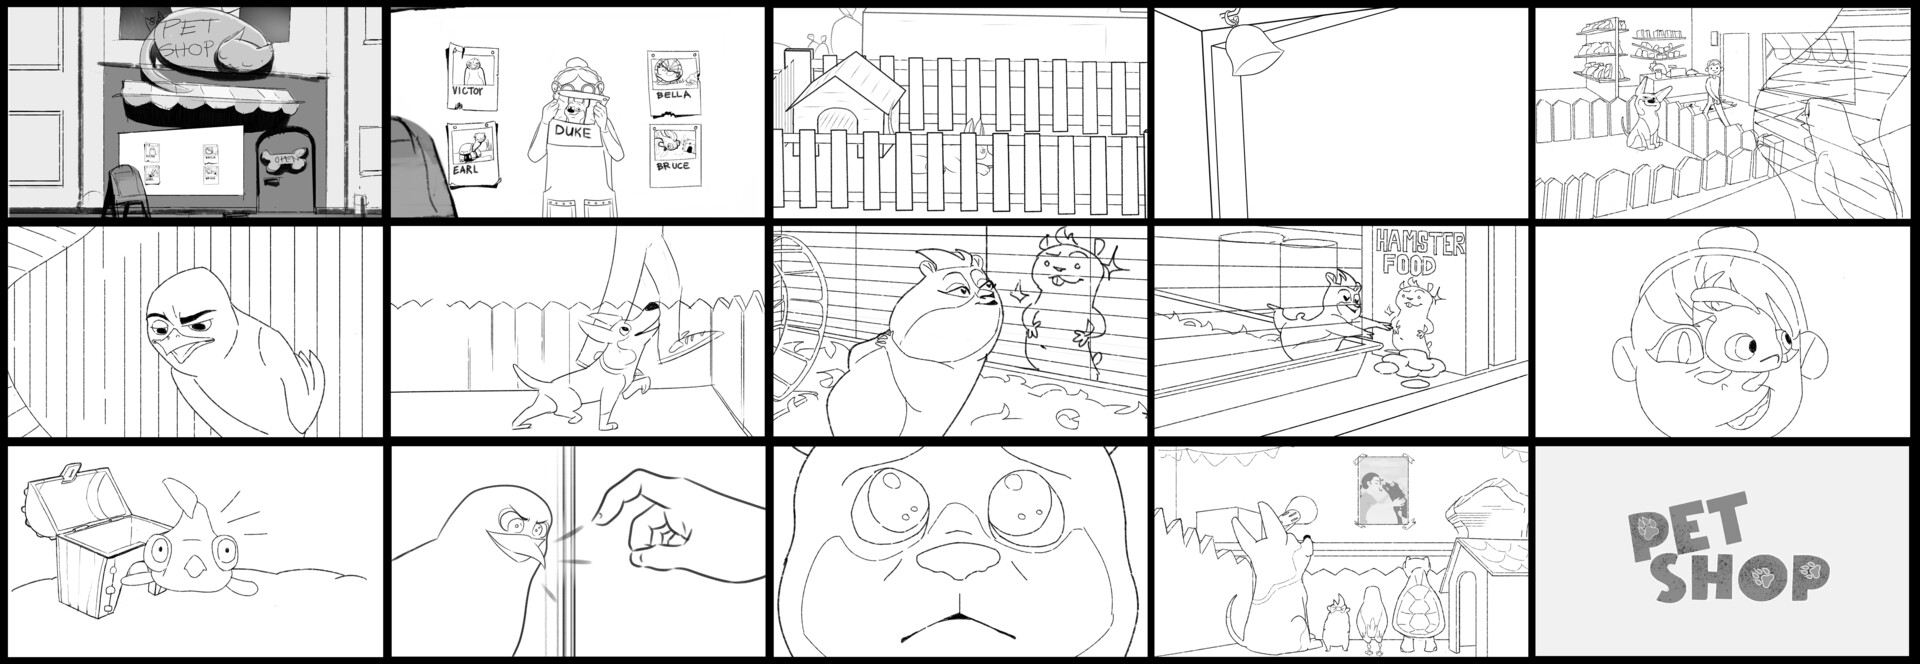
STORYBOARDING:
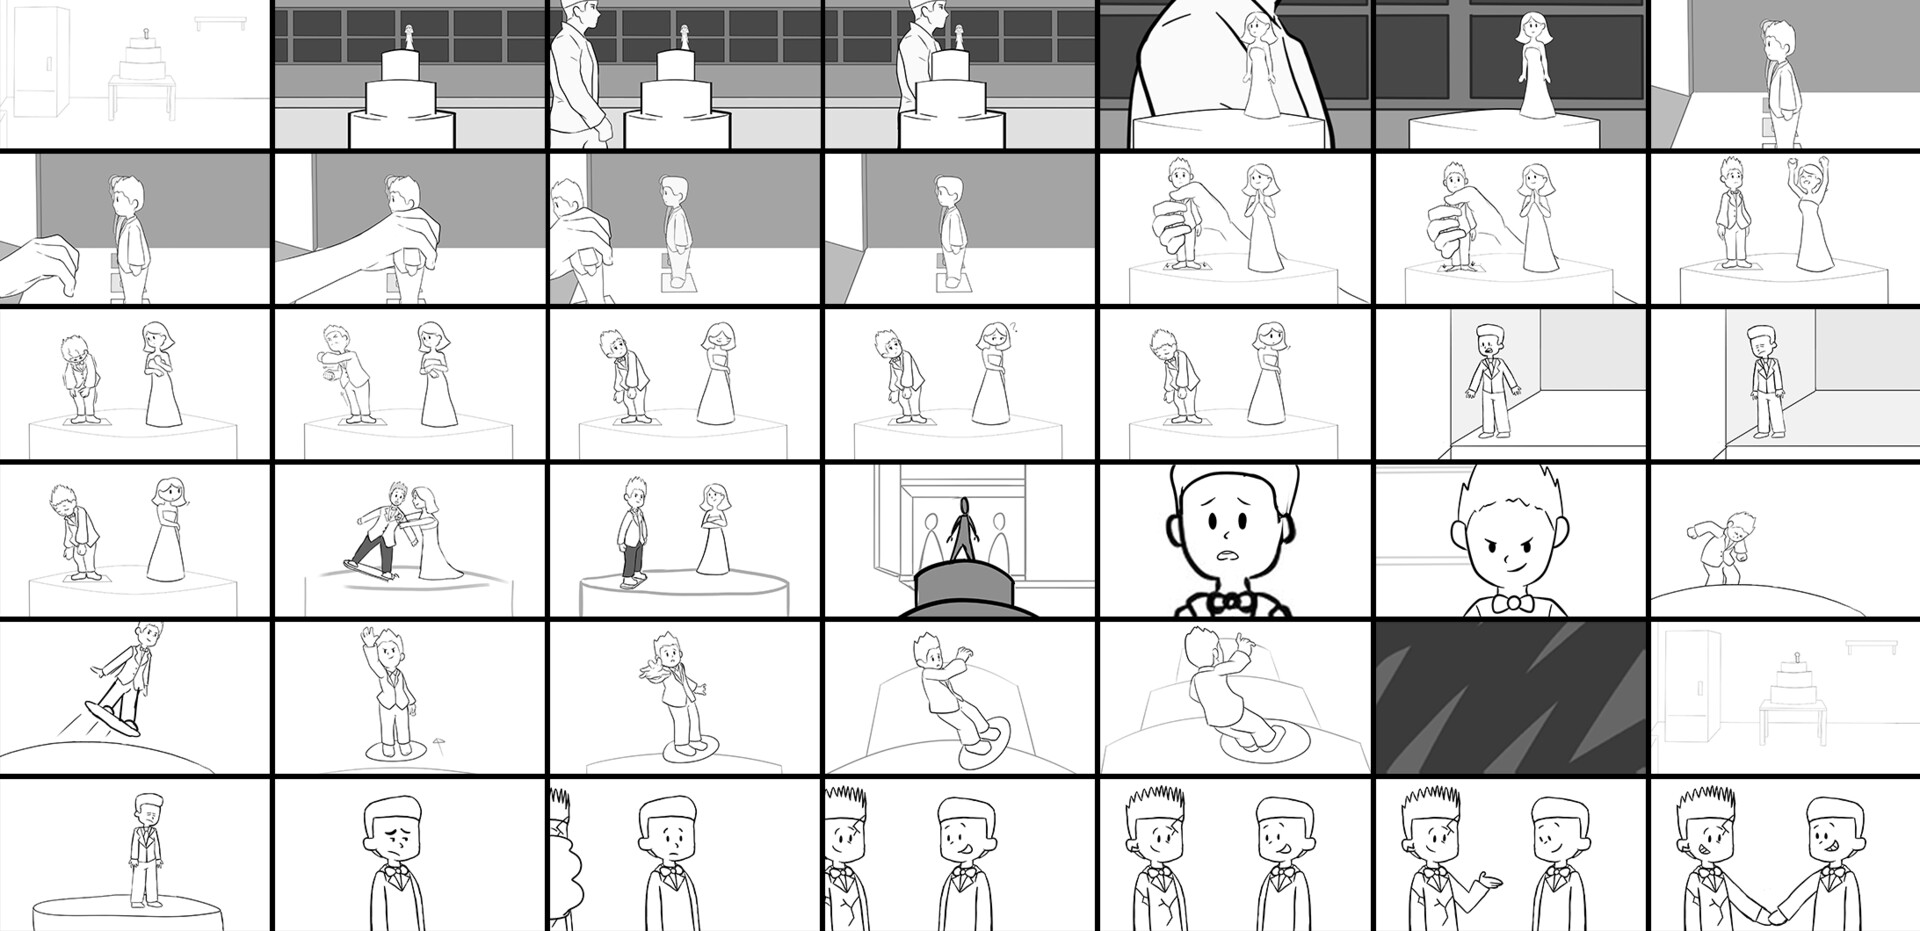
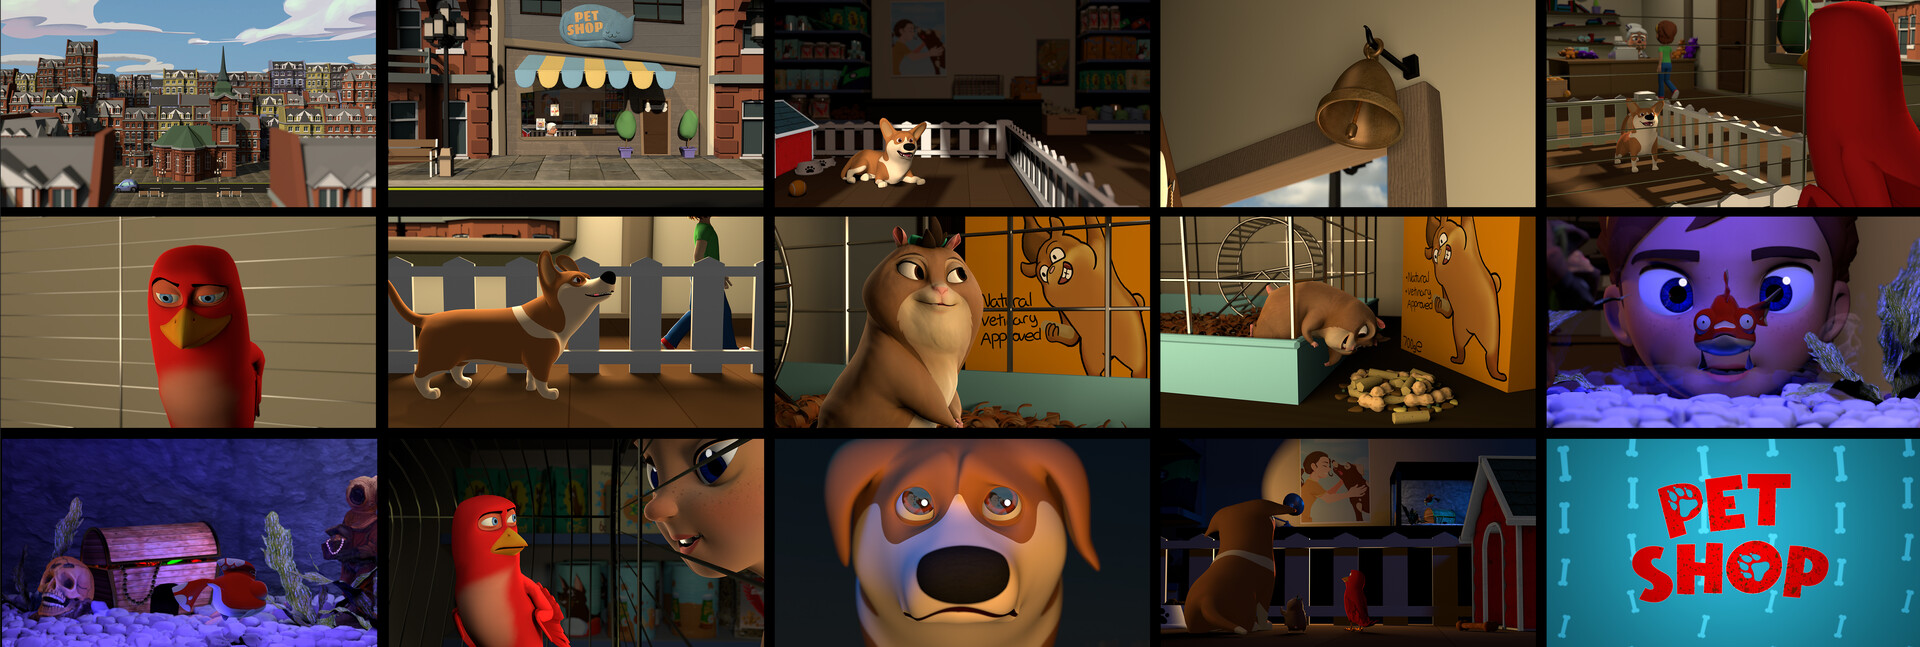
The director initially created a rough first pass of the storyboards, providing a rough outline of the project. This storyboard was then presented to Austin Hill, who was pitched the idea and was happy to join us. He dedicated a couple of weeks to drawing all the storyboarding panels while offering valuable suggestions for camera angles and story adjustments. Through this collaborative process, we progressively refined the storyboard until we achieved a version that perfectly aligned with the director's vision.
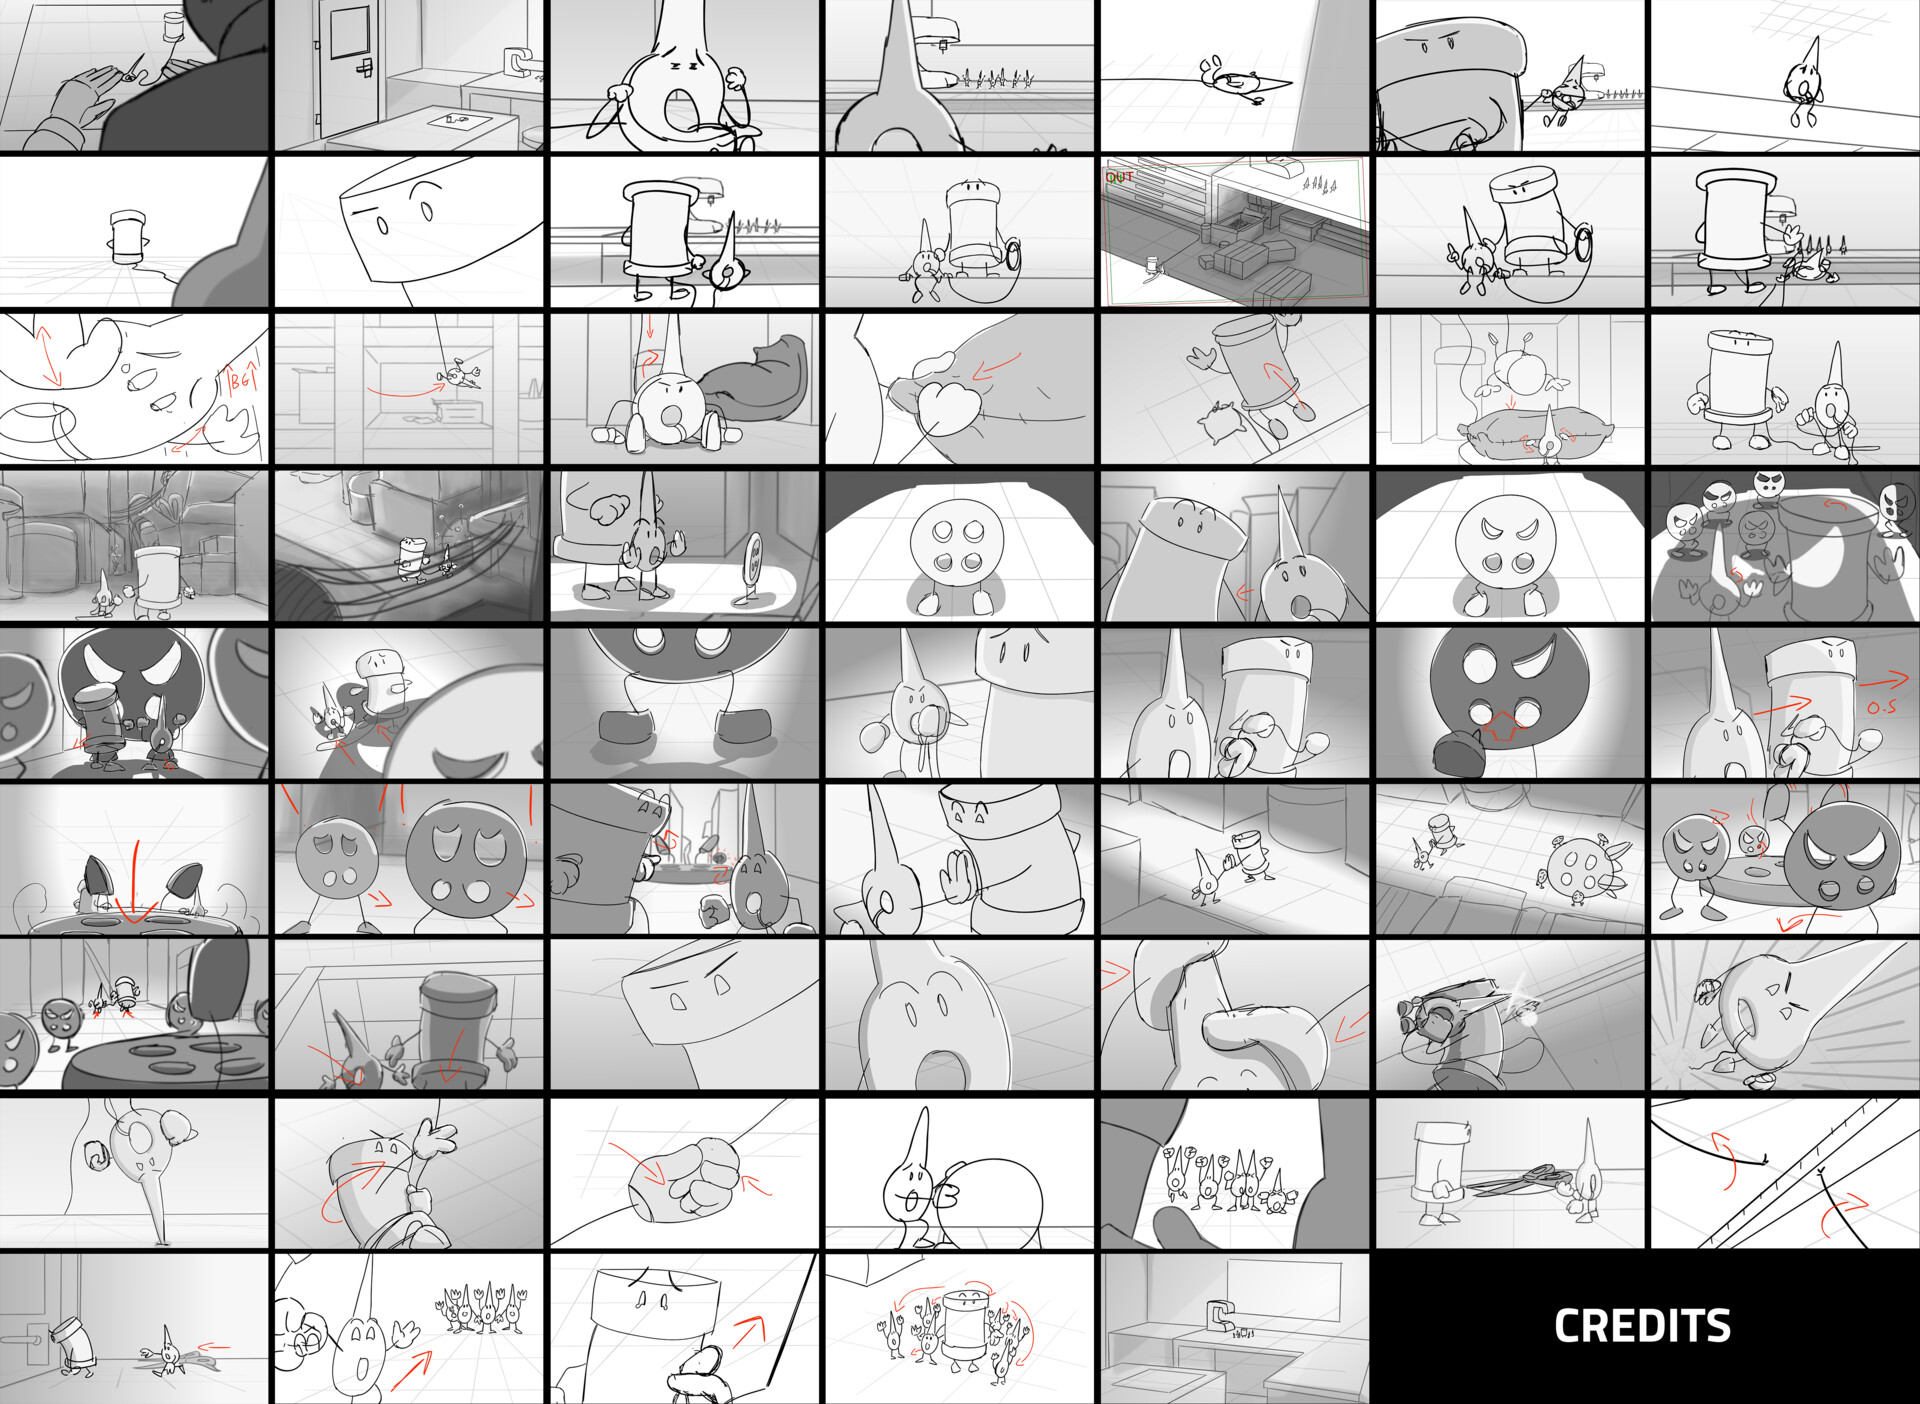
ANIMATIC:
While we were fine-tuning our storyboarding panels, we were also working on editing an animatic. The version below was approved and it's the one that we have proceeded with for production.
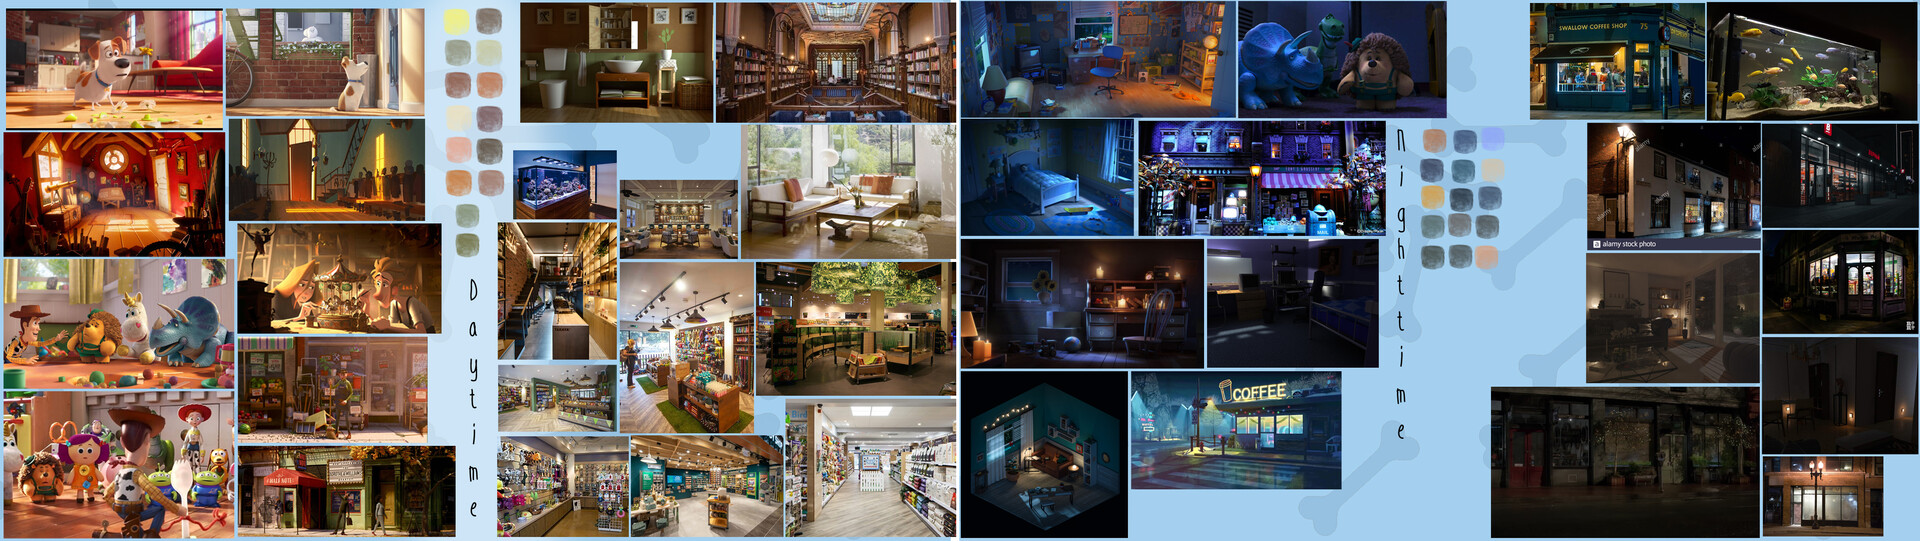
COLOUR SCRIPT:
Creating the colour script early on was an important step for us. It allowed the director to get a feel for what the movie will look like, long before the animation and lighting is complete. We selected the three pivotal moments in our short that had very different moods and lighting setups and painted over them. This process allowed us to establish a clear roadmap, guiding us towards our desired look.

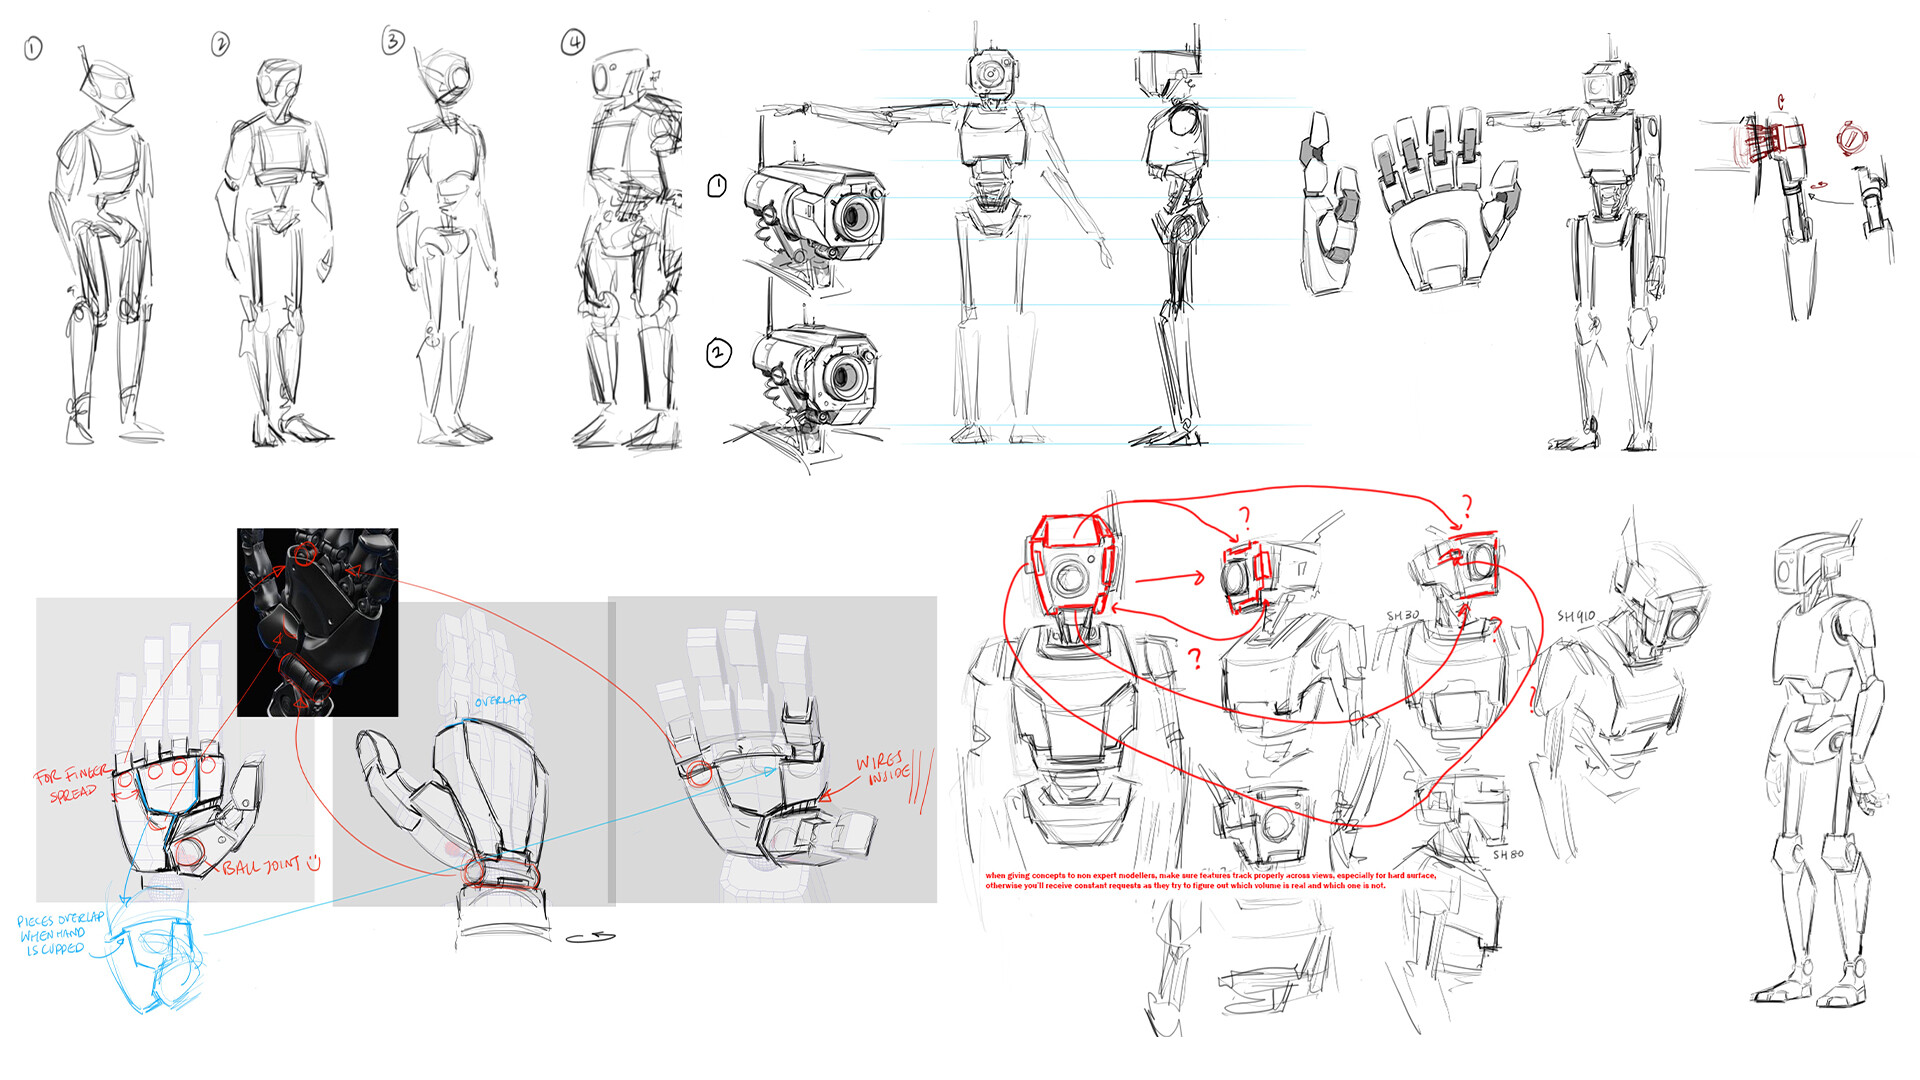
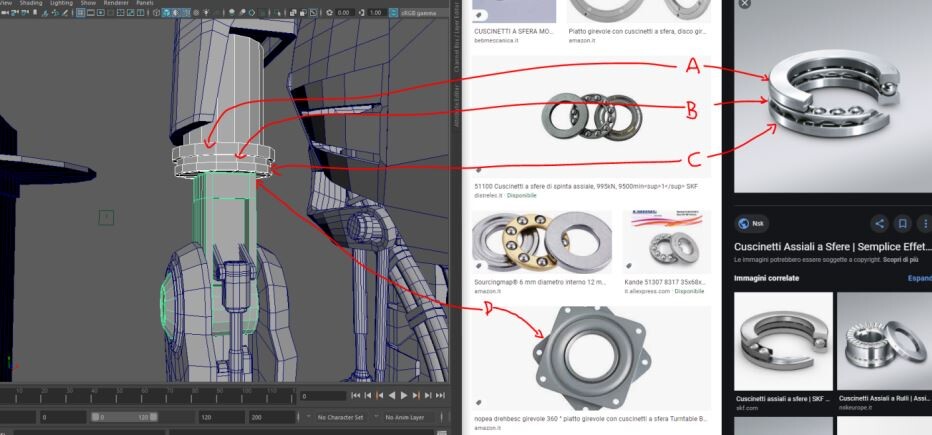
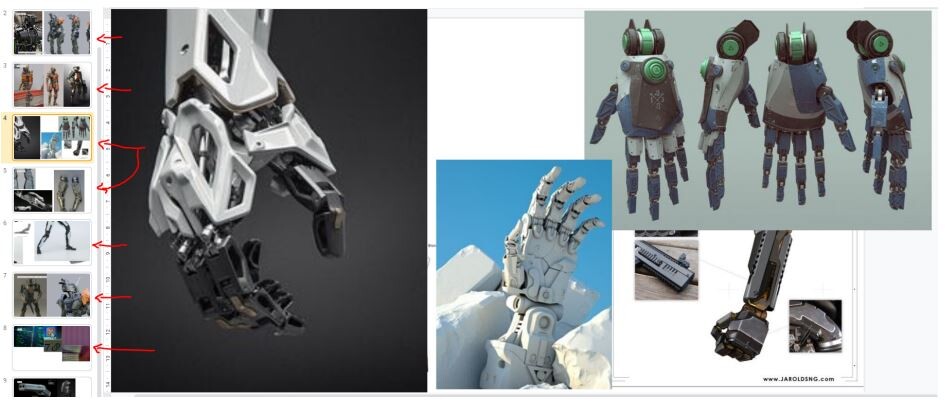
MODELING AND RIGGING:
Next, we proceeded to the process of modeling and rigging our characters. Our objective was to maintain Needle's straight and pointed appearance, while giving Spool floppy arms to create a contrast with his solid and robust body. As for the Buttons, we intentionally designed them without arms, encouraging the animators to convey emotions mainly through their eyes. One challenge we encountered was that the rigs got really heavy due to body deformations, which made animation more challenging. To address this issue, we provided the animators with the flexibility to switch between low-poly and high-poly rigs, depending on the specific shot requirements.
Please see below for our character turnarounds in different stages.
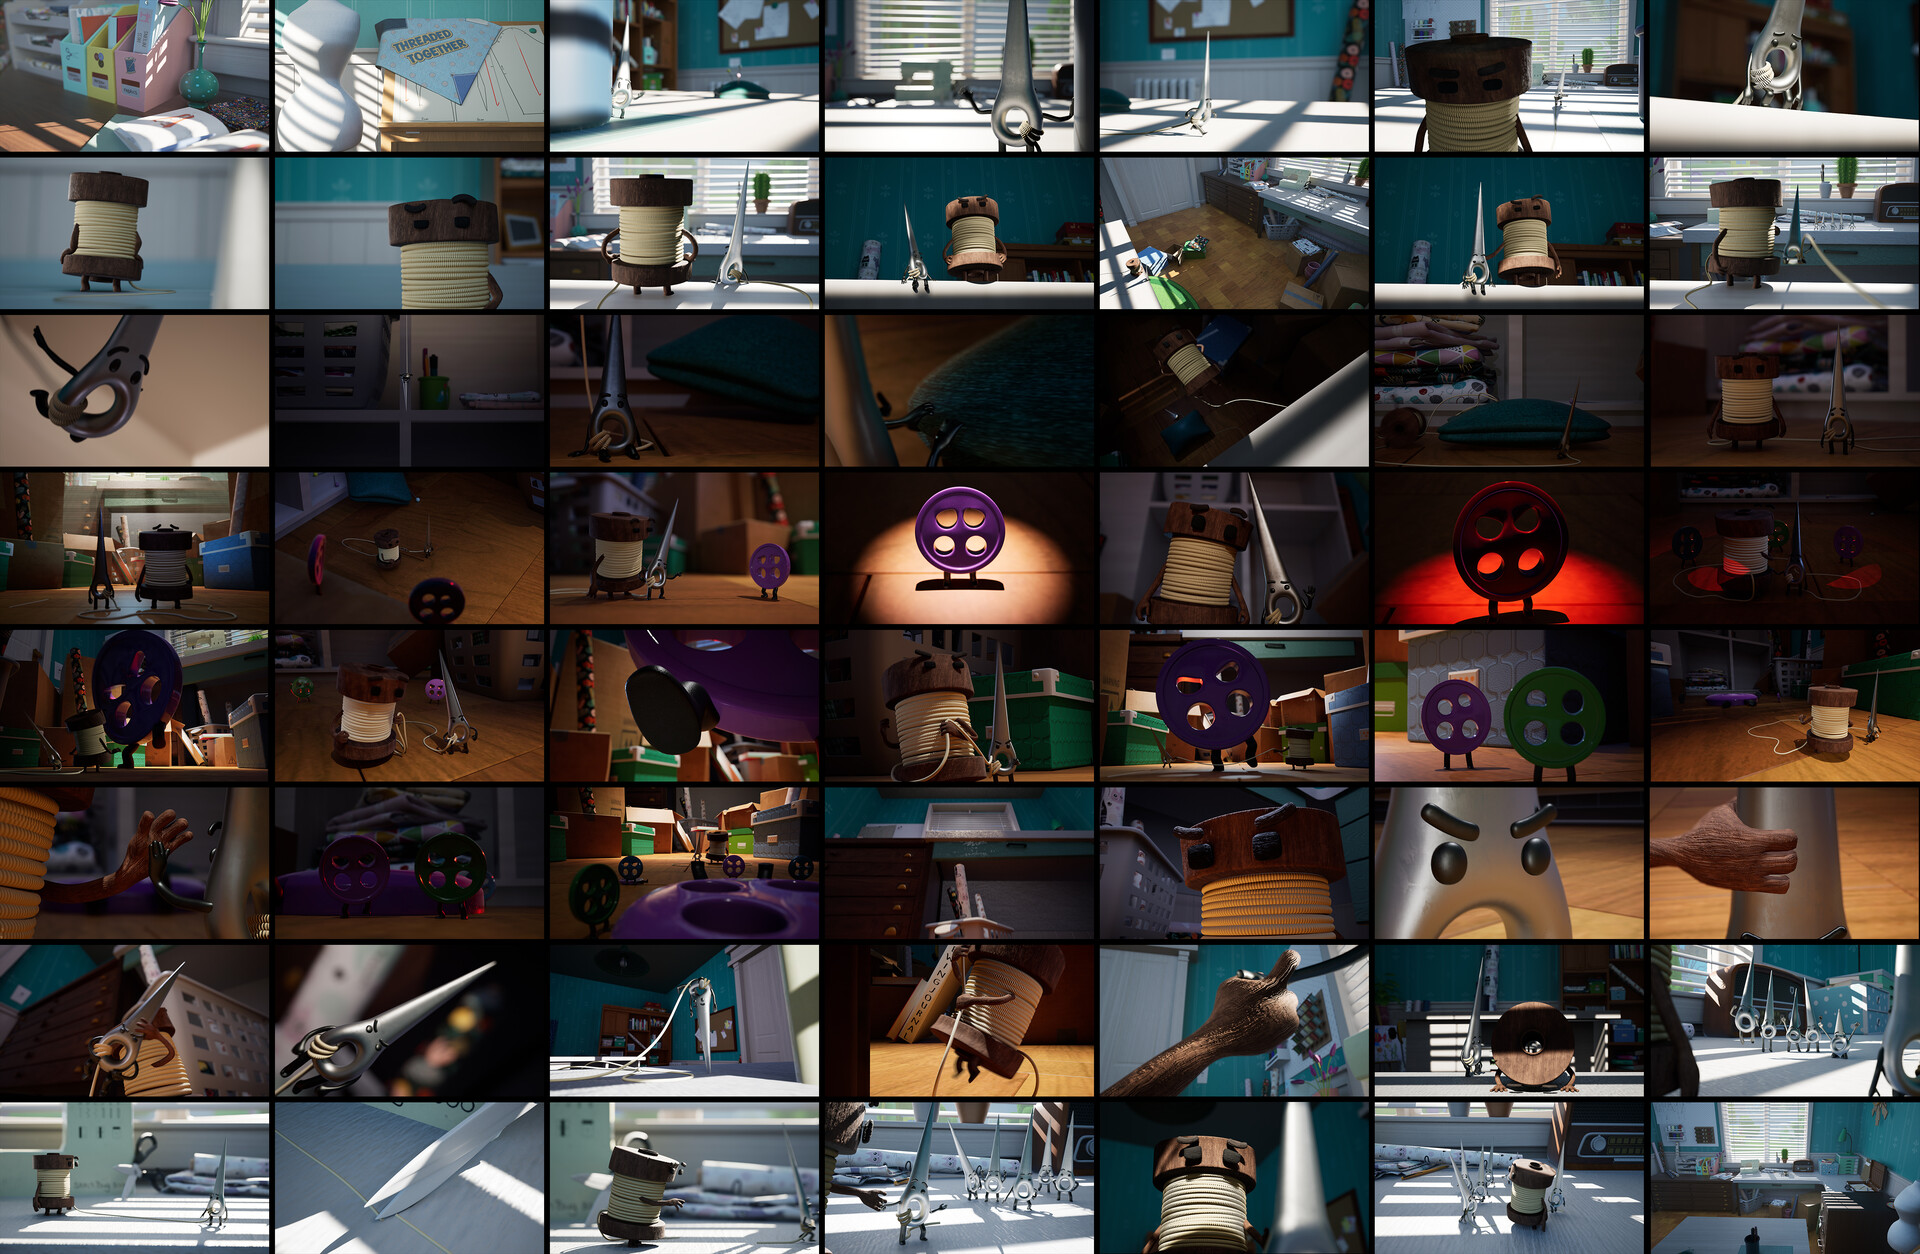
ANIMATION:
Animation proved to be a massive task for the team, with the film including 60 animated shots. Each animator was responsible for completing approximately 5 shots, and numerous processes were involved in the finalization of our short. To create a solid base for our animation and ensure the timing works within shots, we utilized references that were recorded by individual animators for their assigned shots. Moreover, we used Studio Library, where animators could use the poses and expressions provided to keep consistency throughout the project.
Check out the first two videos below to see examples of our references.
We all know that rushing through blocking can ruin a good shot so we made sure to follow a proper workflow and dedicate enough time on each step. The following video demonstrates the different animation stages we went through, from previz to the final render.
THREAD SIMULATIONS:
The simulation of the thread played a crucial role in our story, requiring extensive use of hair simulations in Maya 2022. In total, we simulated the thread in 36 shots using rivets and the sweep tool. However, one of the major challenges we encountered was that certain simulations did not align properly with the character positions, movements, and overall interactions. To overcome this issue, we decided to hand-animate those specific threads, ensuring a more seamless integration with the overall scene.
Please see below for some breakdowns of the process of simulating the threads, and animating them by hand, in their different stages.
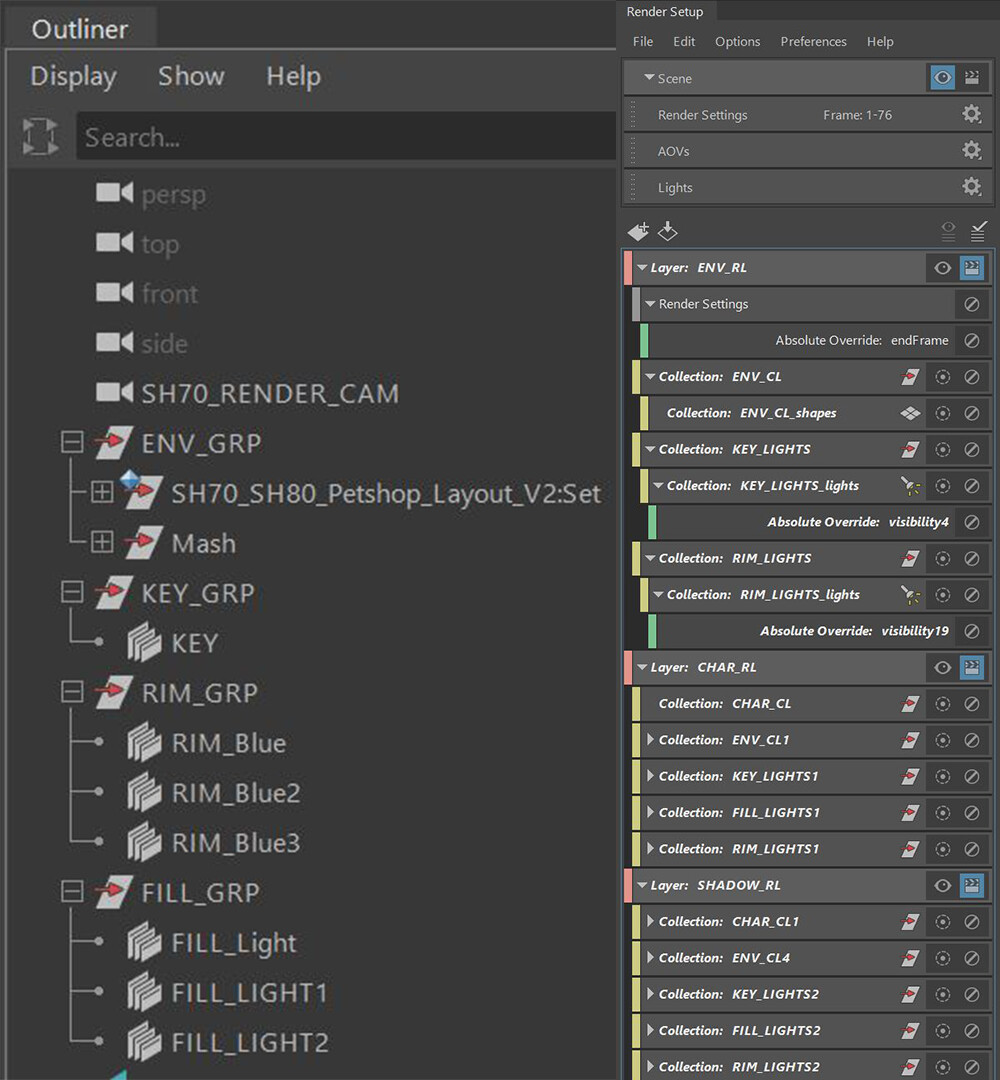
LIGHTING AND RENDERING:
For the lighting and rendering phase, we chose Unreal Engine due to its real-time rendering capabilities. This enabled us to achieve faster rendering speeds and easily implement changes while consistently generating full renders throughout the production process.
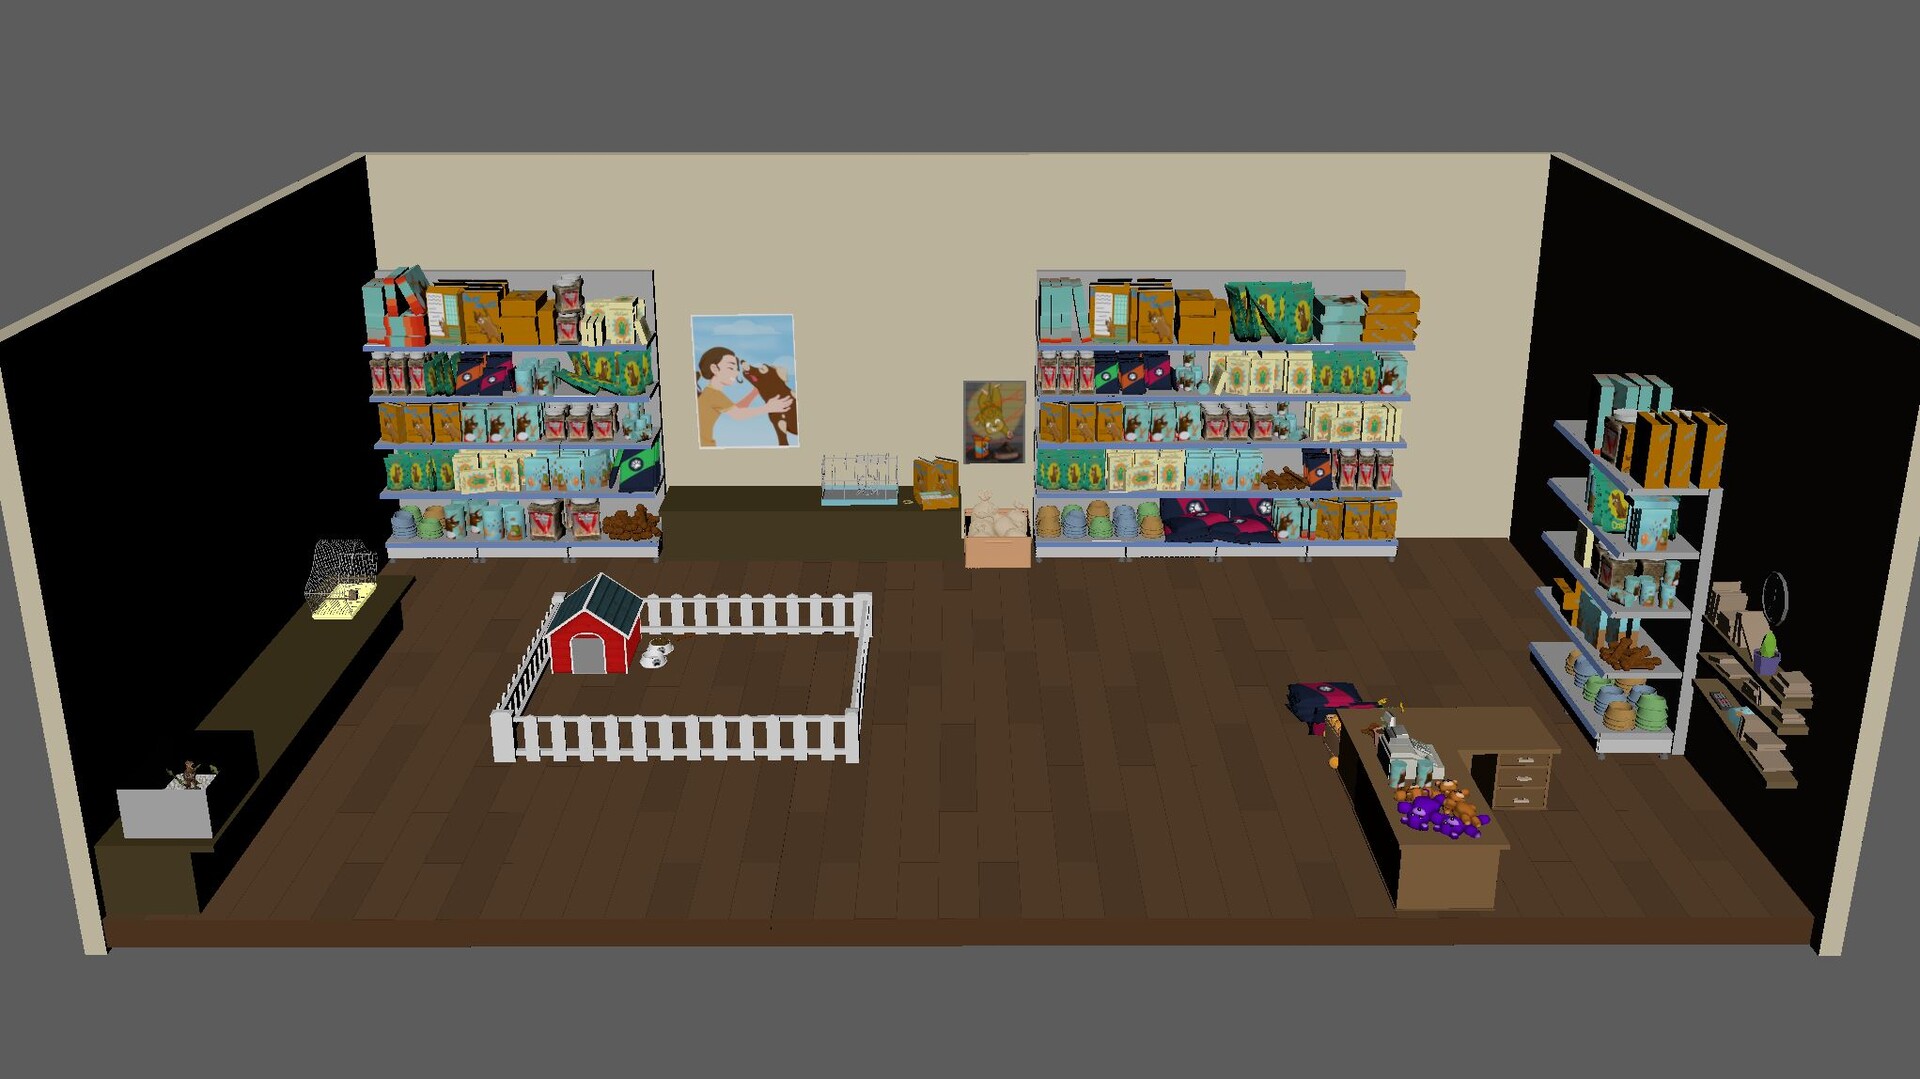
Despite having a single environment, we made the decision to split it into two distinct sets. This approach not only allowed us to emphasize the scale of the environment compared to the characters and create different lighting setups to match the desired moods, but it also allowed our artists to work in both environments at the same time.
Towards the latter stages of production, we incorporated Nuke X into our workflow, which helped us incorporate god-rays and adding additional depth to a handful of shots.
Please see below for our lighting/rendering and post breakdown videos.
Ensuring lighting consistency between shots is crucial. One effective method is to create a quick script that includes all the shots, enabling you to identify any potential issues early on and make prompt corrections. By addressing these concerns proactively, you can avoid last-minute adjustments that may disrupt the overall flow of the production process.
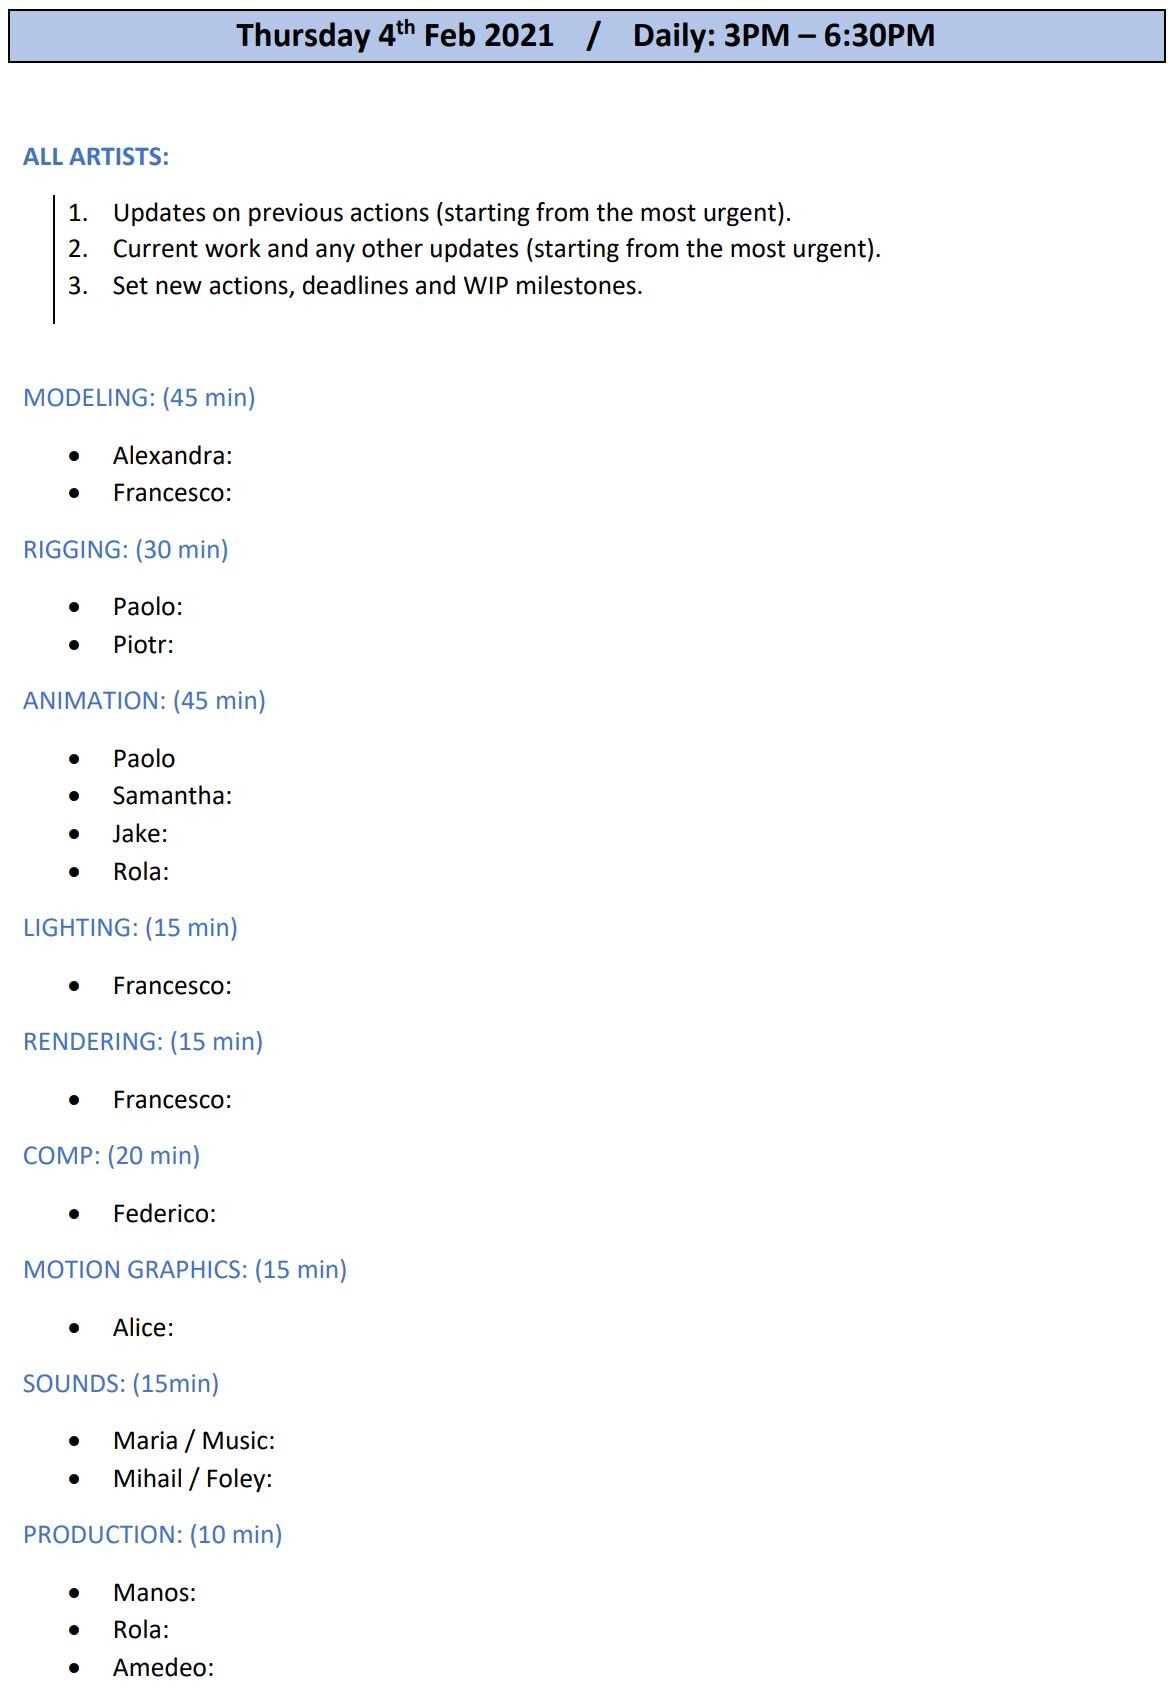
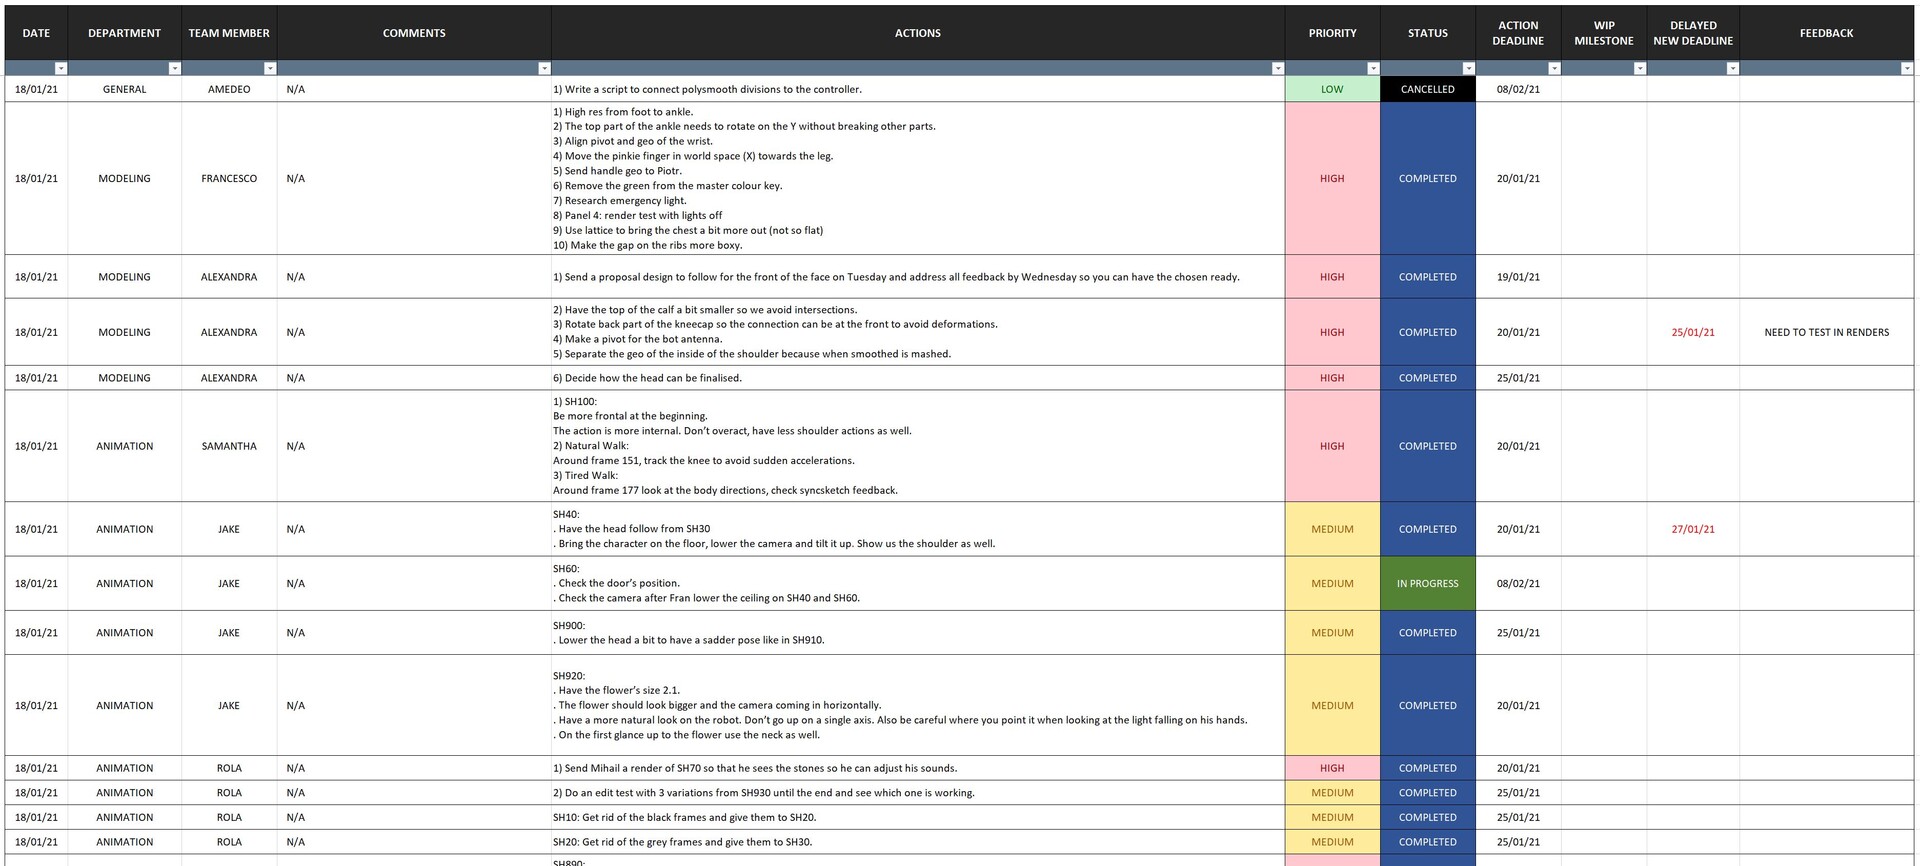
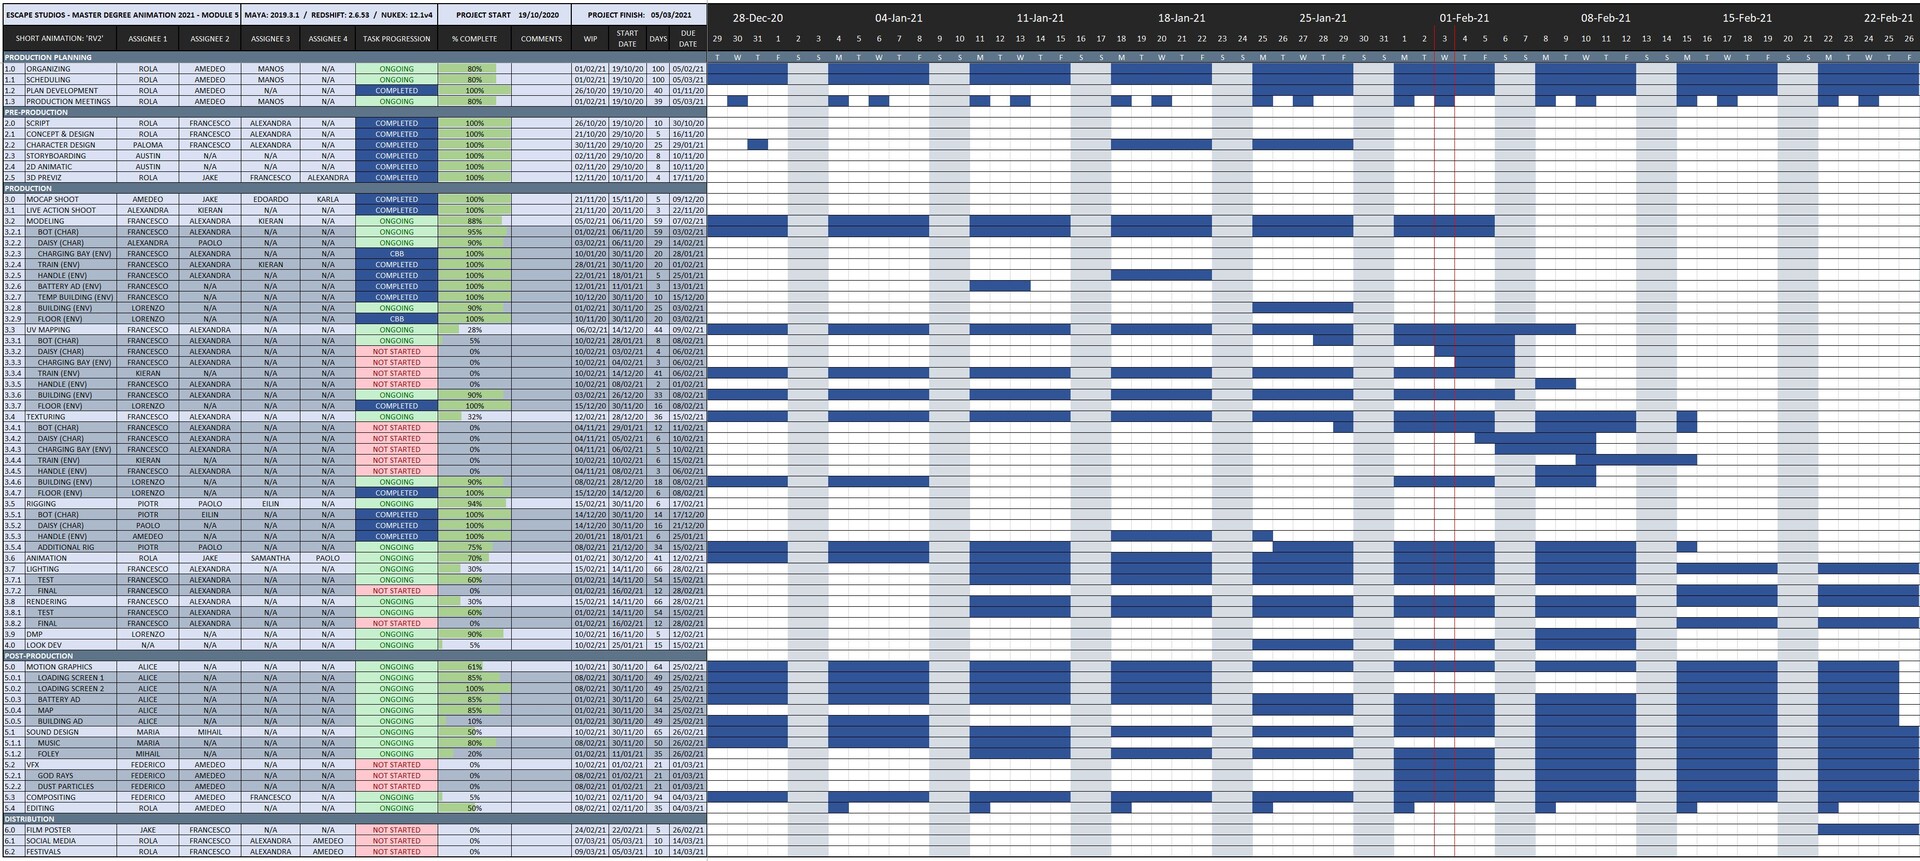
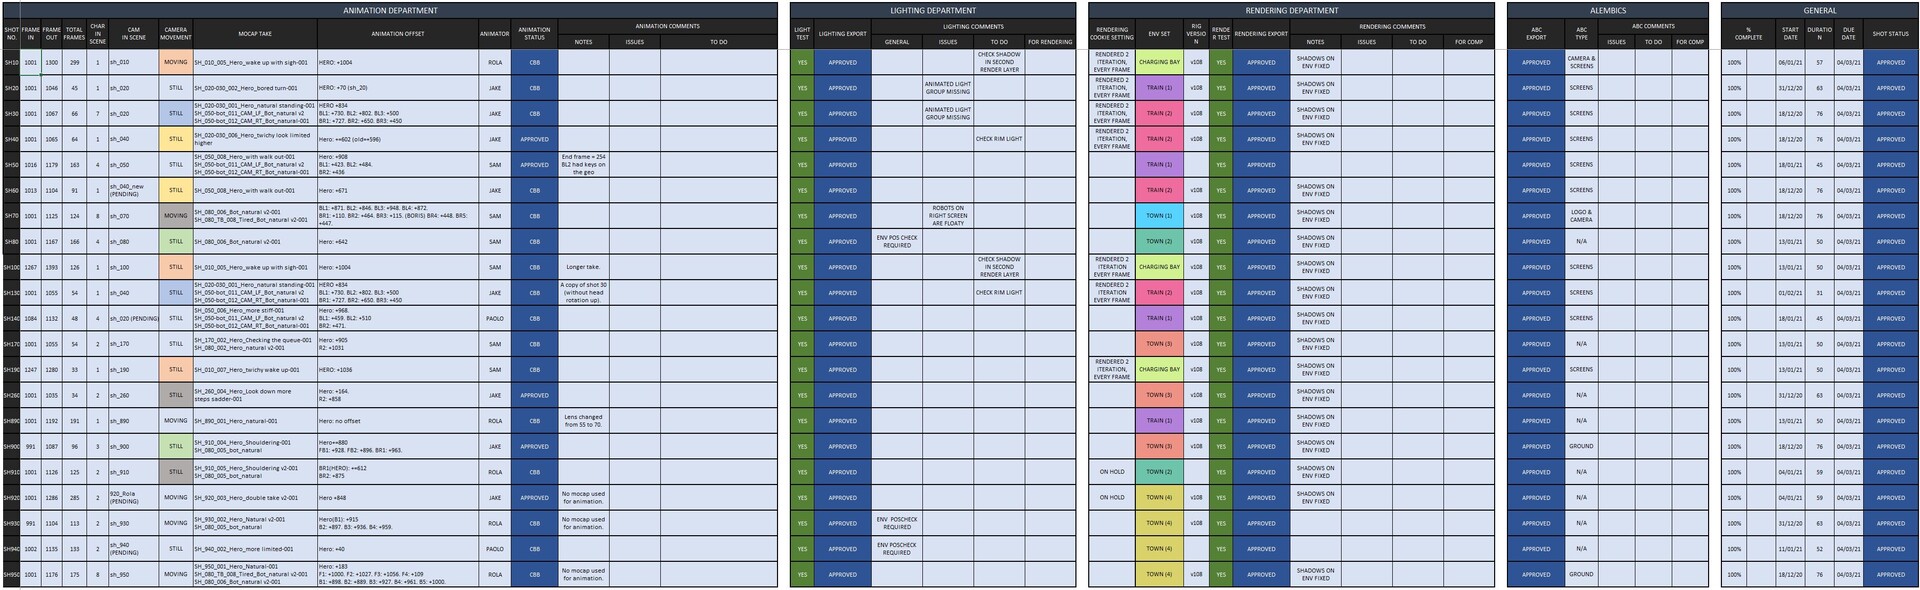
PRODUCTION MANAGEMENT:
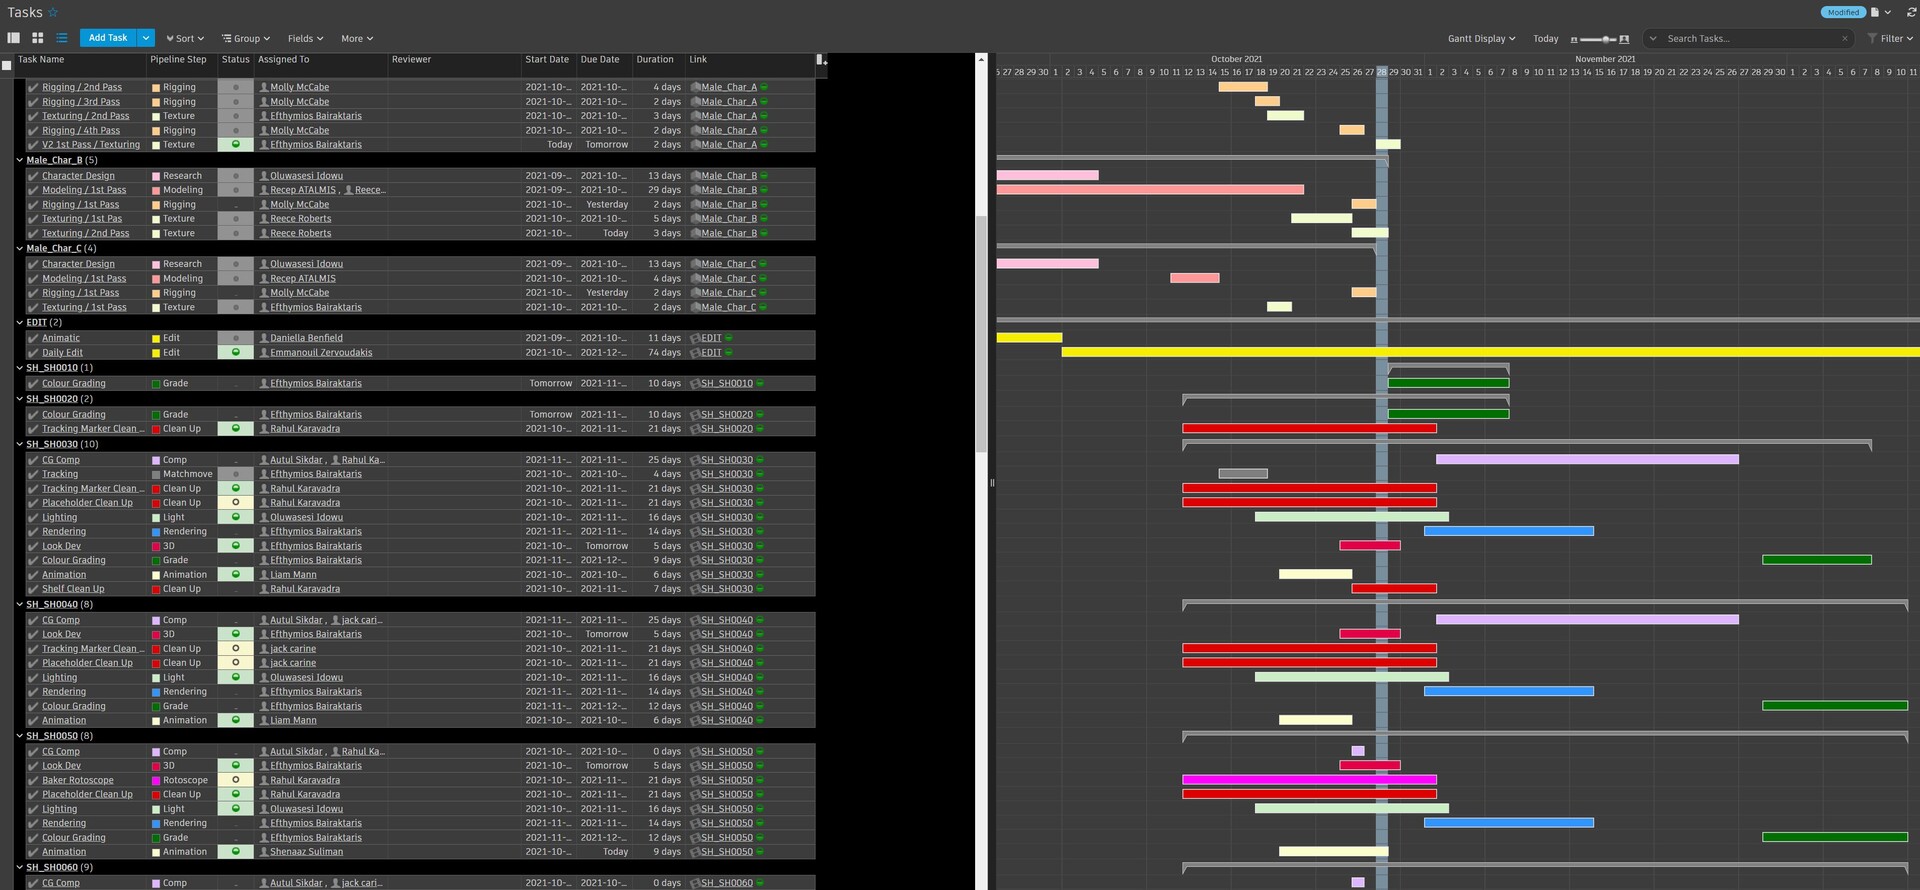
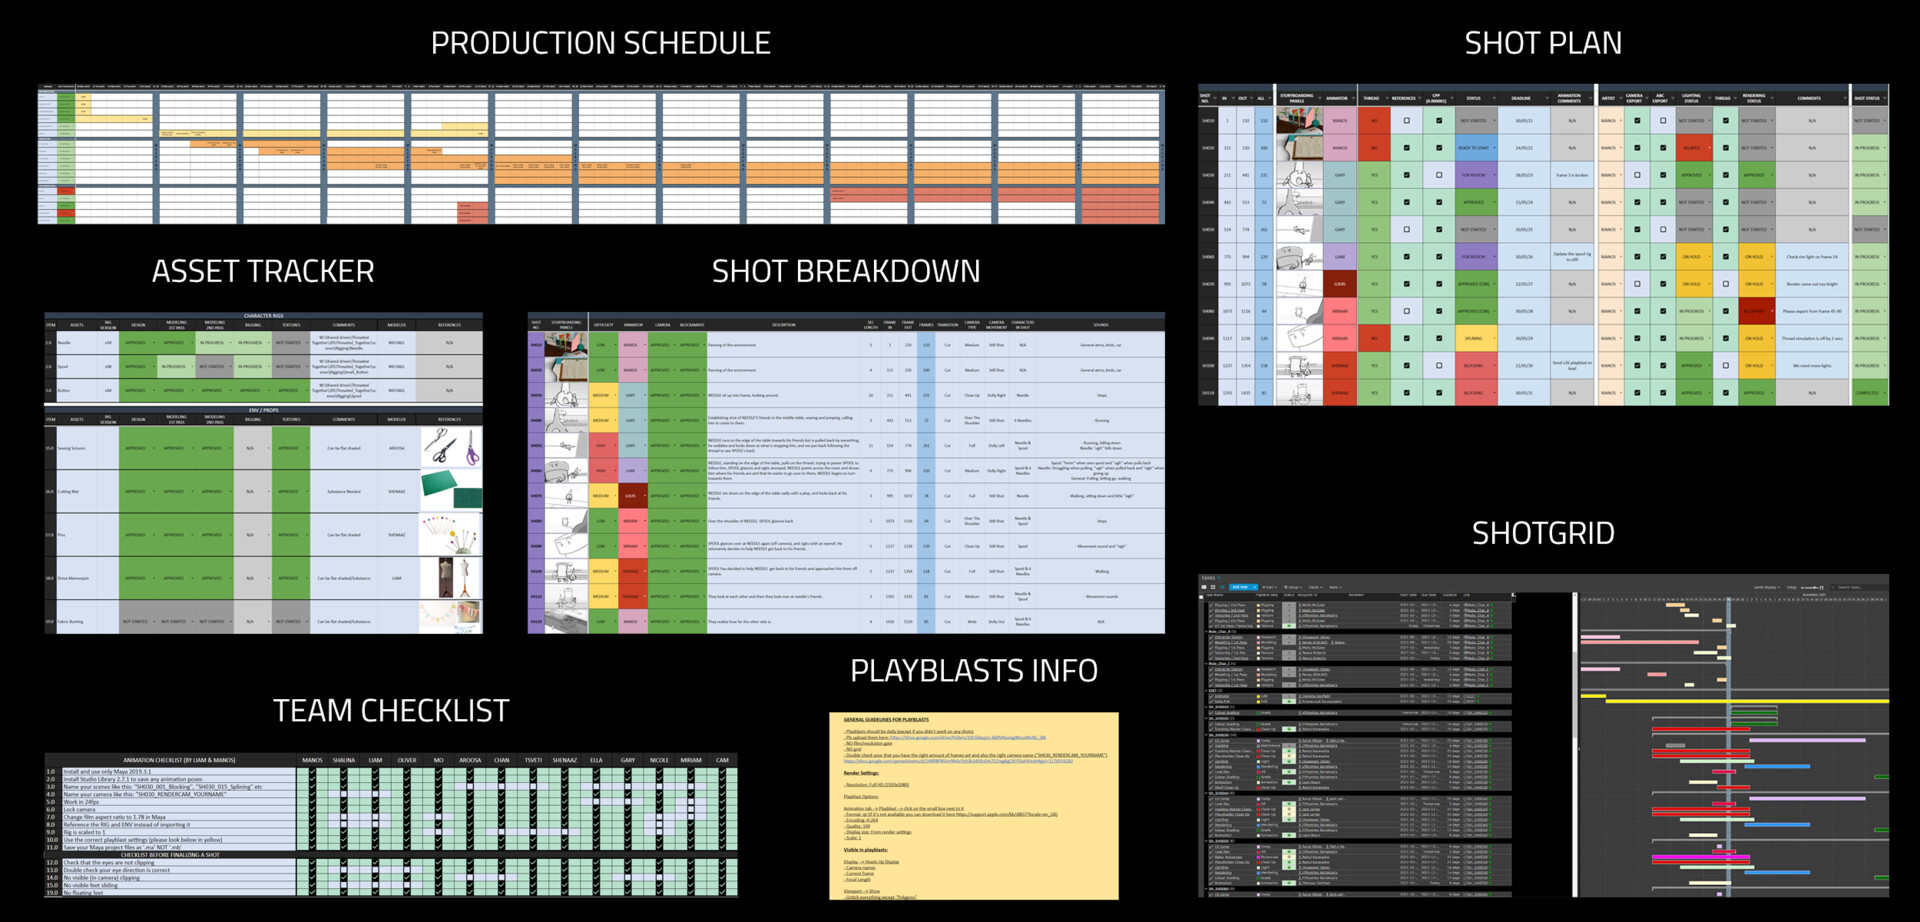
'Threaded Together' was managed using both ShotGrid and Google Sheets.
Please see below for our most important software/documents.
I'll quickly mention a few things for each one.
- Shotgrid:
Everything was in one place and connected, work was visually assigned and easily readable. Artists were also receiving notifications via email and the overall progress tracking was more efficient.
- Production Schedule:
General overview of the whole schedule with progress bars and status options for the main actions in a form of a colour coded calendar.
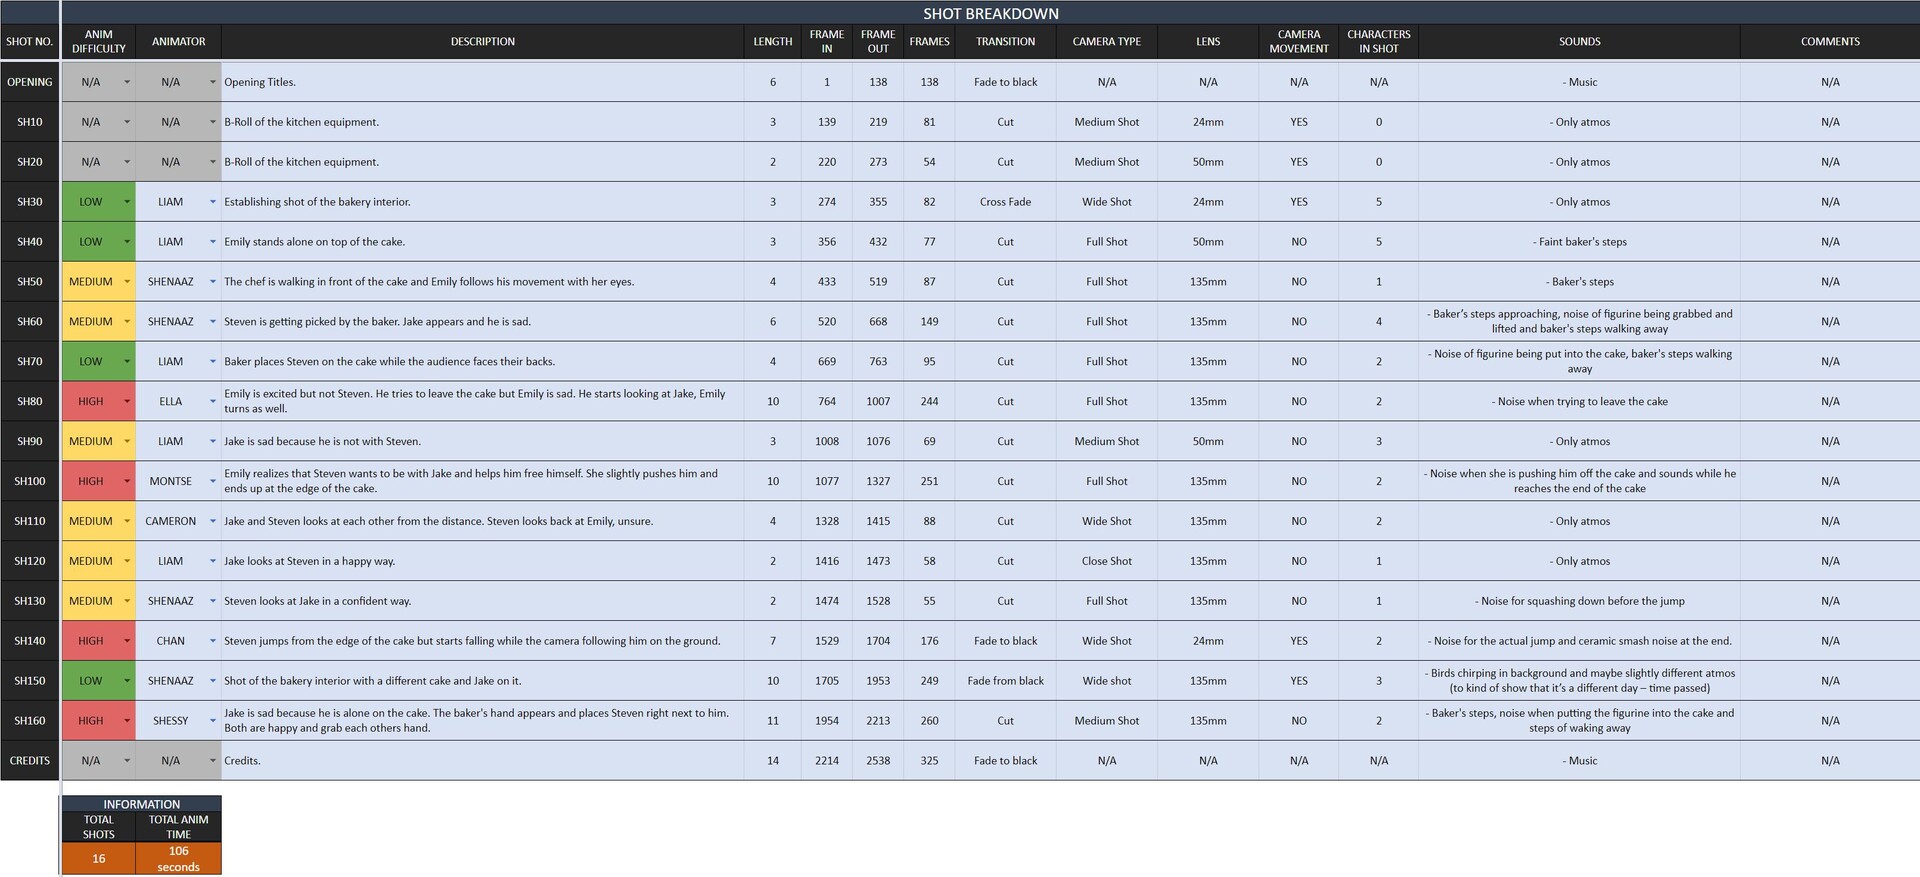
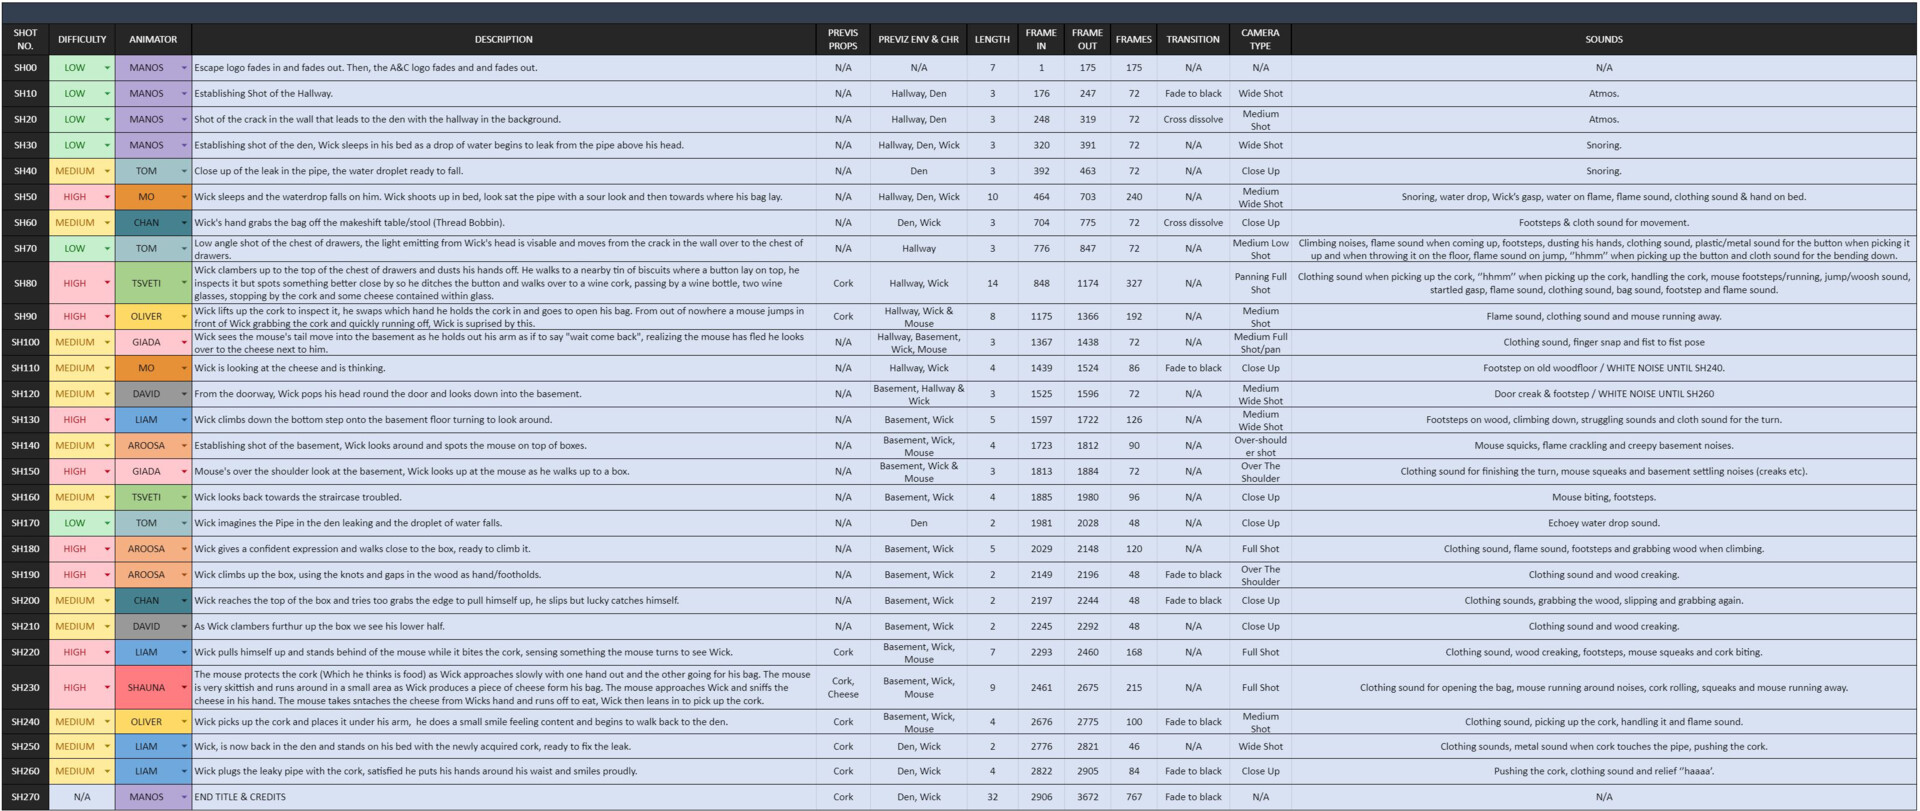
- Shot Breakdown:
Mostly used in pre-production, it displays shot numbers, animation complexity, assigned animators, previz status, shot durations, frame counts, camera types, transitions, and sound effects.
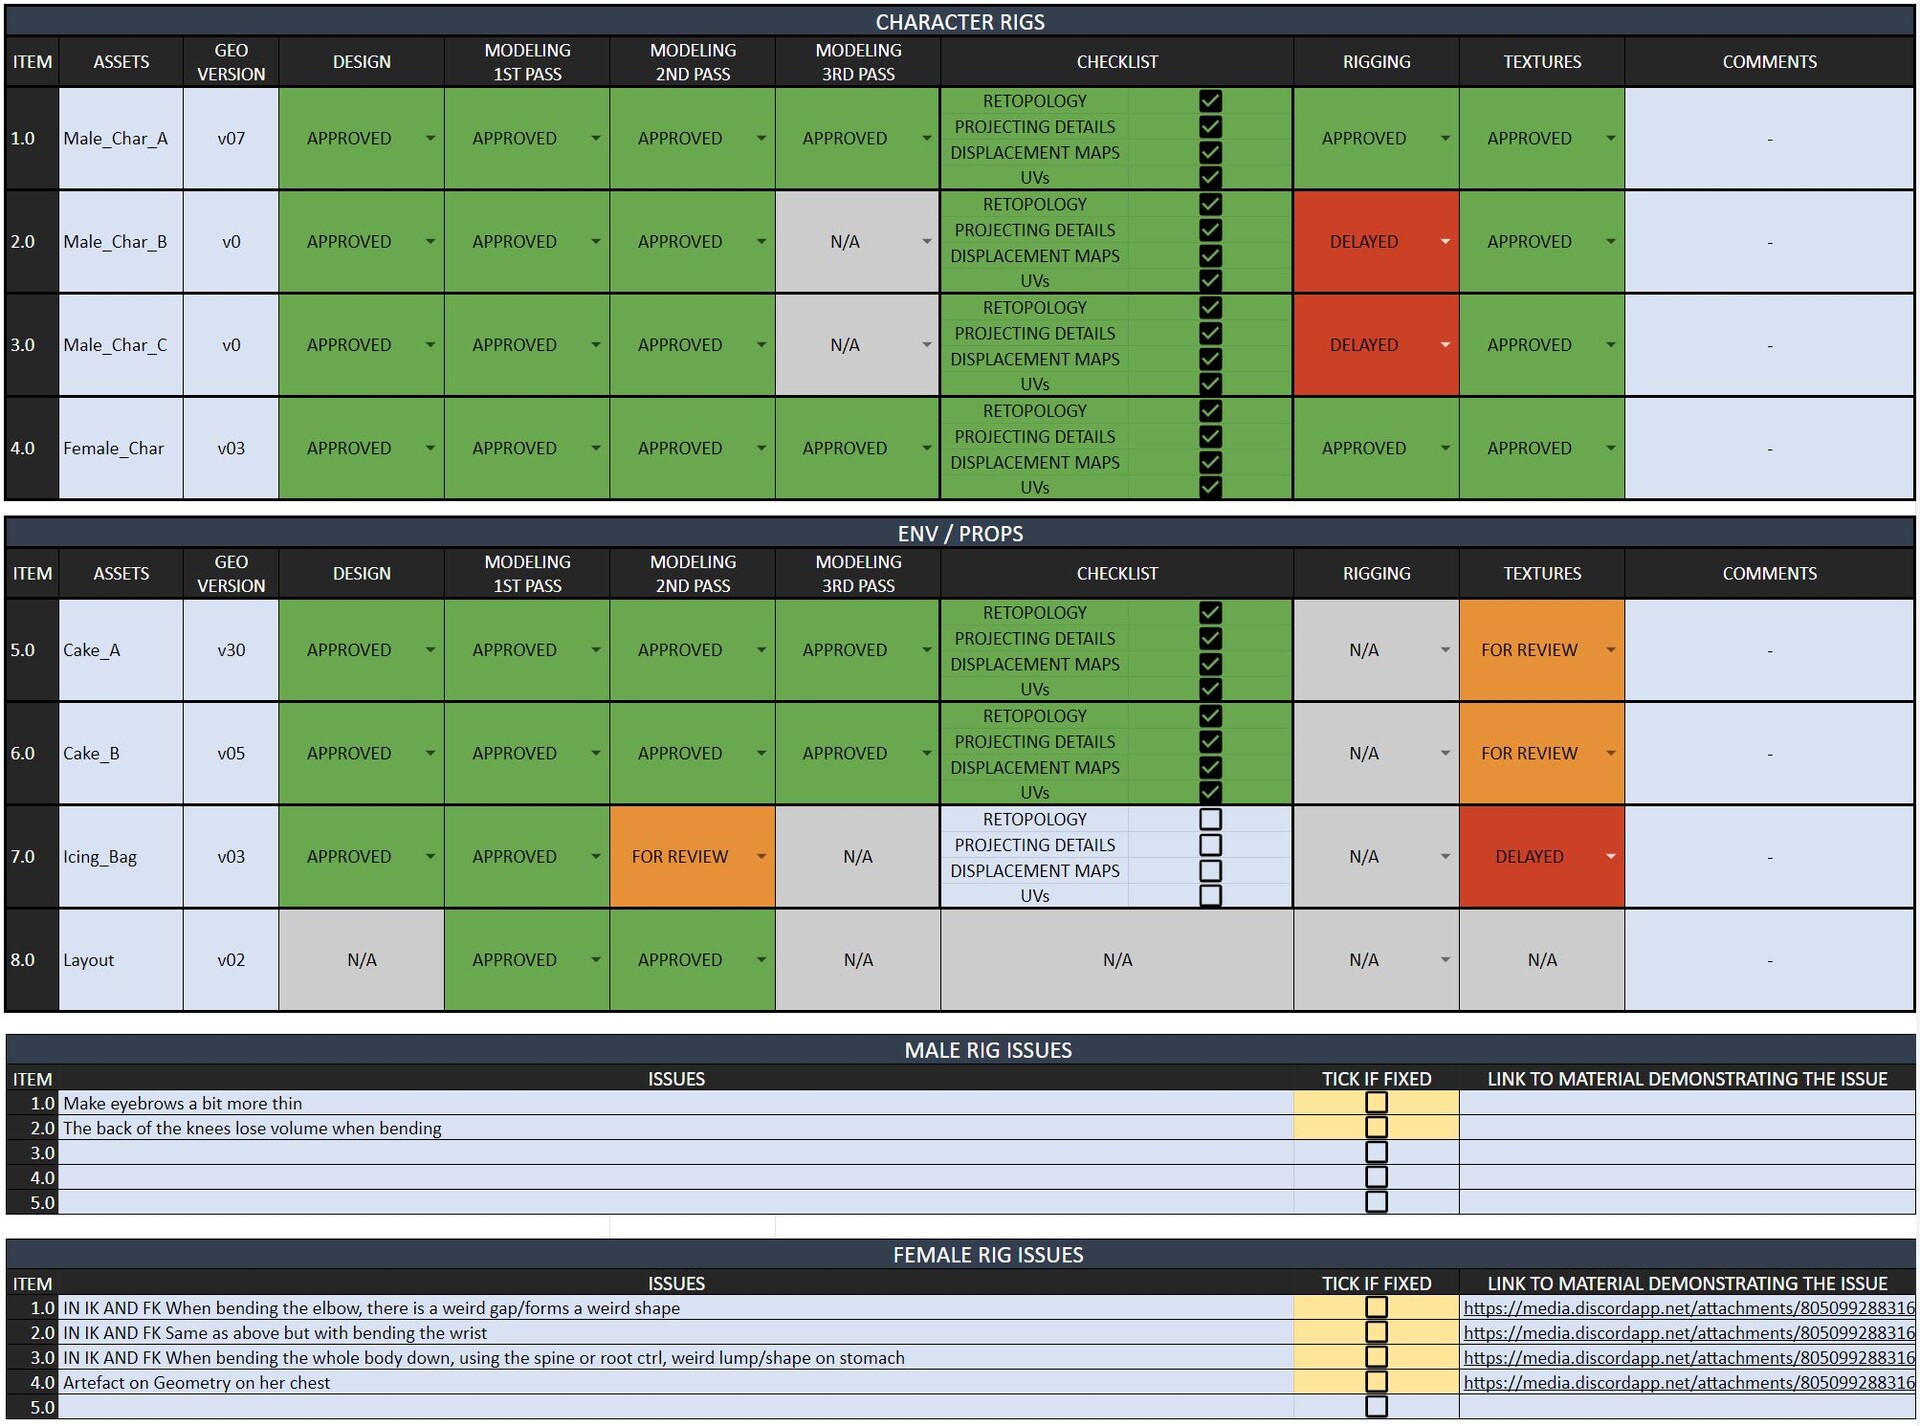
- Asset Tracker:
Tracks the progress of designing, modeling, rigging and texturing for all characters and environments using dropdown lists with different status. It also displays the current rig versions with links attached, assigned individuals, any references used, and a notes section for general comments.
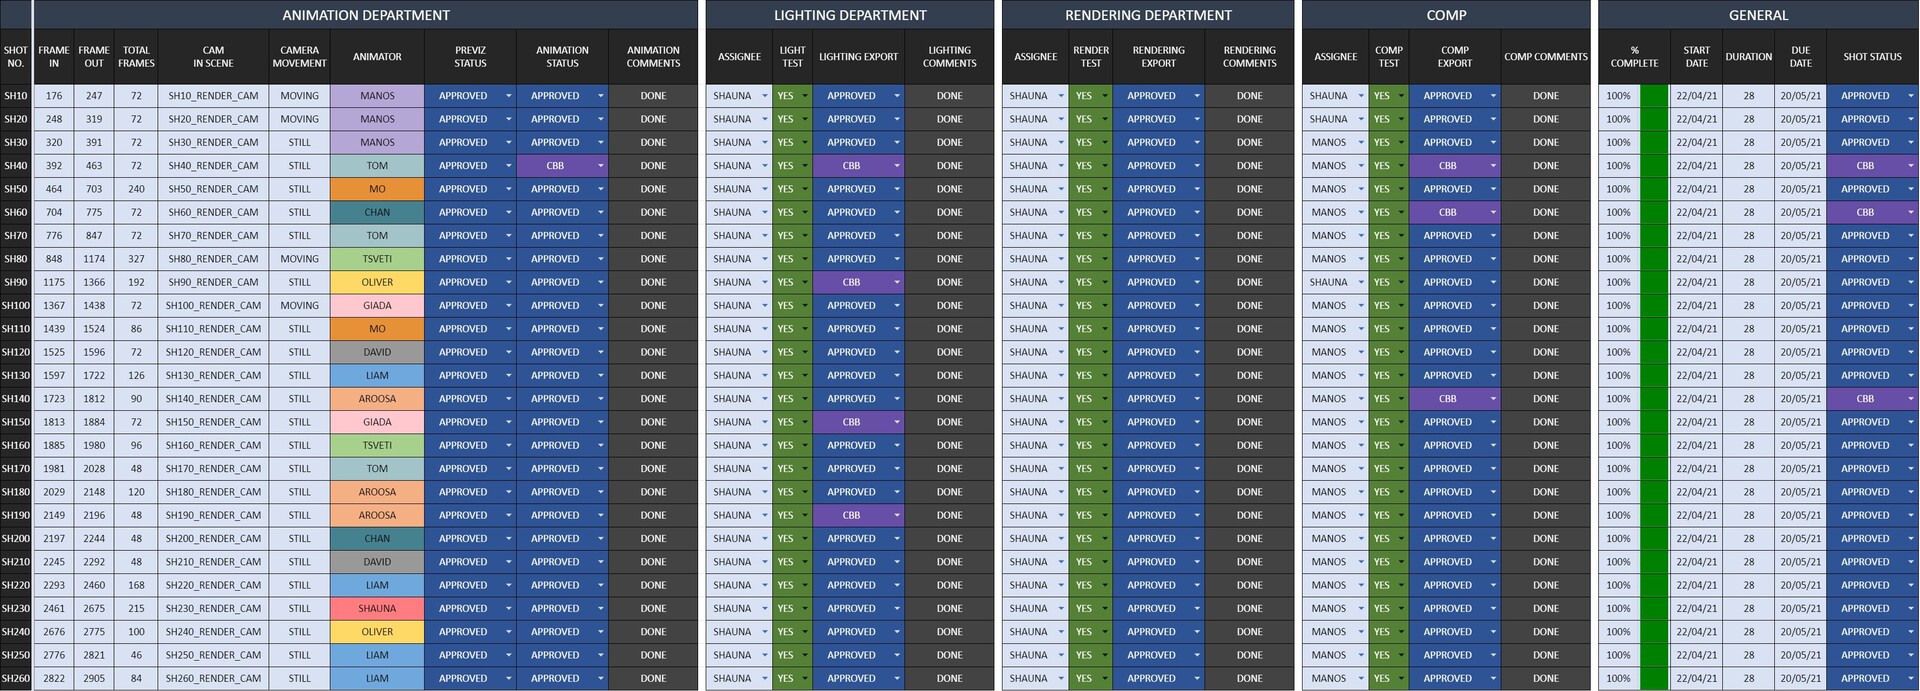
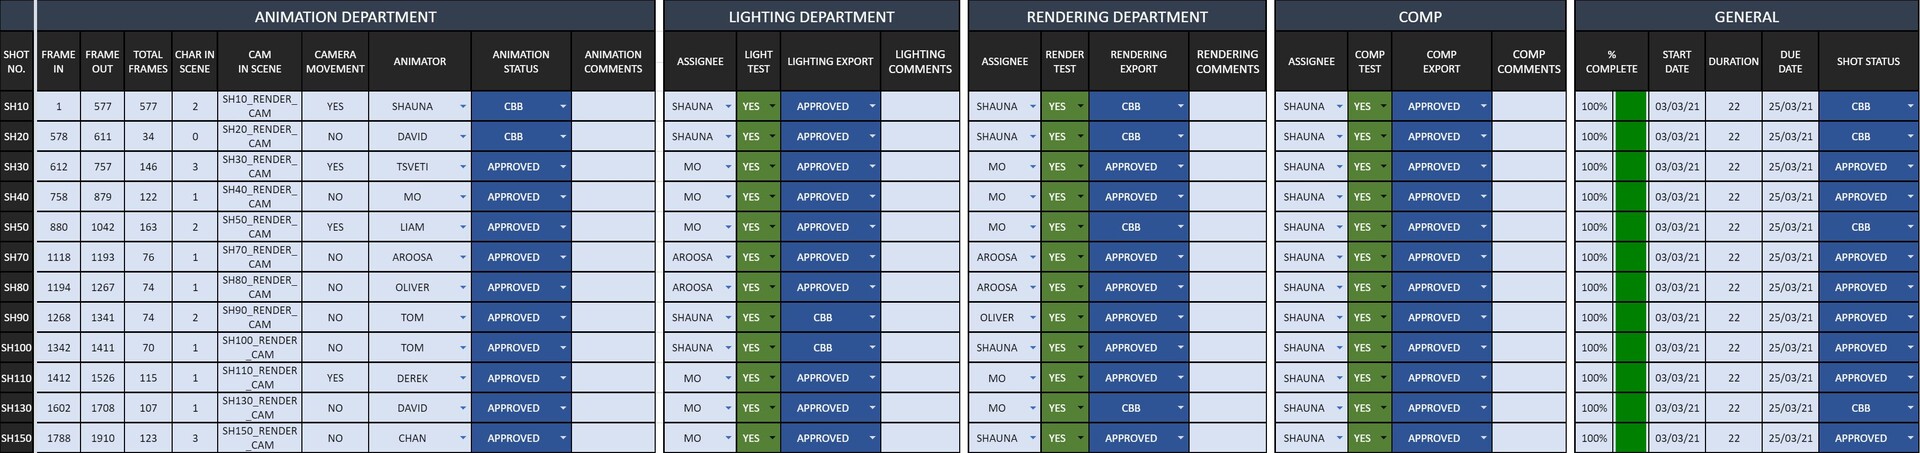
- Shot Plan:
Tracks all shots from previz to comping. It presents a detailed overview of each shot, including frame ranges, assigned individuals, cameras and ABC exports, thread simulations, as well as the current status of animation, lighting, rendering, and compositing (''In Progress'', ''On Hold'', ''Re-Export'', ''Delayed'', ''CBB'', ''Approved'')
- Team Checklist:
This is a document I usually create with the department leads in order to provide the team with a checklist to to ensure that essential elements are in place before starting work on each shot. This includes software and version requirements, naming conventions, FPS, camera specifications, aspect ratio, and referencing guidelines.
- Playblast Info:
A common observation across all my projects was the lack of consistency in animators' playblasts. To address this issue, I created a script that provides detailed instructions on properly exporting playblasts. This document outlines the importance of excluding the grid or film gate, ensuring the correct resolution, format, and settings, and specifying the desired visible elements within the viewport, naming convention and destination folder.
PERSONAL REFLECTION:
- Better preparation
The director and I started working on the story a month ahead, creating the script and the initial storyboarding panels. These panels gave us a good understanding of what works and what needs improvement. Shortly after, we collaborated closely with the storyboard artist to refine the panels, camera angles, and overall narrative, resulting in a successful animatic in a short period.
- Efficient production management
Having already produced six short films prior to 'Thread Together', I had acquired enough experience in creating effective and efficient production docs using Google Docs. Moreover, we were able to utilize Shotgrid, which helped us streamline some of the processes. Learning never stops though so I'm looking forward to the next production so I can improve again my progress tacking techniques, software and documents.
- Better team coordination
Having led a variety of creative teams throughout my prior projects, I gained a deeper understanding of the team's dynamics and how to harness the skills and potential of every individual involved. This enabled me to cultivate a healthy work environment for everyone. Our communication and collaboration were excellent, and the positive impact of this was evident in the final visual aesthetic of our film.
- Proactive risk management
This production required a lot of alertness and proactive anticipation of potential issues due to the fact that Needle was connected to Spool in most of the shots. It was crucial for us to identify any problems early on and either take preventive measures or minimize their impact to the best of our ability.
- Largest project - 60 shots
'Threaded Together' was the largest project I have ever produced which consisted of 60 shots and involving a team of over 20+ individuals who dedicated 16 weeks to its completion. Given the ambitious nature of both the narrative and the technical expertise required, the project presented significant challenges. However, I'm proud to say that we refused to compromise on any aspect and consistently pushed ourselves to get the most out of it, which I believe worked out great.
TEAM:
Writer & Director: Shauna Ludgate
Producer: Emmanouil Zervoudakis
Character Design: Oliver Gallagher
Storyboarding: Austin Hill
Colour Script: Tsvetelina Kumanova
Modelling, Rigging & Texturing: Michael Davies
2D Artists: Chanakan Jeffries
Animation: Liam Martin, Shauna Ludgate, Nicole Widmer, Muhammed Mansoor, Tsvetelina Kumanova, Oliver Gallagher, Aroosa Qureshi, Chanakan Jeffries, Shenaaz Suliman, Ella Grunberger, Gary Roche, Miriam Di Benedetto, Louis Chevis & Cameron Haley
Lighting & Rendering (Unreal Engine): Emmanouil Zervoudakis & Shauna Ludgate
Music: Maria Cortes-Monroy
Sound Design: Mihail Sustov
Editing: Emmanouil Zervoudakis